
These no-bake nut bars are my go-to when I want something sweet but don’t want to fuss with the oven. There’s a real charm in their simplicity, especially when I’m craving a quick grab-and-go snack that’s both satisfying and nostalgic. The smell of toasted nuts and honey filling the kitchen takes me back to childhood afternoons spent in my grandma’s kitchen.
What I love most is how versatile they are — you can swap in whatever nuts or dried fruit you have on hand, making each batch a little different. It’s that honest, no-fuss kind of baking that feels more like a moment of improvisation than strict recipe following. Plus, they keep well in the fridge, ready when those sweet cravings hit unexpectedly.
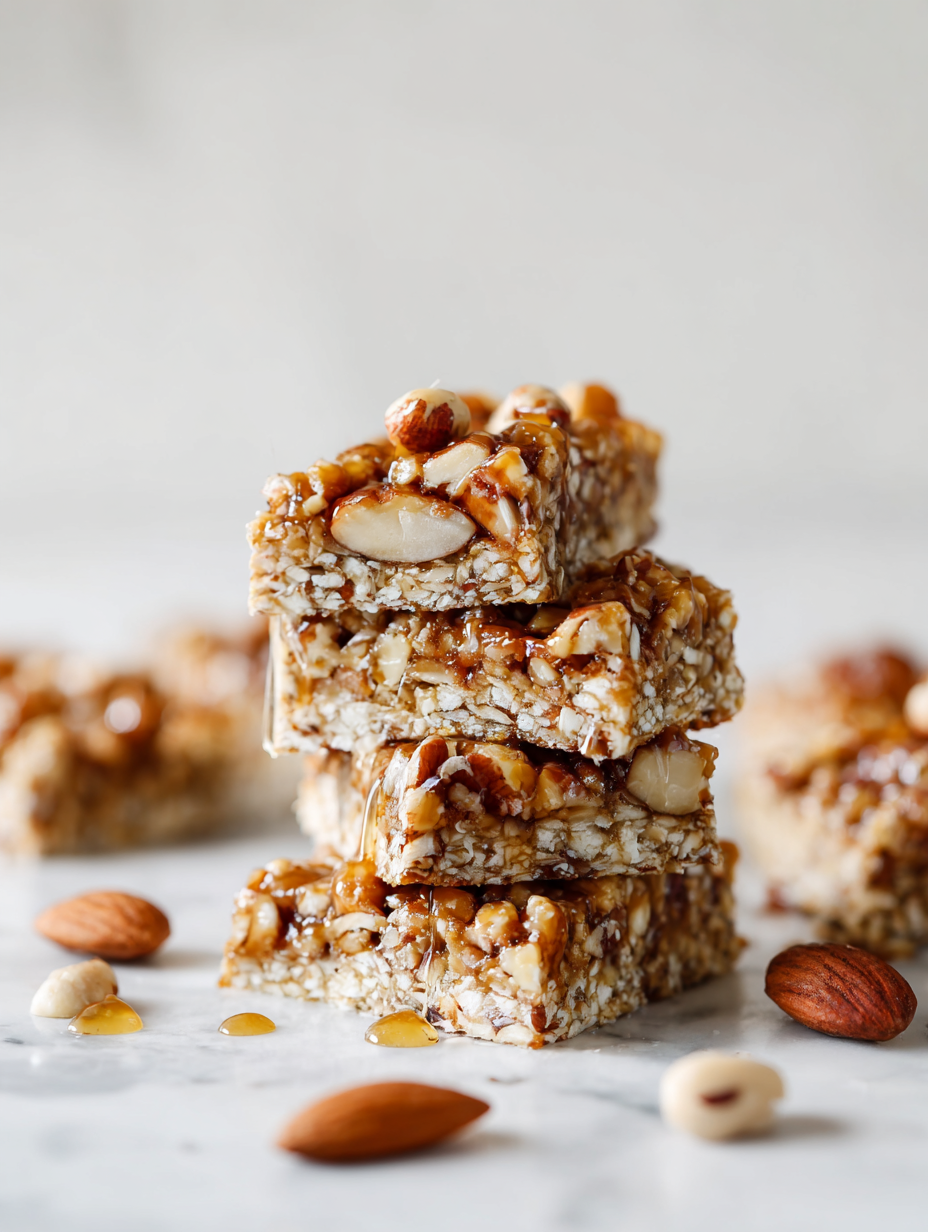
Focusing on the nostalgic comfort of childhood snacks, this recipe transforms store-bought energy bites into a simple, customizable, no-bake nut bar that feels like a warm hug, perfect for quick mornings or late-night cravings.
The story behind this recipe
- This recipe came together one rainy afternoon when I was desperately craving something sweet and crunchy but didn’t want to turn on the oven. I remembered those old-school granola bars my mom used to stash in the fridge—simple, honest, no fuss. I started mixing nuts, honey, and a bit of sea salt, and before I knew it, I had a batch of bars that tasted like a warm memory with every bite.
- I love how these bars became my emergency snack—quick to make, no baking required, and endlessly adaptable. They remind me that sometimes the best treats are the ones you throw together with what’s in the pantry. Plus, they’ve become a small act of rebellion against overly processed snacks, a reminder that simplicity still reigns supreme.
- heading
- story_type
Ingredient breakdown: key components
- Honey: I love how honey binds everything together with a sticky, sweet richness that’s almost caramel-like. If you want a less sweet version, try maple syrup—just be prepared for a slightly different flavor profile.
- Mixed nuts: I use a variety of almonds, cashews, and walnuts because they add different textures and depths. Toast your nuts lightly to bring out their aroma—expect a fragrant, nutty smell that fills the kitchen.
- Dried fruit: I often toss in chopped dried apricots or cranberries for a tangy contrast. If you prefer less chewiness, soak dried fruit briefly in warm water then drain well before chopping.
- Oats: I prefer rolled oats for their chew and stability, but instant oats work in a pinch—just keep an eye on the mixture as they can become mushy if overmixed or heated too long.
- Salt: Just a pinch of sea salt enhances all the sweetness and nuts—don’t skip it, or the bars might taste flat. Try flaky sea salt on top after pressing for a salty crunch.
- Dark chocolate (optional): I drizzle melted dark chocolate on top once cooled. For a dairy-free version, use cocoa butter and cacao powder—just expect a slightly different snap and flavor.
- Vanilla extract: A splash of vanilla rounds out the flavors with a warm aroma. If you don’t have vanilla, a pinch of cinnamon can add a cozy undertone.
Spotlight on key ingredients
Mixed nuts:
- Honey: I love how honey binds everything together with a sticky, sweet richness that’s almost caramel-like. If you want a less sweet version, try maple syrup—just be prepared for a slightly different flavor profile.
- I use a variety of almonds, cashews, and walnuts because they add different textures and depths. Toast your nuts lightly to bring out their aroma—expect a fragrant, nutty smell that fills the kitchen.
Dried fruit and oats:
- Dried fruit: I often toss in chopped dried apricots or cranberries for a tangy contrast. If you prefer less chewiness, soak dried fruit briefly in warm water then drain well before chopping.
- Oats: I prefer rolled oats for their chew and stability, but instant oats work in a pinch—just keep an eye on the mixture as they can become mushy if overmixed or heated too long.
Notes for ingredient swaps
- Sweetener: Maple syrup or agave nectar can replace honey for a vegan or different flavor profile. Expect a slightly less sticky result.
- Nuts: Use sunflower seeds or pumpkin seeds if you’re allergic or want a different crunch. They have a milder, less oily flavor.
- Dried fruit: Swap in chopped dates, figs, or apricots. Dried cranberries add tartness, but soak them briefly if too chewy.
- Oats: Gluten-free rolled oats work if you need to keep it gluten-free. Instant oats can be used but may alter texture slightly.
- Chocolate: Dairy-free dark chocolate or cacao nibs are good alternatives. Expect a different melt and snap, but still delicious.
- Binding syrup: Brown rice syrup or glucose syrup can be used instead of honey, adding a different sweetness and stickiness.
- Salt: Flaky sea salt on top enhances flavor, but regular table salt works fine if you prefer a less pronounced saltiness.
Equipment & Tools
- 20cm (8-inch) square pan: To hold and shape the bars.
- Parchment paper: For easy removal and clean slicing.
- Dry skillet: To toast nuts evenly.
- Spatula: To mix and press the mixture into the pan.
- Microwave or double boiler: To melt chocolate or warm honey mixture.
- Sharp knife: To cut the set bars into portions.
Step-by-step guide to no bake nut bars
- Gather all ingredients: nuts, honey, oats, dried fruit, salt, and optional chocolate. Line a 20cm (8-inch) square pan with parchment paper, leaving overhang for easy removal.
- Chop nuts coarsely; toast them lightly in a dry skillet over medium heat (about 5 minutes) until fragrant and golden. Stir occasionally to prevent burning. Cool slightly.
- In a large mixing bowl, combine honey, a pinch of salt, and vanilla if using. Microwave for 20-30 seconds until warm and runnier, or gently warm over a double boiler. Mix well.
- Add oats, dried fruit, and toasted nuts to the honey mixture. Stir thoroughly until everything is evenly coated and sticky. If the mixture feels too dry, add a drizzle more honey.
- Transfer the mixture to the prepared pan. Using a spatula or the back of a spoon, press firmly into an even layer. For a compact bar, press down with the bottom of a glass or measuring cup.
- Optional: Melt dark chocolate in a microwave in 15-second bursts, stirring between each, until smooth. Drizzle over the pressed mixture for a glossy, rich top layer.
- Let the bars set at room temperature for at least 1 hour or in the fridge for 30 minutes until firm. The mixture should be firm enough to cut cleanly but still chewy.
- Once set, lift out the block using the parchment overhang. Slice into bars or squares with a sharp knife. Store in an airtight container in the fridge for up to a week.
Let the bars rest at room temperature for an hour or chill in the fridge for 30 minutes until firm. Use parchment to lift out and slice into rectangles or squares. Serve immediately or store in an airtight container in the fridge for up to a week.
How to Know It’s Done
- Nut mixture is golden and fragrant after toasting.
- Honey mixture is sticky and well-coated with oats and nuts.
- Bars are firm but chewy when pressed and cut.
No-Bake Nut Bars
Ingredients
Equipment
Method
- Line your square pan with parchment paper, leaving a bit overhang on the sides for easy lifting.
- Chop the nuts roughly and toast them in a dry skillet over medium heat until fragrant and golden, about 5 minutes. Stir occasionally to prevent burning. Let them cool slightly.
- In a large mixing bowl, combine honey, vanilla extract, and a pinch of sea salt. Warm the mixture slightly in the microwave for about 20 seconds until it's runny and fragrant.
- Add the toasted nuts, oats, and chopped dried fruit to the honey mixture. Mix thoroughly with a spatula until everything is evenly coated and sticky.
- Transfer the mixture into the prepared pan. Press it down firmly with the back of a spatula or your fingers to create an even, compact layer. This helps the bars hold together nicely.
- If using chocolate, melt it gently in short bursts in the microwave or over a double boiler until smooth. Drizzle the melted chocolate over the pressed mixture for a glossy finish.
- Chill the bars in the fridge for at least 1 hour, or until the mixture is firm and set. This makes slicing easier and ensures they hold their shape.
- Once set, lift the entire block out of the pan using the parchment overhang. Use a sharp knife to cut into 8 bars or squares, pressing down firmly for clean edges.
- Arrange the bars on a plate or store them in an airtight container in the fridge. They’re ready to enjoy whenever you need a quick, satisfying snack!
Notes
Tips and tricks for perfect bars
- Use freshly toasted nuts to boost aroma and flavor—expect a warm, fragrant smell that fills the kitchen.
- Press mixture firmly into the pan—this creates a clean, compact bar with satisfying texture.
- Chill the bars thoroughly—aim for at least 1 hour in the fridge until they feel firm and easy to cut.
- Melt chocolate gently—use low heat or short bursts in the microwave to prevent burning and achieve a glossy finish.
- Use a silicone spatula for mixing—this helps scrape the sticky mixture effortlessly and ensures even coating.
- Add a pinch of salt on top—flaky sea salt enhances sweetness and adds a pleasant crunch, balancing flavors.
- Store in an airtight container—keeps bars fresh and chewy for up to a week, maintaining their texture and flavor.
Common mistakes and how to fix them
- FORGOT to evenly toast nuts → toast longer and stir frequently for uniform golden colour.
- DUMPED hot honey mix into oats → let honey cool slightly to prevent clumping and sogginess.
- OVER-TORCHED chocolate → melt gently over low heat or short bursts in the microwave to avoid burning.
- MISSED pressing mixture firmly → use the bottom of a glass or spatula to compact for even bars.
Quick fixes and pantry swaps
- When mixture feels dry → splash in a tiny bit more honey to bind.
- If bars crumble → patch with a drizzle of warm honey and press again.
- Splash melted chocolate too thick → stir in a drop of coconut oil for shine and fluidity.
- Dumped mixture too soft → chill for 10 minutes before pressing again.
- Over-torched chocolate → lower heat or microwave in short bursts, stirring often.
Prep, store, and reheat tips
- Preparation: You can toast nuts and melt chocolate ahead of time; store separately in airtight containers for up to 2 days.
- Storage: Keep the bars in an airtight container in the fridge; they stay fresh for up to a week, maintaining chewy texture and nut aroma.
- Shelf life: These bars are best enjoyed within 5–7 days; after that, nuts may lose their crunch slightly, and flavors mellow.
- Reheating: Not necessary—just serve straight from the fridge. If you prefer a softer texture, let a bar sit at room temperature for 10 minutes until slightly warmer and more fragrant.
Top questions about no bake nut bars
1. Can I shape these bars in molds?
Yes, using a silicone mold or pressing the mixture into a lined pan makes slicing easier and neater.
2. Can I substitute ingredients?
Absolutely, you can customize with your favorite nuts or dried fruits for different textures and flavors.
3. How long do they last in the fridge?
Storing in an airtight container in the fridge keeps them fresh for up to a week, maintaining chewy texture.
4. How do I melt chocolate without burning it?
You can melt chocolate in the microwave in short bursts, stirring in between, until smooth and glossy.
5. Should I chill the bars before cutting?
Chilling the bars for at least 30 minutes helps them set properly and makes slicing cleaner.
6. How do I get an even mixture?
Mixing thoroughly ensures every bite is packed with nuts, oats, and sweet honey for consistent flavor.
7. Why toast the nuts?
Toast nuts lightly until fragrant for a richer, more complex flavor and aroma in each bite.
8. How do I cut the bars cleanly?
Use a sharp knife and press down firmly when cutting for clean, neat bars without crumbling.
9. Can I freeze these nut bars?
You can store the bars in the freezer for up to a month for longer shelf life and easy grab-and-go snacks.
10. Should I add salt on top?
Yes, adding a pinch of sea salt on top enhances sweetness and adds a satisfying crunch to each bite.
These no-bake nut bars are what I turn to when I need something quick and honest, with a crunch that lingers. They’re simple, but each bite feels like a small, sweet victory—especially when the kitchen smells toasty and inviting. Sometimes, the simplest treats remind us how satisfying just good nuts and honey can be.
They’re perfect for last-minute cravings or a quick snack that doesn’t compromise on flavor. Plus, knowing you made them yourself adds a quiet pride—no fuss, just real, honest ingredients coming together. It’s a little reminder that sometimes, the best things are the easiest to pull off.
Welcome to Proud of This Mess – a place where food, creativity, and a little chaos come together on a plate!
I’m Emily Carter, the founder and heart behind this little corner of the internet. Born and raised in the United States, I’ve always had a passion for cooking, experimenting, and sharing the messy, delicious journey of creating food that brings people together. My philosophy is simple: good food doesn’t have to be perfect, and a little mess makes it memorable.
At Proud of This Mess, we believe that cooking is more than just following recipes—it’s about exploring flavors, discovering new techniques, and making every meal an experience worth savoring. From comforting weeknight dinners to indulgent desserts, our goal is to inspire home cooks of all levels to embrace the joy of food without fear of imperfection.