
Making chocolate truffles usually feels like a full-on baking project, but these no-bake versions turn that idea upside down. They’re perfect for hot days when melting chocolate in a double boiler sounds like a punishment, not a treat. Plus, they come together in no time, which is a relief when you want something sweet but don’t want to fuss over heat.
There’s a quiet satisfaction in shaping these little bites—no fancy tools required, just your hands and good quality chocolate. It’s a reminder that sometimes, the best desserts are the simplest, especially when they carry a rich, cocoa-scented aroma that fills the kitchen. They’re the kind of treat you reach for after a long day, knowing they’re easy but still indulgent.
This recipe is also a bit of a nostalgia trip—reminding me of childhood afternoons and small, sweet victories. It’s about making something decadent without the fuss, and letting the chocolate do all the work. A small, luscious moment that feels just right in the middle of a busy or warm day.
Focusing on the unexpected pleasure of making rich, decadent chocolate truffles without turning on the stove, perfect for busy or summer days when heat is unwelcome but cravings are real.
Unexpected joys of no-bake treats
- I love how these truffles turned my afternoon chaos into a small, sweet victory, no oven needed.
- Making them reminds me of childhood, when simple pleasures like cocoa and sugar felt like magic.
- The richness of the chocolate, melting on my fingertips, somehow soothes even the busiest days.
- There’s a quiet pride in shaping each one—no fancy tools, just your hands and good chocolate.
- Cracking the shell to reveal that glossy, fudgy center never gets old, even after dozens.
Unexpected joys of no-bake treats
One afternoon, I was desperately craving something rich and chocolatey, but the heat outside made melting chocolate seem like a punishment. I remembered a childhood trick—no-bake treats that came together with just a few ingredients and a bit of patience in the fridge. That moment sparked the idea to turn simple cocoa and butter into tiny, decadent bites without turning on the stove. Now, these truffles are my go-to when I want a quick, satisfying fix that doesn’t heat up the kitchen or take hours to prepare.
Historical and Cultural Tidbits
- The concept of chocolate confections without heat dates back to early 20th-century European kitchens, where resourcefulness was key during wartime shortages.
- No-bake truffles gained popularity in the 1960s as a quick, elegant dessert during post-war social gatherings—no oven required.
- Traditional truffle recipes often used leftover or unsold chocolate, turning it into decadent treats that minimized waste and maximized flavor.
- In recent years, the rise of minimalist and fuss-free baking trends has brought these simple, rich bites back into the spotlight, especially for summer and busy lifestyles.
Key ingredients and tips
- High-quality dark chocolate: I use 70% cocoa for a deep, bittersweet flavor that melts smoothly—don’t skimp on good chocolate, it makes all the difference for that luscious finish.
- Unsalted butter: I prefer European-style butter for its rich, creamy texture that helps the truffles set perfectly—if you only have regular butter, just add a pinch of salt to balance the sweetness.
- Heavy cream: I love how it adds a silky richness and helps meld the chocolate into a fudgy, shiny mixture—if you’re out, full-fat coconut milk can work, but it’ll add a slight coconut note.
- Cocoa powder: I sift mine to avoid lumps and get that velvety coating—try smoked cocoa for a smoky twist, or skip it if you want a more subtle, glossy finish.
- Vanilla extract: I use pure vanilla for warmth and depth—imitation vanilla is fine in a pinch, but it won’t offer the same aromatic complexity.
- Optional add-ins (like sea salt or espresso powder): I sprinkle sea salt on top for contrast, or mix in a teaspoon of espresso for a mocha punch—these tiny tweaks elevate the flavor without overpowering.
- Chilling time: I find that a good 2 hours in the fridge firms them up just right—if you’re in a rush, a quick 30-minute freeze helps, but they won’t be as firm for rolling.
Spotlight on key ingredients
High-quality dark chocolate:
- I use 70% cocoa for a deep, bittersweet flavor that melts smoothly—don’t skimp on good chocolate, it makes all the difference for that luscious finish.
- Unsalted butter: I prefer European-style butter for its rich, creamy texture that helps the truffles set perfectly—if you only have regular butter, just add a pinch of salt to balance the sweetness.
- Cocoa powder: I sift mine to avoid lumps and get that velvety coating—try smoked cocoa for a smoky twist, or skip it if you want a more subtle, glossy finish.
Heavy cream and vanilla extract:
- Heavy cream: I love how it adds a silky richness and helps meld the chocolate into a fudgy, shiny mixture—if you’re out, full-fat coconut milk can work, but it’ll add a slight coconut note.
- Vanilla extract: I use pure vanilla for warmth and depth—imitation vanilla is fine in a pinch, but it won’t offer the same aromatic complexity.
Notes for ingredient swaps
- Dairy-Free: Swap butter for coconut oil or a dairy-free butter alternative. It might alter the richness slightly but keeps the texture firm.
- Vegan: Use dark chocolate with no dairy and coconut cream instead of heavy cream. Expect a slightly fruitier, coconut aroma.
- Sweetener: Replace sugar with maple syrup or agave nectar for a different sweetness profile—note it may make the mixture softer.
- Flavor Boost: Add a pinch of chili powder or cinnamon to the cocoa for a spicy or warm twist—start small and adjust to taste.
- Nut-Free: Omit nuts or use toasted coconut flakes for a different texture—be mindful of cross-contamination if allergies are a concern.
- Cocoa Powder: Use Dutch-processed cocoa for a mellower, less acidic flavor or try a smoky variety for depth.
- Chocolate Type: For a milkier flavor, opt for milk chocolate instead of dark—note it will be sweeter and less intense.
Equipment & Tools
- Heatproof bowl: Melts the chocolate gently and evenly without burning.
- Small saucepan: Optional for heating cream if not using microwave.
- Spoon or small scoop: Portions out and shapes the ganache into balls.
- Parchment paper: Prevents sticking and makes cleanup easier.
- Sifter: Covers the finished truffles with cocoa powder evenly.
Step-by-step guide to no-bake truffles
- Gather your ingredients and tools: a mixing bowl, a spatula, a baking sheet, and parchment paper. No fancy equipment needed, just your hands and patience.
- Chop the chocolate: break into small pieces, about 1/2 inch, so it melts evenly. Place in a heatproof bowl.
- Warm the cream: microwave for about 30 seconds until just steaming, or heat in a small saucepan over low heat (no boiling!).
- Pour the warm cream over the chocolate: let sit for 2-3 minutes to soften the chocolate, then stir gently until smooth and glossy. If it’s stubborn, microwave the mixture for 10 seconds and stir again.
- Add butter and vanilla: mix until fully incorporated, creating a rich, fudgy texture. You should have a thick, shiny chocolate ganache.
- Let the mixture cool: cover the bowl and refrigerate for about 1-2 hours until firm enough to scoop. It should be scoopable but not rock-hard.
- Scoop and shape: using a teaspoon or small scoop, portion out the ganache and roll quickly between your palms into small balls, about 1 inch diameter. Place on parchment-lined tray.
- Optional coating: sift cocoa powder onto a plate. Roll each truffle in cocoa to coat evenly. For a different look, you can dip in melted chocolate or roll in chopped nuts.
- Chill again: refrigerate the shaped truffles for at least 30 minutes to set the coating and ensure they hold their shape.
- Serve or store: enjoy immediately, or store in an airtight container in the fridge for up to a week. For longer storage, freeze for up to a month, letting them thaw slightly before serving.
Chill the shaped truffles for at least 30 minutes to set fully. Serve straight from the fridge for best texture. Let sit at room temperature for 5 minutes before eating to enhance flavor and aroma.
How to Know It’s Done
- The ganache is glossy, smooth, and holds its shape when scooped.
- Truffles are firm but not hard—test by gently pressing; they should give slightly.
- Coating is even and shiny, with no cracks or cracks forming during handling.
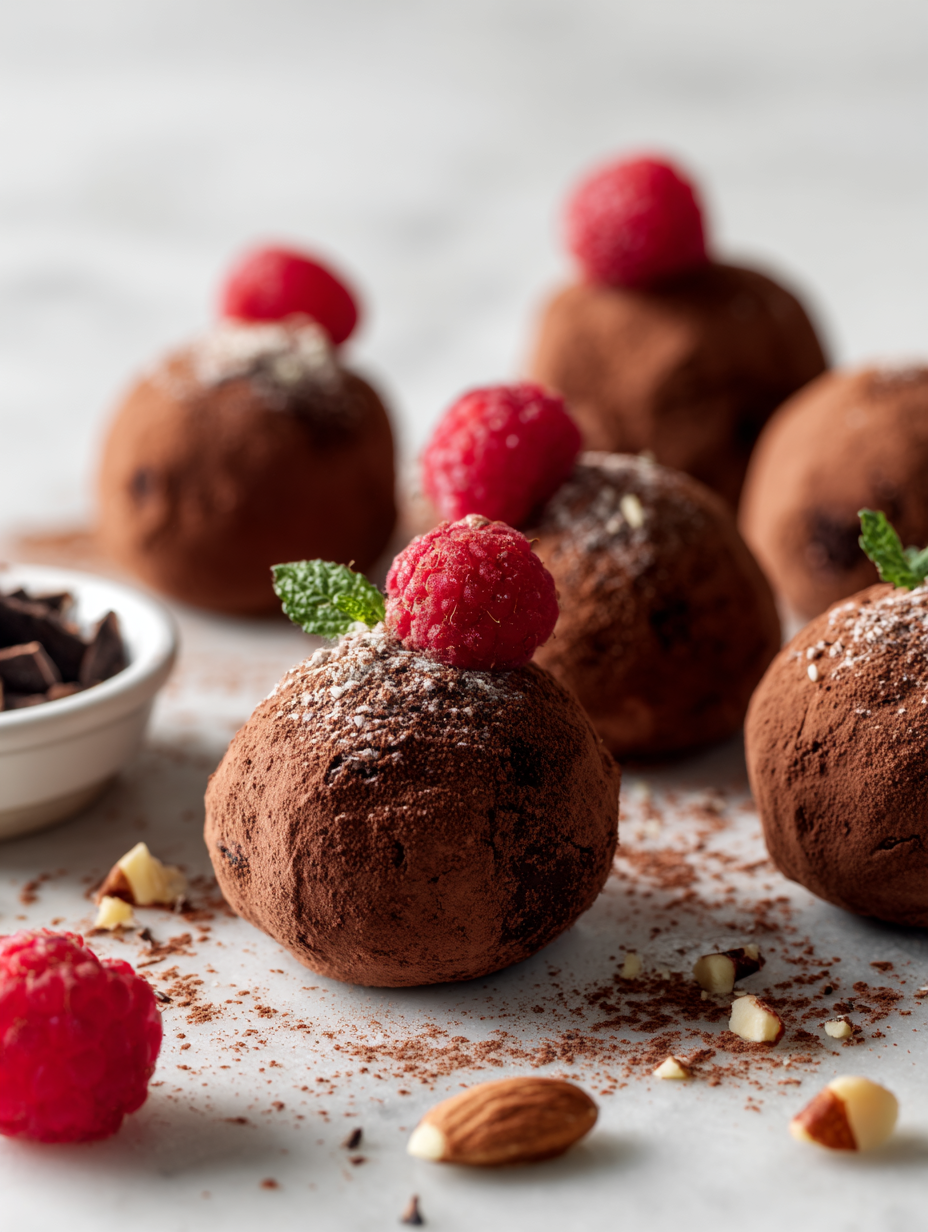
No-Bake Chocolate Truffles
Ingredients
Equipment
Method
- Chop the chocolate into small pieces and place them in a heatproof bowl.
- Warm the heavy cream in a small saucepan over low heat until it just begins to steam—avoid boiling.
- Pour the hot cream over the chopped chocolate and let sit for 2-3 minutes, allowing the chocolate to soften and meld.
- Gently stir the mixture with a spatula until smooth, glossy, and completely combined—this creates a rich ganache.
- Add the butter and vanilla extract to the ganache and stir until fully incorporated, resulting in a thick, fudgy texture.
- Cover the bowl with plastic wrap and refrigerate for 1-2 hours until the ganache is firm enough to scoop and shape.
- Using a teaspoon or small scoop, portion out the chilled ganache and quickly roll between your palms into 1-inch balls, placing each on parchment paper.
- Sift the cocoa powder onto a plate and roll each truffle in the cocoa, coating evenly for a beautiful, velvety finish.
- Return the coated truffles to the parchment-lined tray and refrigerate for an additional 30 minutes to set the coating.
- Serve the truffles straight from the fridge for a firm, fudgy bite, or allow them to sit at room temperature for 5 minutes for a softer, more aromatic experience.
Tips for perfect no-bake truffles
- Bolded mini-head: Use high-quality chocolate—melts into a rich, glossy ganache that’s worth the splurge.
- Bolded mini-head: Chill the ganache until just firm—over-chilling makes shaping tricky, but too soft and it’s messy.
- Bolded mini-head: When rolling, slightly dampen your hands—keeps the mixture from sticking and makes smooth balls easier.
- Bolded mini-head: Sift cocoa powder before coating—prevent lumps and get that velvety, even finish on each truffle.
- Bolded mini-head: Temper the chocolate coating—melt in gentle heat, then cool to just below melting point for a shiny shell.
- Bolded mini-head: Don’t rush the chilling—allow at least 30 minutes in the fridge after shaping, for a firm, crack-free finish.
- Bolded mini-head: For a quick fix, dip in warm chocolate—just 10 seconds in the microwave, then swirl for a smooth coat.
Common mistakes and how to fix them
- FORGOT to let the ganache cool before shaping → Chill for at least 1 hour to firm up.
- DUMPED hot cream directly on chocolate → Pour warm cream slowly and wait 2 minutes.
- OVER-TORCHED the chocolate mixture → Remove from heat immediately if it starts to smell burnt.
- MISSED the final chill step → Refrigerate for at least 30 minutes to set properly.
Quick fixes and pantry swaps
- If mixture is too soft → Chill for 15 minutes before rolling.
- When truffles crack during coating → Slightly warm the coating for a smoother finish.
- Splash with a few drops of oil if chocolate seizes or becomes grainy.
- Patch dry or crumbly truffles by gently pressing with a damp finger or adding a tiny bit of cream.
- Shield delicate truffles from moisture by storing in an airtight container with parchment layers.
Prep, store, and reheat tips
- The ganache can be made a day ahead; keep it covered in the fridge and it will develop a richer cocoa aroma overnight.
- Shape the truffles and coat them in cocoa powder up to 2 hours before serving; store in an airtight container in the fridge to keep them fresh and fudgy.
- For best texture, let the truffles sit at room temperature for 5 minutes before eating—they’ll be softer and more fragrant.
- Store leftovers in the fridge for up to a week, or freeze for up to a month. Thaw in the fridge, then bring to room temp for best sensory experience.
- Reheat by briefly warming in the microwave for 5 seconds if the coating feels a little hard—just enough to shimmer softly without melting.
Top questions about no bake truffles
1. Can I make these vegan or dairy-free?
Yes, using full-fat coconut milk instead of cream works well and gives a slight coconut flavor.
2. Can I use milk chocolate instead of dark?
Absolutely, you can substitute dark chocolate with milk chocolate for a sweeter, creamier taste.
3. How long do I need to chill the truffles?
Yes, refrigerate the shaped truffles for at least 30 minutes to set the coating properly.
4. My ganache is too soft to roll, what should I do?
If the mixture feels too soft, chill it in the fridge for 15-20 minutes before shaping.
5. What are some good coatings besides cocoa powder?
You can roll the truffles in chopped nuts, sprinkles, or cocoa powder for different textures and looks.
6. Can I add salt or other flavorings?
Yes, adding a pinch of sea salt on top enhances the chocolate flavor and balances the sweetness.
7. How should I store the truffles?
They can be stored in an airtight container in the fridge for up to a week or frozen for a month.
8. How do I reheat or soften the truffles?
Reheat briefly in the microwave for 5 seconds if the coating feels too hard right before serving.
9. Can I customize the flavor of the truffles?
Yes, you can add flavorings like espresso powder or chili for a spicy kick or mocha flavor.
10. How do I know when the truffles are ready?
Ensure the chocolate mixture is glossy and holds its shape when scooped, and the coating is shiny and crack-free.
These no-bake chocolate truffles are a reminder that sometimes, the simplest ingredients can create the most satisfying treats. Making them is effortless, yet each bite feels indulgent and rich, especially when you savor that glossy, fudgy center. They’re perfect for spontaneous cravings or last-minute gatherings, offering a decadent escape without heating up the kitchen.
In a world full of complicated recipes, these little bites stand out for their ease and pure chocolate pleasure. They’re a small, sweet gesture that fits into busy schedules or warm weather, when turning on the stove feels like a hassle. And honestly, once you get the hang of shaping and coating them, you might find yourself reaching for these more often than you expected.
Welcome to Proud of This Mess – a place where food, creativity, and a little chaos come together on a plate!
I’m Emily Carter, the founder and heart behind this little corner of the internet. Born and raised in the United States, I’ve always had a passion for cooking, experimenting, and sharing the messy, delicious journey of creating food that brings people together. My philosophy is simple: good food doesn’t have to be perfect, and a little mess makes it memorable.
At Proud of This Mess, we believe that cooking is more than just following recipes—it’s about exploring flavors, discovering new techniques, and making every meal an experience worth savoring. From comforting weeknight dinners to indulgent desserts, our goal is to inspire home cooks of all levels to embrace the joy of food without fear of imperfection.