
This no-bake chocolate almond clusters recipe is my go-to when I need something sweet in a flash, but I still want it to feel special. It’s the kind of treat that comes together in minutes, mostly just waiting around while the chocolate sets up—no fuss, no heat, just good ingredients doing their thing.
I love how it feels like a little luxury, especially when unexpected guests drop by or I need a quick gift for someone. The crunch of toasted almonds paired with the smooth, rich chocolate is a simple joy that doesn’t require a fancy kitchen or a lot of time. It’s honest, straightforward comfort, wrapped up in a tiny cluster.
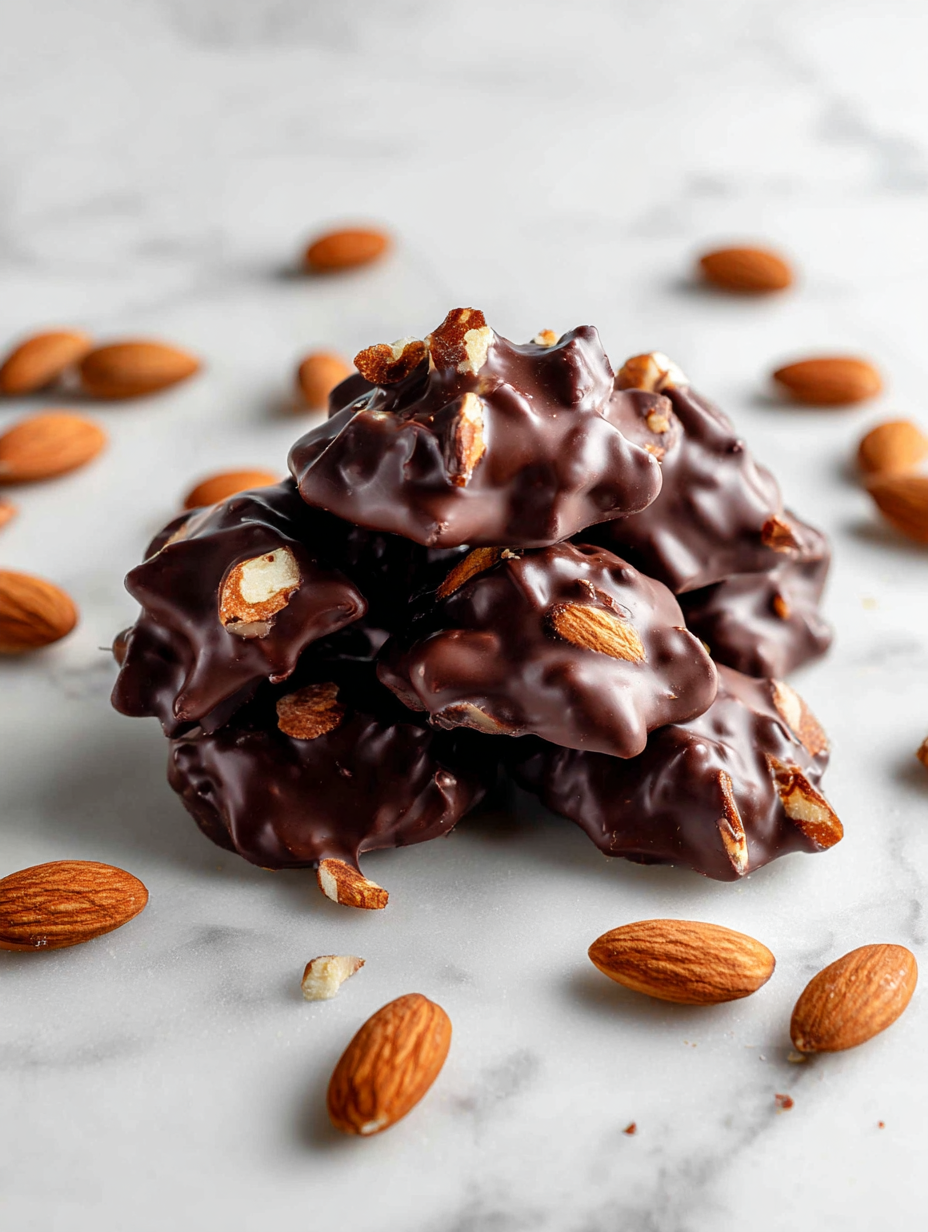
This recipe is a secret weapon for when you need a quick, satisfying treat that feels fancy but is practically effortless, perfect for unexpected guests or a last-minute gift.
Unexpected Bliss in Every Bite
- This recipe is my secret weapon for when I need a quick, satisfying treat that feels a bit fancy but is truly effortless.
- I love how these clusters bring back childhood memories of simple, crunchy sweets, but with a grown-up richness from the dark chocolate.
- Making these is oddly meditative—melting chocolate, toasting almonds—and the smell alone makes the kitchen feel cozy.
- Every time I share these with friends, I get that surprised look—like I just pulled off some tiny, delicious magic in no time.
The spark behind this treat
- This recipe came together on a rainy afternoon when I was rummaging through the pantry, looking for something sweet but quick. The idea of combining toasted almonds with rich chocolate has been a favorite in my family for years, but I wanted to streamline it for busy days. The no-bake aspect means I can whip it up in the midst of chaos or when I just need a small moment of calm with good flavors.
- There’s something satisfying about the tactile process—melting, mixing, shaping—that reminds me of childhood afternoons spent helping in the kitchen. It’s a recipe born out of necessity and a love for simple, honest ingredients. Now, it’s become my go-to for spontaneous gatherings or a quick gift that feels personal without any fuss.
- heading
- story_type
Historical & Cultural Tidbits
- These clusters likely originated as a practical way to use up leftover chocolate and nuts, common during wartime rationing.
- In some European countries, similar no-bake confections have been a holiday staple since the early 20th century.
- The combination of chocolate and almonds has a long history, dating back to ancient Mediterranean trade routes.
- The simplicity and no-heat method made these a popular homemade treat during times when kitchen resources were limited.
Ingredient breakdown: key components
- Almonds: I toast mine lightly until they smell nutty and golden. You can skip to save time, but the flavor really deepens with the toast.
- Dark chocolate: I prefer a good-quality dark chocolate with at least 70% cacao; it melts smoothly and has a rich, slightly bitter edge that balances the sweetness.
- Honey or maple syrup: I add just enough to enhance the chocolate’s gloss and a touch of sweetness—if you prefer less, cut back, but it helps everything stick together.
- Sea salt: A pinch on top after melting adds a surprising burst of flavor. Don’t skip it unless you want a milder finish; it really makes the chocolate pop.
- Coconut oil: I use a little to help the chocolate melt smoothly and set shiny. If you’re avoiding it, just melt the chocolate slowly over low heat, but expect a slightly less glossy finish.
- Optional add-ins: Dried fruit, shredded coconut, or a pinch of cinnamon can add a personal touch. Just keep in mind, they can change the texture and moisture level.
- Parchment paper: I line my tray with it for easy clean-up and to prevent clusters from sticking. No need to oil the paper, just lay the clusters directly on it.
Spotlight on Key Ingredients
Almonds and Chocolate:
- Almonds: I toast mine lightly until they smell nutty and golden. You can skip to save time, but the flavor really deepens with the toast.
- Dark chocolate: I prefer a good-quality dark chocolate with at least 70% cacao; it melts smoothly and has a rich, slightly bitter edge that balances the sweetness.
- Honey or maple syrup: I add just enough to enhance the chocolate’s gloss and a touch of sweetness—if you prefer less, cut back, but it helps everything stick together.
Notes for ingredient swaps
- Dairy-Free: Substitute dark chocolate with dairy-free or vegan chocolate. It melts just as smoothly but may have a slightly different flavor profile, less creamy and more cocoa-forward.
- Nuts: Swap almonds for toasted pecans, walnuts, or cashews. Each brings a distinct crunch and flavor, from buttery to slightly bitter.
- Sweetener: Use maple syrup or agave instead of honey. They provide similar sweetness but add a different note—earthy or floral, respectively.
- Oil: Replace coconut oil with a neutral oil like grapeseed or light olive oil for a less pronounced flavor and similar melting properties.
- Salt: If you prefer a milder touch, skip the sea salt or use smoked salt for a smoky depth that complements the chocolate.
- Add-ins: Dried cranberries, shredded coconut, or a dash of cinnamon can customize the flavor. Just be mindful of moisture content or texture changes.
- Parchment: For an eco-friendly option, use silicone baking mats. They prevent sticking and are reusable, though they may slightly alter the ease of removal.
Equipment & Tools
- baking sheet with parchment paper: to hold the clusters and prevent sticking
- small heatproof bowl: for melting chocolate safely
- spatula: to mix and fold ingredients
- microwave or double boiler: to melt chocolate evenly
- spoon or small scoop: to shape clusters uniformly
- cooling rack: to let clusters set without sticking
Step-by-step guide to no bake clusters
- Equipment & Tools: line a baking sheet with parchment paper, small heatproof bowl, spatula, microwave or double boiler, spoon or small scoop, cooling rack.
- Toast almonds: spread 1 cup of almonds on the baking sheet. Bake at 180°C (350°F) for 8-10 minutes, or until they smell nutty and are lightly golden. Let cool.
- Melt chocolate: in a small heatproof bowl, melt 8 oz of dark chocolate. Use microwave in 20-second bursts, stirring each time, or a double boiler over low heat. The chocolate should be shiny and smooth. If it seizes or gets grainy, add a teaspoon of coconut oil and stir until glossy.
- Combine ingredients: add the cooled almonds to the melted chocolate. Mix well with a spatula until evenly coated. If the mixture is too thick, gently warm it again and stir.
- Form clusters: using a small scoop or spoon, drop spoonfuls of the mixture onto the prepared parchment. Shape into small mounds, about 1-2 inches in diameter.
- Rest & set: leave the clusters at room temperature or in the fridge for at least 30 minutes. They should feel firm and have a shiny finish. If they look dull or feel soft, give them more chilling time.
- Finish & serve: sprinkle a tiny pinch of sea salt on each cluster for contrast. Serve immediately or store in an airtight container in the fridge for up to a week.
- Storage tips: keep in a cool, dry place or fridge. For longer storage, freeze for up to a month. Let come to room temp before serving for best flavor and texture.
Allow clusters to rest at room temperature or in the fridge until firm and glossy. Finish with a sprinkle of sea salt if desired. Serve directly from the fridge or at room temp for optimal crunch and flavor.
How to Know It’s Done
- Chocolate is fully melted and shiny, with no graininess or seizing.
- Almonds are toasted and fragrant, with a golden hue.
- Clusters are firm and hold shape when gently pressed, with a glossy surface.
No-Bake Chocolate Almond Clusters
Ingredients
Equipment
Method
- Spread the almonds evenly on a baking sheet and toast in a preheated oven at 180°C (350°F) for about 8-10 minutes until fragrant and golden. Let them cool completely.
- Place the chopped dark chocolate in a small heatproof bowl. Melt it gently in the microwave in 20-second bursts, stirring well after each, until smooth and shiny. Alternatively, use a double boiler on low heat.
- Stir in the honey and coconut oil into the melted chocolate until fully incorporated. The mixture should be glossy and smooth.
- Add the cooled toasted almonds into the chocolate mixture and fold gently with a spatula until evenly coated.
- Using a spoon or small scoop, drop spoonfuls of the chocolate almond mixture onto a parchment-lined baking sheet, shaping them into small clusters about 1-2 inches wide.
- Sprinkle a tiny pinch of sea salt over each cluster for a flavor contrast. Place the tray in the fridge for at least 30 minutes until the clusters are firm and glossy.
- Once set, remove the clusters from the fridge, and if desired, add another light sprinkle of sea salt. Serve immediately or store in an airtight container in the fridge for up to a week. Enjoy the crunchy, rich, and glossy bites!
Notes
Pro tips for perfect clusters
- Use high-quality chocolate for a smooth melt and rich flavor. Cheaper chocolates can seize or become grainy.
- Toast almonds until golden and fragrant. This enhances their flavor and gives a satisfying crunch.
- Melt chocolate slowly, either in short bursts in the microwave or over low heat, to prevent burning or seizing.
- Mix in toasted almonds while chocolate is still warm to help everything stick together better.
- Chill clusters until firm and shiny—at least 30 minutes in the fridge. Dull or soft clusters need more time to set.
- Sprinkle a pinch of sea salt on top after setting. It heightens the chocolate’s flavor and adds a subtle contrast.
- Store in an airtight container in the fridge for up to a week or freeze for longer keeping. Bring to room temp before serving for optimal texture.
Common mistakes and how to fix them
- FORGOT to pre-toast almonds → Toast almonds until fragrant and golden, about 8-10 minutes.
- DUMPED chocolate into hot pan → Melt chocolate gently over low heat or in short bursts in microwave.
- OVER-TORCHED chocolate → Remove from heat immediately if chocolate starts smelling burnt or becomes lumpy.
- FAILED to cool almonds before mixing → Let toasted almonds cool completely to prevent melting the chocolate.
Quick fixes and pantry swaps
- When chocolate seizes, splash in a teaspoon of coconut oil and stir until glossy.
- If almonds aren’t toasted enough, patch with a quick 2-minute broil — watch for burning!
- Dumped too much salt? Rinse clusters briefly under cold water, then dry and chill again.
- Over-melted chocolate? Shield with a sprinkle of crushed nuts or shredded coconut for texture.
- When clusters stick to parchment, shield with a light mist of non-stick spray before next batch.
Prep, store, and reheat tips
- You can prepare the clusters up to a week in advance; store them in an airtight container in the fridge for best freshness. The chocolate will stay shiny and firm if kept cool and dry.
- For longer storage, freeze the clusters for up to a month. Wrap them tightly in plastic wrap or store in a freezer bag, then thaw in the fridge before serving.
- Refrigeration enhances the crunch and keeps the chocolate glossy, but if you prefer softer clusters, let them sit at room temperature for 10-15 minutes before eating.
- To reheat or soften slightly, let the clusters sit at room temp or give them a quick 10-second zap in the microwave—watch for melting or gloss loss, and smell for any burnt notes.
Top questions about clusters
1. Can I make these without honey?
Yes, you can skip the honey if you prefer a less sticky cluster, but it might be slightly less glossy.
2. Can I use chocolate chips instead of bars?
Absolutely, use dark chocolate chips or a chopped bar. Just make sure they melt evenly and smoothly.
3. How long do these last and how should I store them?
To keep clusters firm, store them in an airtight container in the fridge. They can last up to a week.
4. Can I substitute the almonds?
Yes, swap almonds for cashews, pecans, or walnuts. Toasted or raw works, but toasted adds more flavor.
5. How do I toast the almonds properly?
To toast almonds, spread them on a baking sheet and bake at 180°C (350°F) for about 10 minutes until fragrant.
6. What to do if my melted chocolate gets grainy?
If the chocolate seizes or gets grainy, add a teaspoon of coconut oil and stir until smooth again.
7. How do I know when the clusters are ready?
Chill the clusters for at least 30 minutes until they feel firm and glossy. They should hold shape when touched.
8. Can I freeze the clusters for later?
Yes, you can freeze these clusters for up to a month. Wrap them tightly and thaw in the fridge before serving.
9. How should I melt the chocolate without burning it?
When melting chocolate, do it slowly over low heat or in short microwave bursts to prevent burning.
10. My clusters are sticking to the paper, what now?
If clusters stick to the parchment, give them a quick spray with non-stick spray or gently lift them with a spatula.
These clusters are a little celebration of simple ingredients and quick thinking. They remind me that sometimes, the best treats come from spontaneity and a handful of pantry staples.
Whenever I make these, I’m struck by how something so modest can turn into a moment of real indulgence. It’s a small, imperfect pleasure that feels just right for the busy days or last-minute cravings.
Welcome to Proud of This Mess – a place where food, creativity, and a little chaos come together on a plate!
I’m Emily Carter, the founder and heart behind this little corner of the internet. Born and raised in the United States, I’ve always had a passion for cooking, experimenting, and sharing the messy, delicious journey of creating food that brings people together. My philosophy is simple: good food doesn’t have to be perfect, and a little mess makes it memorable.
At Proud of This Mess, we believe that cooking is more than just following recipes—it’s about exploring flavors, discovering new techniques, and making every meal an experience worth savoring. From comforting weeknight dinners to indulgent desserts, our goal is to inspire home cooks of all levels to embrace the joy of food without fear of imperfection.