
This no-bake chocolate almond bars recipe is a little treasure for anyone who loves that perfect crunch with their chocolate. I discovered this combo during a chaotic kitchen moment—toast the almonds until they’re golden and fragrant, then let the chocolate melt into that warm nutty aroma. It’s a treat that feels fancy but is honestly just a few pantry staples and a bit of patience waiting for everything to set.
What I love most is how the toasted almonds add a surprising texture that contrasts beautifully with the smooth, rich chocolate. It’s the kind of snack that’s both nostalgic and indulgent, perfect for when you want something sweet but don’t want to fuss over a complicated recipe. Plus, it’s so quick to throw together, it’s practically a kitchen hack for a last-minute craving.
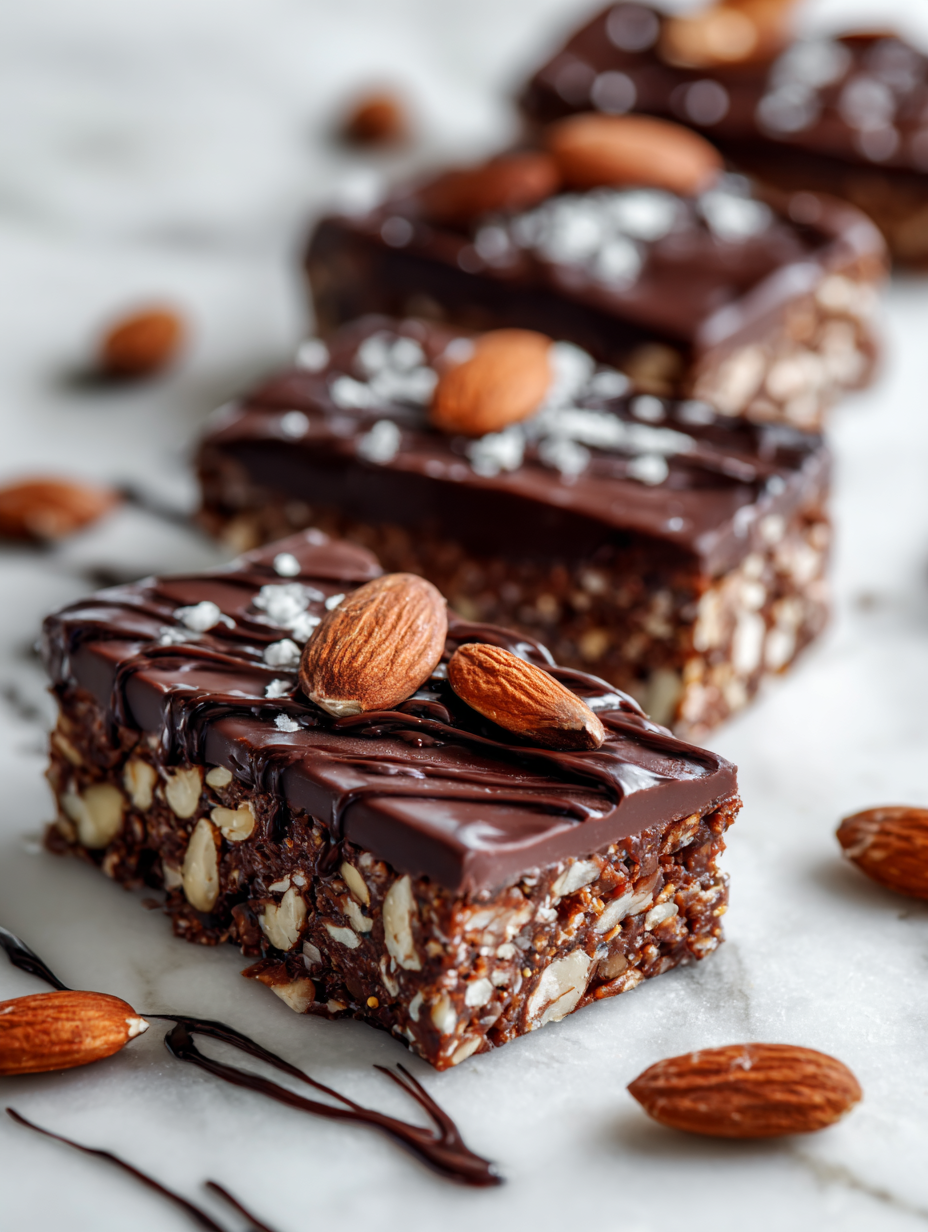
Focusing on the unexpected crunch of toasted almonds combined with smooth chocolate, this recipe emphasizes texture contrast in no-bake treats, turning simple ingredients into a satisfying snack that’s both nostalgic and uniquely indulgent.
The story behind this recipe
- This recipe came about during a moment of kitchen improvisation. I had a handful of toasted almonds and a bar of dark chocolate that needed using up, and I wanted something that felt indulgent but wasn’t going to take ages. The crunch of toasted almonds paired with smooth chocolate just clicked in my mind, and I decided to give it a shot. Turns out, these bars became a quick go-to whenever I needed a little sweet fix without fuss.
- What makes this recipe special to me is how it’s a reminder that simple ingredients, treated right, can create something truly satisfying. I love the smell of toasted almonds mingling with melting chocolate—so warm and inviting. It’s also a recipe I feel proud of because it’s honest, straightforward, and always delivers that perfect bite—crunch, melt, and just a touch of sweetness.
- heading: ‘The story behind this recipe’
Ingredient breakdown: key components
- Dark chocolate: I prefer a high cocoa content for that deep, bittersweet flavor that melts smoothly; you can swap it for milk chocolate if you want a sweeter, creamier taste—just be mindful it’ll soften faster.
- Almonds: Toasted until golden, they bring a warm, nutty aroma and crunch. Skip the toasting if you’re in a hurry, but you’ll lose that smoky depth and extra crunch.
- Butter: I use unsalted to control the saltiness, but salted works if you need a little extra flavor punch. Melt it gently so it doesn’t seize up or burn, and keep an eye on the color—lightly golden is perfect.
- Sweetener: Honey or maple syrup adds a subtle sticky sweetness; if you prefer a more neutral flavor, you can skip it or add a touch of vanilla instead—just watch for the texture to stay firm enough to set.
- Coconut oil: I add a splash for a glossy finish and to enhance the chocolate’s shine. You can omit it for a thicker, less glossy bar, but the texture might be a bit stiffer.
- Salt: Just a pinch enhances the chocolate’s richness. If you’re using salted almonds, cut back a bit on the added salt to keep the flavor balanced.
- Optional add-ins: Dried cranberries or sea salt flakes can elevate these bars—just sprinkle on top before they set, and watch how they add bursts of flavor and texture contrast.
Spotlight on key ingredients
Dark chocolate:
- I love a high cocoa content for that deep, bittersweet flavor that melts smoothly; swap it for milk chocolate if you want a sweeter, creamier taste—just be mindful it’ll soften faster.
- Almonds: Toasted until golden, they bring a warm, nutty aroma and crunch. Skip the toasting if you’re in a hurry, but you’ll lose that smoky depth and extra crunch.
Almonds:
- Toasted until golden, they bring a warm, nutty aroma and crunch. Skip the toasting if you’re in a hurry, but you’ll lose that smoky depth and extra crunch.
- Salt: Just a pinch enhances the chocolate’s richness. If you’re using salted almonds, cut back a bit on the added salt to keep the flavor balanced.
Notes for ingredient swaps
- Dairy-Free: Use coconut oil instead of butter for richness, though the texture will be slightly less creamy.
- Sweetener: Maple syrup or agave nectar can replace honey, adding a different floral or neutral sweetness.
- Chocolate: Swap dark chocolate for milk chocolate if you prefer a sweeter, creamier bite—less intense cocoa flavor.
- Nuts: Walnuts or pecans can replace almonds for a different crunch and flavor profile, but toast them first for aroma.
- Add-ins: Dried cranberries or sea salt flakes can be sprinkled on top before setting for bursts of tartness or salty contrast.
- Oil: If you prefer a firmer bar, omit coconut oil; it keeps the chocolate glossy and slightly softer.
- Flavor boost: A splash of vanilla extract in the melted chocolate adds warmth and depth—skip if you want a straightforward chocolate taste.
Equipment & Tools
- Baking pan: Holds the mixture and helps shape the bars.
- Parchment paper: Prevents sticking and makes removal easier.
- Small saucepan: Melts the chocolate gently over low heat.
- Spatula: Stirs and presses the mixture evenly.
Step-by-step guide to no-bake bars
- Gather your equipment: a 20cm (8-inch) square baking pan, a heatproof spatula, a small saucepan, and parchment paper. Line the pan with parchment for easy removal.
- Toast the almonds: spread 1 cup of sliced almonds on a baking sheet. Bake at 180°C (350°F) for 8-10 minutes until golden and fragrant. Shake halfway. Let cool completely.
- Melt the chocolate: in a small saucepan over low heat (around 50°C/122°F), melt 1 1/2 cups of chopped dark chocolate. Stir constantly until smooth. If it seizes or gets too hot, remove from heat and stir vigorously.
- Add butter and sweetener: stir in 2 tbsp of unsalted butter and 1 tbsp honey or maple syrup into the melted chocolate. Mix until glossy and well combined. Be careful not to overheat.
- Incorporate almonds: fold in the cooled toasted almonds, ensuring they’re evenly coated with chocolate. If the mixture thickens too much, warm it slightly over low heat and stir again.
- Transfer and press: pour the mixture into the prepared pan. Use the spatula to press it down evenly. Smooth the top for a clean finish. Chill in the fridge for at least 2 hours, or until firm.
- Cut into bars: once set, lift the mixture out using the parchment paper. Slice into 8-10 bars with a sharp knife. For clean cuts, wipe the knife between slices.
- Final resting: let the bars sit at room temperature for 10 minutes before serving to soften slightly and enhance flavor. Store leftovers in an airtight container in the fridge for up to a week.
Chill the bars until firm, then cut into desired shapes. Let sit at room temperature for 10 minutes before serving to soften slightly and bring out full flavor.
How to Know It’s Done
- Chocolate is fully melted and glossy before mixing.
- Almonds are evenly coated and fragrant after toasting.
- Bars are firm and hold shape when cut, with a shiny surface.
No-Bake Chocolate Almond Bars
Ingredients
Equipment
Method
- Line your baking pan with parchment paper to make removal easy, and set aside.
- Spread the sliced almonds on a baking sheet and toast in a preheated oven at 180°C (350°F) for 8-10 minutes until golden and fragrant, shaking the pan halfway through. Let them cool completely; you'll smell that warm, nutty aroma.
- In a small saucepan over low heat, gently melt the chopped dark chocolate, stirring constantly to keep it smooth and glossy. Once melted, remove from heat.
- Add the butter, honey or maple syrup, coconut oil, and a pinch of salt into the melted chocolate. Stir until the mixture is shiny and well combined, about 1-2 minutes.
- Gently fold in the cooled toasted almonds into the chocolate mixture, ensuring they are evenly coated and distributed.
- Pour the mixture into your prepared pan and use a spatula to press it down evenly, creating a smooth, compact layer. Place in the fridge and chill for at least 2 hours until set and firm.
- Once set, lift the block out of the pan using the parchment paper and transfer to a cutting board. Slice into 8-10 bars with a sharp knife, wiping the knife clean between cuts for neat edges.
- Let the bars sit at room temperature for about 10 minutes to soften slightly before serving, which enhances their flavor and texture.
Notes
Pro tips for perfect bars
- Bolded mini-head: Use gentle heat → Melt chocolate slowly over low heat to prevent seizing and maintain glossy texture.
- Bolded mini-head: Toast almonds thoroughly → Achieve a fragrant, golden crunch that enhances flavor and adds depth.
- Bolded mini-head: Chill in layers → Allow the mixture to set firmly in the fridge, ensuring clean, crisp cuts.
- Bolded mini-head: Wipe knife regularly → Keep cuts smooth and neat by cleaning the blade between slices.
- Bolded mini-head: Adjust sweetener → Balance sweetness by adding honey or maple syrup gradually, tasting as you go.
- Bolded mini-head: Incorporate ingredients carefully → Fold in almonds gently to preserve their crunch and avoid breaking them.
- Bolded mini-head: Check texture before cutting → Bars should be firm yet slightly yielding when pressed, indicating readiness.
Common mistakes and how to fix them
- FORGOT to check chocolate temperature → Use a thermometer to prevent seizing.
- DUMPED in too much salt → Reduce salt if using salted almonds or other salty ingredients.
- OVER-TORCHED chocolate → Melt slowly over low heat, stir constantly for glossy finish.
- MISSED chilling time → Chill at least 2 hours until bars are firm and easy to cut.
Quick fixes and pantry swaps
- When chocolate seizes, splash in a little warm cream to rescue smoothness.
- If almonds burn during toasting, dump and start with fresh nuts—they add better flavor.
- Splash a few drops of oil if bars are too brittle to cut cleanly.
- Patch cracked bars with a tiny spoonful of melted chocolate for a seamless look.
- Shield delicate toppings from moisture by wrapping bars tightly before storing.
Prep, store, and reheat tips
- Prepare the mixture in advance: melt chocolate, toast almonds, and assemble ingredients the day before for quick assembly later. The warm aroma of toasted almonds will make your kitchen smell inviting.
- Store the assembled, uncut mixture in an airtight container in the fridge for up to 24 hours. The chocolate will firm up, making it easier to cut clean slices when ready.
- Bars will keep well in the fridge for up to a week, maintaining their texture and flavor—just cover tightly to prevent absorption of fridge odors.
- Refrigerated bars soften slightly at room temperature, about 10 minutes, which enhances flavor and makes biting into them more satisfying. Avoid leaving them out too long to prevent melting or sticky surfaces.
Top questions about no bake bars
1. Can I use milk chocolate instead of dark?
Use high-quality dark chocolate for the richest flavor and smooth melting. Cheaper chocolates might seize or be waxy.
2. How do I know when almonds are toasted enough?
Toast your almonds until they smell warm and nutty, about 8-10 minutes at 180°C (350°F). They should be golden and fragrant.
3. How long do I need to chill the bars?
Chill the mixture for at least 2 hours until firm. The edges will be crisp, and the surface shiny. Don’t rush this step.
4. Can I substitute coconut oil with butter?
Yes, you can swap coconut oil for butter for a different texture. Coconut oil makes the bars glossy and slightly softer.
5. Can I make these without sweetener?
Skip the honey or maple syrup if you want less sticky bars. They add a touch of sweetness and help bind the ingredients.
6. Why is my melted chocolate lumpy or seizing?
Ensure the chocolate is fully melted and glossy before mixing. Stir constantly and keep heat low to prevent seizing.
7. How do I get smooth, clean cuts?
Wipe your knife between cuts to keep slices neat and prevent sticking. Warming the knife slightly helps cut cleanly.
8. How long do these bars stay fresh?
Store the bars in an airtight container in the fridge for up to a week. Let sit at room temperature for 10 minutes before serving.
9. My chocolate won’t melt smoothly, what do I do?
If the chocolate doesn’t melt smoothly, remove from heat and stir vigorously, or add a splash of warm cream to rescue it.
10. My bars are crumbly, how can I fix them?
When bars are too crumbly, gently warm them slightly or add a tiny bit more coconut oil to soften.
These no-bake chocolate almond bars are more than just a quick treat; they’re a reminder that simple, honest ingredients can create something truly satisfying. When you pop one in your mouth, the crunch of toasted almonds paired with that rich, smooth chocolate is a moment of pure, uncomplicated pleasure.
In a world that often feels chaotic, these bars offer a small, dependable comfort—easy to make, endlessly adaptable, and just right for sharing or keeping for yourself. No matter the season or occasion, they’re a little bit of kitchen honesty wrapped up in a glossy, crunchy package.
Welcome to Proud of This Mess – a place where food, creativity, and a little chaos come together on a plate!
I’m Emily Carter, the founder and heart behind this little corner of the internet. Born and raised in the United States, I’ve always had a passion for cooking, experimenting, and sharing the messy, delicious journey of creating food that brings people together. My philosophy is simple: good food doesn’t have to be perfect, and a little mess makes it memorable.
At Proud of This Mess, we believe that cooking is more than just following recipes—it’s about exploring flavors, discovering new techniques, and making every meal an experience worth savoring. From comforting weeknight dinners to indulgent desserts, our goal is to inspire home cooks of all levels to embrace the joy of food without fear of imperfection.