
Making a cheese ball isn’t just about mixing cheese and rolling it in nuts. It’s a chance to play with flavors, adding unexpected twists like smoked paprika or fresh herbs that elevate the whole thing from familiar to memorable. I’ve always loved how a simple cheese ball can be both nostalgic and surprisingly sophisticated.
This recipe is about balancing that cozy, creamy texture with a bit of a flavor punch. It’s perfect for when you want something comforting but also want to impress with a little extra effort. Plus, it’s a great way to get everyone gathered around the table, dipping and reminiscing.
Focusing on how to make a cheese ball that balances nostalgic comfort with unexpected flavor twists, like adding a hint of smoked paprika or fresh herbs, transforming it from a simple party snack into a memorable appetizer.
Nostalgic Comfort with a Flavor Twist
- Thinking back to family gatherings, this cheese ball always brought a smile and a messy plate.
- I love the chaos of rolling this in nuts—each one feels uniquely imperfect and perfect.
- There’s a quiet pride in crafting something that’s both simple and impressive for friends.
- Whenever I make this, I remember how a humble cheese ball can turn a casual snack into a small celebration.
- Sometimes, the best memories are made around a plate of something as straightforward as this, shared among good friends.
The story behind this recipe
- This cheese ball recipe came together one chaotic afternoon in my tiny kitchen. I was trying to make something special for a last-minute get-together and realized that sometimes, the simplest dishes are the most memorable. It’s become a little tradition in my family, especially around the holidays, to whip up a batch that’s more about love and less about perfection.
- I love how a good cheese ball can be both a no-fuss snack and a centerpiece. It’s a perfect canvas for experimenting—switching up herbs, adding a smoky kick, or tossing in unexpected crunch. Each time, I feel like I’m creating a little edible hug for my friends and family, something that feels familiar but always a bit new.
- heading: ‘The story behind this recipe’
Cheese Ball Trivia & Origins
- The cheese ball gained popularity in mid-20th-century American potlucks as a no-fuss appetizer.
- Originally, cheese balls were made with simple cream cheese and nuts, often served at holiday gatherings.
- Some believe the cheese ball has roots in European cheese molds, adapted into a casual American party dish.
- The texture and shape make it ideal for dipping, evolved from old-fashioned cheese molds used in European kitchens.
Ingredient breakdown: key components
- Cream cheese: I love the silky richness it provides, but you can swap in Greek yogurt for a lighter version, though you’ll lose some of that melt-in-your-mouth feel.
- Cheddar cheese: Sharp cheddar adds a bold punch, but if you prefer milder, mild cheddar or even a touch of Gruyère works well—just watch for meltability.
- Nuts (pecans or walnuts): I enjoy the crunch and earthy flavor, but toasted sunflower seeds can give a similar texture with a nutty twist if you’re nut-sensitive.
- Herbs (chives, parsley): Fresh herbs brighten the flavor, but dried herbs can be used in a pinch—just increase the quantity slightly for that vibrant hit.
- Spices (paprika, black pepper): Smoked paprika gives a subtle smoky depth, but chili powder or cayenne can add heat—start small and taste as you go.
- Optional add-ins (bacon bits, olives): I find these add a savory complexity, but sun-dried tomatoes or roasted red peppers offer a different, vibrant flavor profile.
- Binding agent (cream or sour cream): I prefer the cream for smoothness, but sour cream adds a tangy zing—both help achieve that spreadable, scoopable texture.
Spotlight on key ingredients
Cream cheese:
- I love its silky, melt-in-your-mouth texture, especially when softened properly. It provides the base for that creamy, smooth consistency we crave.
- Cheddar cheese: Sharp and punchy, it melts beautifully but can be overpowering if not balanced. I prefer a good aged cheddar for depth and richness.
Nuts and herbs:
- Nuts (pecans or walnuts): They add crunch and earthy flavor, toast them until fragrant and golden for the best texture and aroma.
- Fresh herbs (chives, parsley): Brighten the mixture with their clean, vegetal notes; chop finely to distribute evenly and avoid overpowering the cheese.
Notes for ingredient swaps
- Dairy-Free: Swap cream cheese for a nut-based spread like cashew cream or a dairy-free cheese alternative. The texture will be a bit different, more spreadable and less creamy.
- Cheddar Cheese: Use Monterey Jack or Gouda if you want a milder, mellower flavor. For a sharper profile, try aged Parmesan or Pecorino, but keep in mind they’re drier and saltier.
- Nuts: Substitute pecans or walnuts with toasted sunflower seeds or pumpkin seeds for crunch and earthiness, especially if nuts are a concern. Toasted seeds add similar texture with a different flavor punch.
- Herbs: Fresh basil or tarragon can replace chives and parsley, offering a different aromatic lift. Dried herbs work too—use about half the amount and crush them first.
- Spices: Smoked paprika can be replaced with chili powder or cayenne for heat, or a dash of cumin for a smoky undertone. Start small and taste as you go to avoid overpowering.
- Add-ins: Bacon bits or chopped olives can be swapped with sun-dried tomatoes or roasted red peppers, which add vibrant flavor and moisture. Adjust quantities based on your taste.
- Binding agents: Instead of cream, try Greek yogurt or sour cream for a tangy twist. Both add creaminess but slightly alter the flavor profile—taste and adjust seasoning accordingly.
Equipment & Tools
- Mixing bowl: To blend and combine ingredients
- Spatula: For mixing and scraping bowl sides
- Plastic wrap: To shape and chill the cheese ball
- Skillet: To toast nuts
- Plate: For rolling the coated cheese ball
Step-by-step guide to cheese ball
- Gather your ingredients: cream cheese, sharp cheddar, nuts (pecans or walnuts), fresh herbs, spices like smoked paprika, and optional add-ins like bacon bits or olives. Have a mixing bowl and spatula ready.
- In a large bowl, soften 16 oz cream cheese at room temperature for about 15 minutes. This makes mixing easier and smoother.
- Add 1 cup shredded cheddar cheese to the cream cheese. Mix thoroughly until well combined and creamy, about 2 minutes. Use a spatula to scrape the sides as needed.
- Stir in your chosen herbs: 2 tablespoons chopped chives or parsley for freshness. Mix well. If using dried herbs, add about 1 teaspoon for a vibrant flavor.
- Mix in 1 teaspoon smoked paprika and freshly ground black pepper. Use your nose—smoked paprika should smell earthy and slightly smoky. Adjust to taste.
- Fold in optional add-ins like 2 tablespoons crumbled bacon or chopped olives if desired. Mix until evenly distributed.
- Shape the mixture into a ball about 10 cm (4 inches) in diameter. Use your hands or form on parchment paper. Wrap tightly in plastic wrap.
- Refrigerate the cheese ball for at least 1 hour, ideally 2-3 hours. This helps the flavors meld and the shape to firm up.
- While chilling, toast 1 cup of nuts in a dry skillet over medium heat until golden and fragrant, about 5 minutes. Let cool.
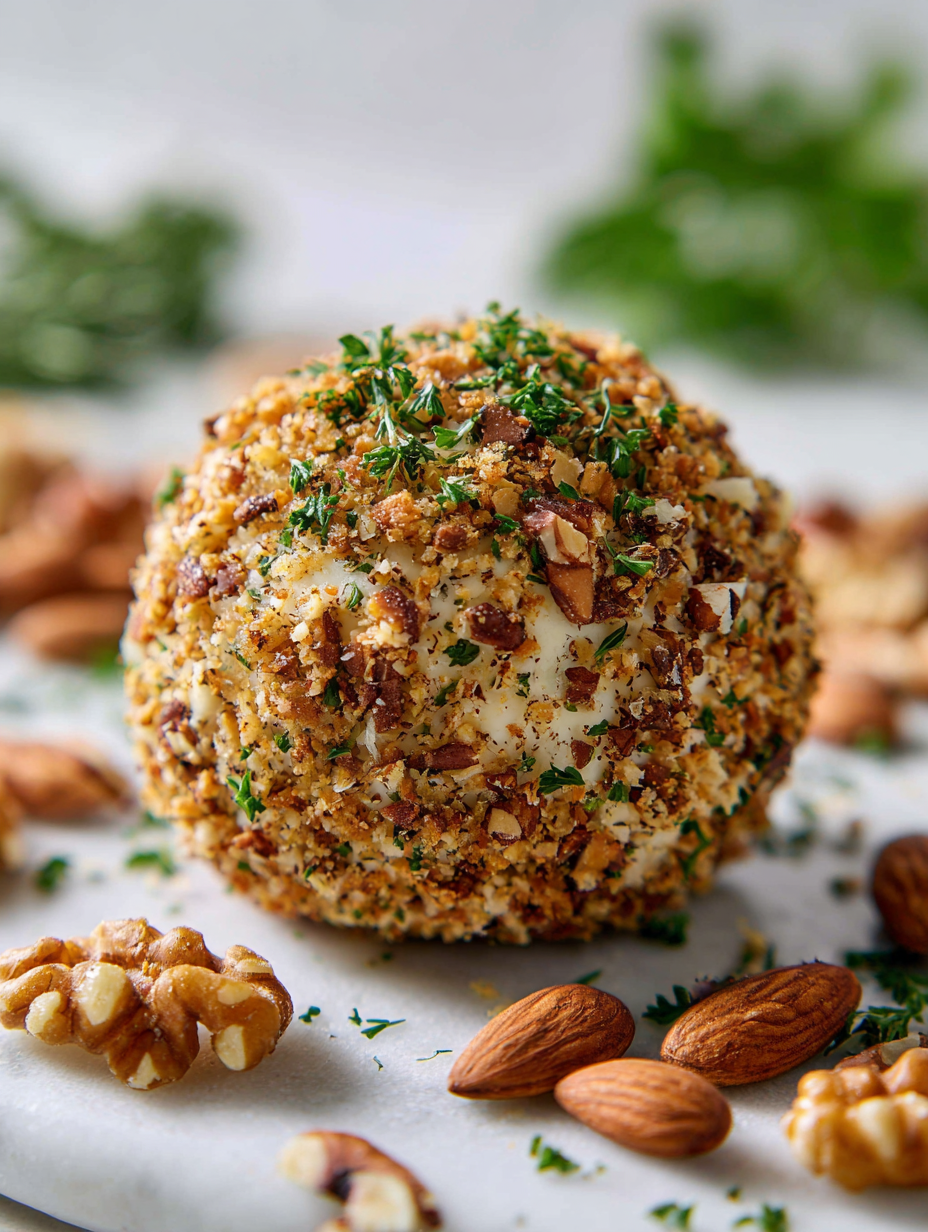
- Place the toasted nuts in a shallow plate. Roll the chilled cheese ball in the nuts, pressing gently to coat evenly.
- For an extra touch, sprinkle additional herbs or paprika on top for visual appeal. Serve with crackers, fresh bread, or veggie sticks.
- Let the cheese ball sit at room temperature for 10 minutes before serving. This softens the cheese and enhances the aroma.
- Slice or scoop into dips, ensuring the nuts stay attached. The texture should be creamy with a crunchy exterior.
Chill the cheese ball for at least 1 hour, preferably overnight. Serve at room temperature, sliced or scooped, with your favorite crackers or bread. Garnish with extra herbs if desired.
How to Know It’s Done
- Cheese ball feels firm but yields slightly when pressed.
- Nuts are toasted golden and fragrant before coating.
- Surface is evenly coated with nuts, with no cracks or cracks forming.
Flavorful Nut-Crusted Cheese Ball
Ingredients
Equipment
Method
- Place the softened cream cheese in a large mixing bowl and use a spatula to blend it until smooth and creamy, about 2 minutes. The mixture should be soft and easy to stir.
- Add the shredded cheddar cheese to the cream cheese and fold together until evenly incorporated, creating a slightly sticky, uniform mixture.
- Stir in the chopped fresh herbs, like chives or parsley, which will add bright flavor and color to the mixture.
- Sprinkle in the smoked paprika and freshly ground black pepper, then gently fold to distribute the spices evenly throughout the mixture.
- If using, fold in chopped bacon bits or olives for extra savory flavor, mixing just until evenly combined.
- Transfer the cheese mixture onto a sheet of plastic wrap and gently shape it into a ball about 4 inches in diameter, pressing firmly to ensure it holds its shape.
- Wrap the shaped cheese ball tightly with plastic wrap and refrigerate for at least 1 hour, or up to 3 hours, to let flavors meld and the shape set.
- Meanwhile, toast the nuts in a dry skillet over medium heat until fragrant and golden, about 5 minutes. Let them cool completely.
- Unwrap the chilled cheese ball and place it on a plate. Pour the cooled, toasted nuts onto a shallow plate.
- Gently roll the cheese ball in the toasted nuts, pressing lightly to coat the entire surface evenly with nuts. The nuts will adhere to the slightly sticky surface.
- Place the coated cheese ball back in the refrigerator for another 30 minutes to firm up before serving. Then, let it sit at room temperature for about 10 minutes to soften slightly and enhance aroma.
Notes
Pro tips for perfect cheese ball
- Bolded mini-head: Use room temperature cream cheese to ensure easy mixing and a smooth texture.
- Bolded mini-head: Toast nuts until fragrant and golden—this enhances flavor and adds crunch.
- Bolded mini-head: Chill the formed cheese ball for at least 1 hour—this helps it hold shape and meld flavors.
- Bolded mini-head: When coating, gently press nuts onto the surface—avoid pressing too hard to prevent cracking.
- Bolded mini-head: Taste and adjust spices before shaping—this ensures balanced flavor from the start.
- Bolded mini-head: Use fresh herbs for brightness—dried herbs can work, but use half as much for vibrancy.
- Bolded mini-head: Serve at room temperature—this softens the cheese and releases full aroma.
Common mistakes and how to fix them
- FORGOT to chill the cheese ball before coating? Chill for at least 1 hour to set.
- DUMPED the toasted nuts in without cooling? Let nuts cool completely for crunch and flavor.
- OVER-TORCHED the nuts? Toast until golden and fragrant, not burnt or bitter.
- FAILED to taste and adjust spices? Always taste and tweak for balanced flavor.
Quick fixes and pantry swaps
- When mixture is too soft, refrigerate for 15 minutes to firm up.
- Splash a little lemon juice if cheese tastes flat or dull.
- Patch cracked surface by gently pressing nuts onto the cheese ball.
- Shield from moisture by wrapping tightly; keep away from humid air.
- If nuts burn, lower the heat and toast until fragrant—smell is your cue.
Prep, store, and reheat tips
- You can prepare the cheese mixture a day in advance. Keep it covered in the fridge; the flavors meld better overnight, and it firms up nicely, making shaping easier.
- The cheese ball can be stored wrapped tightly in plastic wrap for up to 3 days in the fridge. Expect the flavors to deepen slightly, with the nuts maintaining a crunch if kept sealed away from moisture.
- For longer storage, freeze the uncoated cheese ball for up to a month. Wrap it well in plastic and then foil; it might lose a touch of freshness but remains scoopable.
- Refrigerate the coated cheese ball for at least 30 minutes before serving. To reheat, let it sit at room temperature for about 10 minutes to soften, or serve cold for a firmer bite. The nuts stay crisp as long as kept dry and chilled.
Common Questions About Cheese Balls
1. Can I use cold cream cheese?
Use softened cream cheese for easy mixing and smooth texture. Cold cheese is harder to blend and can lead to lumps.
2. Can I change the cheese type?
Yes, you can swap in shredded mozzarella or pepper jack for different flavors, but they melt differently and can affect texture.
3. How do I toast nuts properly?
Toast the nuts until fragrant and golden. Over-toasting can turn them bitter, so keep an eye and smell for that nutty aroma.
4. How long should I chill the cheese ball?
Chill the cheese ball for at least an hour. This helps it hold shape better and lets flavors meld before serving.
5. What if the cheese mixture is too soft?
If the mixture is too soft, refrigerate for 15-20 minutes. If nuts don’t stick, press them gently onto the surface.
6. Can I make it ahead?
Yes, you can prepare the mixture a day ahead. Keep it covered in the fridge and shape just before serving for best freshness.
7. Can I use dried herbs?
Use fresh herbs like chives or parsley for brightness. Dried herbs work too, but use half the amount and crush them first.
8. Should I serve it cold or at room temperature?
Serve at room temperature to soften the cheese and enhance aroma. Cold cheese can be too firm to scoop easily.
9. What if the nuts burn or the mixture cracks?
If nuts burn, lower the heat and toast until fragrant—smell is your best guide. If mixture cracks, refrigerate to firm up.
10. How do I store leftovers?
Use a sharp knife or scoop to serve. To keep nuts crunchy, store the cheese ball in a dry, airtight container in the fridge.
Making this cheese ball isn’t just about the ingredients, it’s about the messy joy of shaping something familiar into a small celebration. When I serve it, I love watching people dip in and surprise themselves at how good simple ingredients can taste.
In the end, it’s a recipe that’s rooted in nostalgia but open to your twists—smoky, herbaceous, crunchy. It’s not fancy, but it’s honest and unpretentious, perfect for sharing moments around a table that feels just right.
Welcome to Proud of This Mess – a place where food, creativity, and a little chaos come together on a plate!
I’m Emily Carter, the founder and heart behind this little corner of the internet. Born and raised in the United States, I’ve always had a passion for cooking, experimenting, and sharing the messy, delicious journey of creating food that brings people together. My philosophy is simple: good food doesn’t have to be perfect, and a little mess makes it memorable.
At Proud of This Mess, we believe that cooking is more than just following recipes—it’s about exploring flavors, discovering new techniques, and making every meal an experience worth savoring. From comforting weeknight dinners to indulgent desserts, our goal is to inspire home cooks of all levels to embrace the joy of food without fear of imperfection.