
This no-bake peanut clusters recipe is a little piece of childhood magic. I remember sneaking into the kitchen after school, the smell of melting chocolate mingling with roasted peanuts, and just wanting to grab one more handful. It’s honest, no fuss, and perfect for when you need a quick sweet fix without turning on the oven.
What I love most is how these clusters are like a messy, crunchy hug. They come together fast — just melt, stir, scoop, and chill. No fancy tools needed, just simple ingredients and a moment to reconnect with those cozy, nostalgic snack times. Sometimes, quick treats are the best, especially when they remind you of simpler days.
Making these is more than just a sweet task; it’s a little ritual that brings back messy counters and the smell of roasted peanuts. They’re my go-to when I want something satisfying but easy, especially when I’m short on time but craving that perfect combo of salty and sweet. It’s a recipe that’s all about honest comfort, no shortcuts needed.
Focusing on the nostalgic comfort of childhood snacks, this recipe is my go-to when I need a quick, satisfying treat that taps into simple joys. It’s a throwback to messy kitchen counters and the smell of melting chocolate mixed with roasted peanuts, all whipped up in under 20 minutes. No fancy tools, just honest ingredients and a little patience for the best crunch.
A nostalgic crunch in every bite
- Biting into these clusters takes me straight back to childhood afternoons, with sticky fingers and the irresistible aroma of roasted peanuts.
- I love how these treats come together in minutes, perfect for when I need a quick burst of comfort without the fuss of baking.
- There’s a quiet joy in watching the chocolate melt, knowing I’ll end up with crunchy, salty-sweet bites that never disappoint.
- Making these is a small act of rebellion against overly complicated desserts—just simple ingredients and honest, messy fun.
- They remind me that some of the best treats are born from necessity—no oven, no fuss, just pure, nostalgic crunch.
The story behind this recipe
This recipe came together on a chaotic afternoon when I needed a quick fix for my sweet tooth. I remembered how my grandma used to keep a jar of roasted peanuts on hand, and I started experimenting with melting chocolate and mixing in those crunchy, oily bites. It’s funny how simple ingredients can turn into something so satisfying—like a little moment of calm amidst the noise. Now, whenever I make these clusters, I think of those quiet afternoons and the kind of comfort only good, honest snacks can bring.
Historical & Cultural Tidbits
- These clusters have roots in mid-20th-century American snack culture, where quick, no-bake treats became popular in home kitchens.
- Historically, combining chocolate and peanuts was a way to create a satisfying, energy-packed snack during wartime shortages.
- The simplicity of this recipe reflects a time when resourcefulness and minimal ingredients were key to homemade confections.
Ingredient breakdown: key components
- Peanut butter: I use creamy, natural peanut butter for that rich, oily texture. Feel free to swap with almond butter for a different nutty punch, but expect a slightly thinner bite.
- Roasted peanuts: The crunch and toasty smell are what make these clusters special. You can substitute with salted mixed nuts if needed, but don’t skip that smoky aroma.
- Chocolate chips: I prefer semi-sweet for balanced sweetness, but dark or milk chocolate works too. For a dairy-free version, try coconut or carob chips—they melt just as smoothly.
- Honey: Adds a sticky sweetness and helps everything bind. Maple syrup can replace it if you want a different flavor, but don’t reduce the amount—stick to 2 tbsp for best stickiness.
- Vanilla extract: A splash enhances the depth of flavor. If you don’t have any, a pinch of cinnamon or a dash of almond extract can add a warm aroma.
- Sea salt: I sprinkle just a pinch for contrast, but you can omit if salty isn’t your thing. For a flavor twist, try smoked sea salt for an extra smoky hit.
- Coconut flakes (optional): I love the chewy texture they add. Toasted coconut amps up the flavor, but raw flakes are fine if you prefer a softer bite.
Spotlight on key ingredients
Peanut butter:
- I prefer creamy, sticky peanut butter that melts smoothly into the chocolate. If you use crunchy, expect tiny crispy bits in every bite, which I actually love for texture.
- Roasted peanuts: The oily, smoky aroma is what makes these clusters pop. You can swap in salted mixed nuts, but don’t skip roasting for that deep, toasty scent.
Roasted peanuts:
- Chocolate chips: I use semi-sweet for balanced sweetness, but milk or dark works too. When melted, they turn glossy and oozy—just watch for burning if you microwave them.
- Honey: It’s the glue that gives the clusters their chewy, sticky bite. Maple syrup can replace it, but the flavor shifts slightly toward caramel-y and less floral.
Notes for ingredient swaps
- Nuts: Swap peanuts for almonds or cashews for a milder, buttery flavor, but expect a softer crunch.
- Chocolate: Use dark, milk, or white chocolate depending on your taste. For dairy-free, try coconut or carob chips—melts just as well.
- Sweetener: Honey can be replaced with maple syrup or agave nectar for a different sweetness profile, but keep the same amount for consistency.
- Peanut butter: Swap creamy with crunchy for extra texture, or try almond or sunflower seed butter for variety, but expect a different oily richness.
- Add-ins: Dried cranberries, chopped dried apricots, or toasted coconut flakes can replace or complement peanuts, adding chewy or tropical notes.
- Salt: Use smoked sea salt or flaky finishing salt for an extra savory boost or skip for a more straightforward sweet treat.
- Binder: Instead of honey, a bit of corn syrup or golden syrup can help with binding, but may slightly alter the flavor profile.
Equipment & Tools
- Parchment paper: Line the baking sheet to prevent sticking and for easy cleanup.
- Heatproof bowl: Melt chocolate evenly over simmering water or microwave.
- Spoon or small scoop: Portion out and shape clusters uniformly.
- Refrigerator: Set the chocolate and firm up the clusters.
Step-by-step guide to peanut clusters
- Equipment & Tools: Line a baking sheet with parchment paper; use a medium mixing bowl for melting; a sturdy spoon or spatula for stirring; and a small scoop or teaspoon for portioning.
- Melt chocolate: In a heatproof bowl set over simmering water (about 60°C/140°F), stir until smooth. If using a microwave, 30-second bursts, stirring in between, work well. Watch for glossy, shiny chocolate; if it seizes or looks grainy, start over with fresh chocolate.
- Prepare peanuts: Measure out about 1 cup of roasted peanuts. For extra crunch, toss them in a tiny pinch of sea salt or a sprinkle of smoked paprika before mixing.
- Combine ingredients: Pour melted chocolate into the peanuts and stir until evenly coated. The mixture should feel sticky but not greasy. If it’s too thick, add a teaspoon of coconut oil to loosen it slightly.
- Portion clusters: Use a small scoop or teaspoon to drop mounds onto the prepared baking sheet. Space them about 2 inches apart. For uniform clusters, gently press down with the back of a spoon if needed.
- Chill: Place the tray in the fridge for at least 30 minutes. The chocolate should set firm, and the clusters will become crunchy. If your kitchen is warm, refrigerate longer—up to 1 hour—until completely firm.
- Final check: Gently wiggle a cluster; it should crackle when bitten and hold its shape. The chocolate should be glossy and shiny, with a firm bite. If it feels soft or sticky, chill a little longer.
- Store: Keep in an airtight container at room temperature for up to a week, or in the fridge for 2–3 weeks. For best crunch, consume within the first few days of storage.
- Serve: These clusters are perfect as a snack or sweet addition to a picnic. Enjoy the salty-sweet crunch that’s just right—no melting mess, just honest flavor.
Let the clusters rest in the fridge until fully set, about 30 minutes. Once firm, transfer to an airtight container. Serve straight from the fridge or room temperature for crunchiest bite.
How to Know It’s Done
- Chocolate is glossy and smooth, with no streaks or graininess.
- Clusters are firm and crack when gently pressed or bitten.
- Peanuts are well coated, with no excess oil or stickiness.
No-Bake Peanut Clusters
Ingredients
Equipment
Method
- Line a baking sheet with parchment paper and set aside. In a microwave-safe bowl, combine the chocolate chips and melt them in 30-second bursts, stirring well after each until smooth and glossy.
- Pour the honey and vanilla extract into the melted chocolate, then stir until fully incorporated. The mixture should be smooth and fragrant, with a shiny appearance.
- Add the roasted peanuts to the chocolate mixture, stirring gently to coat each nut evenly. The mixture will become thick and sticky, clinging to the peanuts beautifully.
- Use a small scoop or spoon to drop spoonfuls of the mixture onto the prepared parchment-lined tray, spacing them about 2 inches apart. Press down slightly to shape the clusters as desired.
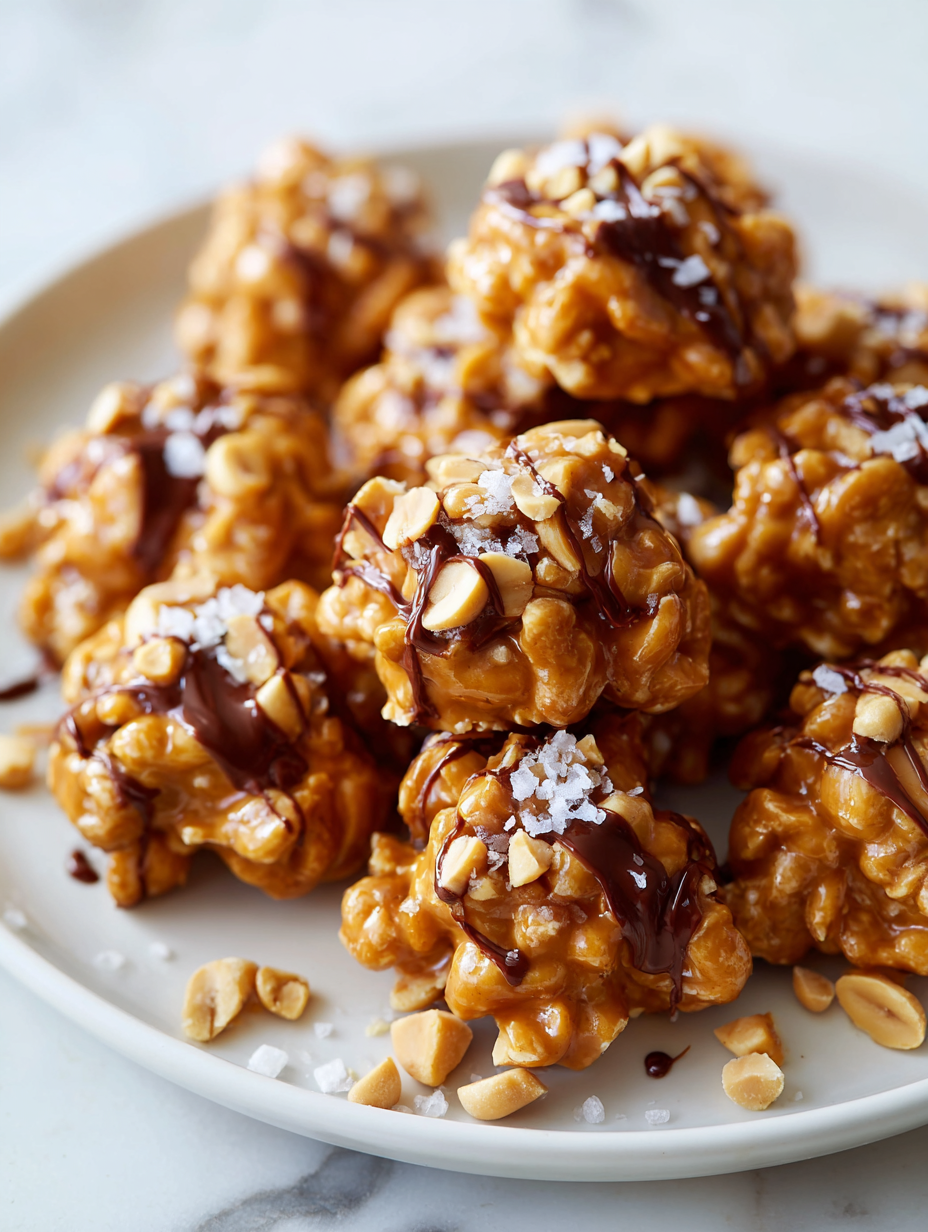
- Sprinkle a tiny pinch of sea salt and toasted coconut flakes on top of each cluster for added flavor and crunch.
- Place the tray in the refrigerator for 30 minutes, allowing the chocolate to set and the clusters to become crunchy and firm.
- Once chilled and firm, gently remove the clusters from the parchment paper. They should crackle when bitten and hold their shape with a glossy, crunchy exterior.
- Store the clusters in an airtight container at room temperature for up to a week, or in the fridge for longer freshness and crunch. Serve and enjoy that nostalgic, salty-sweet crunch!
Notes
Pro tips for perfect clusters
- Bolded mini-head: Use a double boiler → Ensures smooth, glossy chocolate without burning or seizing.
- Bolded mini-head: Chill in stages → Refrigerate clusters for 10-minute bursts to prevent melting when handling.
- Bolded mini-head: Stir frequently → Keeps the chocolate uniform and prevents sticking or burning at the edges.
- Bolded mini-head: Add a pinch of salt → Enhances flavor contrast and prevents sweetness from overpowering.
- Bolded mini-head: Adjust nut size → Coarsely chop peanuts for more crunch or leave whole for a softer bite.
- Bolded mini-head: Watch melting time → Microwave in 30-second intervals, stirring until just smooth, to avoid overheating.
- Bolded mini-head: Use parchment paper → Prevents sticking and makes cleanup quick, plus makes removing clusters easier.
Common mistakes and how to fix them
- FORGOT to stir continuously → Stir constantly to prevent burning or seizing.
- DUMPED too much chocolate → Use just enough to coat, avoid excess for better crunch.
- OVER-TORCHED the chocolate → Remove from heat immediately if chocolate looks grainy or smells burnt.
- SEIZED the chocolate during melting → Add a teaspoon of vegetable oil and gently reheat to smooth.
Quick fixes and pantry swaps
- When chocolate seizes, splash in a teaspoon of vegetable oil to smooth it out.
- If clusters are too soft, chill them for 10-minute bursts until firm and crunchy.
- Dumped in too much chocolate? Fix by adding more peanuts to balance the coating.
- Over-torched chocolate? Remove from heat immediately and start over with fresh chocolate if burnt smell occurs.
- Splash a pinch of sea salt if sweetness feels flat, enhancing flavor contrast and shimmer.
Prep, store, and reheat tips
- Prepare the clusters up to the point of chilling; the chocolate-coated peanuts can be made a day in advance. Keep covered at room temperature to prevent melting or sticking.
- Store the finished clusters in an airtight container at room temperature for up to one week. The chocolate may soften slightly over time, but the crunch remains.
- For longer storage, refrigerate for up to two weeks. The cold enhances crunch but may dull some flavors; bring to room temp before serving for best texture.
- Reheating isn’t necessary, but if the clusters soften, briefly warm them in a low oven (around 90°C/200°F) for 3–5 minutes to revive their crispness. Watch for melting or burning, and let cool before eating.
Top questions about peanut clusters
1. Can I use chunky peanut butter?
Use smooth, natural peanut butter for best binding and flavor. Chunky can work but might make clusters less uniform.
2. Can I use different types of chocolate?
Yes, you can substitute dark or milk chocolate chips, but semi-sweet offers a balanced flavor that melts smoothly.
3. How do I know when they are ready?
Refrigerate for 30 minutes to 1 hour until firm. The chocolate should crack when you gently bite into a cluster.
4. How long do they last?
Store in an airtight container at room temperature for up to a week or in the fridge for 2-3 weeks to keep crunch.
5. What if my chocolate seizes?
If the chocolate seizes or becomes grainy, add a teaspoon of vegetable oil and gently reheat to smooth it out.
6. Can I use other sweeteners?
You can swap honey for maple syrup or agave nectar, but keep the same amount for proper stickiness.
7. How do I enhance the flavor of peanuts?
For a nuttier flavor, roast your peanuts a little longer until fragrant and slightly smoky before mixing.
8. How do I get uniform clusters?
Use a small scoop or teaspoon for evenly sized clusters, which helps with consistent setting and presentation.
9. My clusters are soft, what now?
If your clusters are too soft, chill them longer or briefly reheat in a low oven to restore crunch.
10. How can I make them more flavorful?
Add a pinch of flaky sea salt on top before chilling to heighten the sweet and salty contrast.
There’s something about these no-bake clusters that makes them a go-to for unplanned cravings. They come together fast, and that smell—rich chocolate mixed with roasted peanuts—invites a kind of cozy pause in the day.
Whenever I make them, I appreciate how simple ingredients can turn into a little moment of honest, crunchy comfort. It’s not about perfection, just a straightforward treat that reminds me sometimes the best snacks are the easiest ones to love.
Welcome to Proud of This Mess – a place where food, creativity, and a little chaos come together on a plate!
I’m Emily Carter, the founder and heart behind this little corner of the internet. Born and raised in the United States, I’ve always had a passion for cooking, experimenting, and sharing the messy, delicious journey of creating food that brings people together. My philosophy is simple: good food doesn’t have to be perfect, and a little mess makes it memorable.
At Proud of This Mess, we believe that cooking is more than just following recipes—it’s about exploring flavors, discovering new techniques, and making every meal an experience worth savoring. From comforting weeknight dinners to indulgent desserts, our goal is to inspire home cooks of all levels to embrace the joy of food without fear of imperfection.