
This recipe is born from those late-night cravings where I want something sweet, but I don’t want to fuss over a complicated dessert. It’s about having a little jar of chocolate oat bites in the fridge, ready to grab when that sweet tooth hits hard and I need something honest and quick.
I love how these bites come together without any baking—just a bit of mixing, a quick chill, and they’re good to go. It’s a kitchen moment that feels almost meditative, scooping out spoonfuls of sticky, chocolaty goodness, then shaping them into little bites. They remind me of childhood snacks but with a grown-up, wholesome twist.
Plus, they’re flexible enough to tweak with whatever I’ve got on hand—nuts, dried fruit, a splash of vanilla. It’s the kind of recipe that’s forgiving yet satisfying, perfect for those nights when I want a treat that’s simple, honest, and hits the spot without heating up the house.
This recipe is inspired by my late-night craving for something sweet and wholesome that I can whip up without turning on the stove. It’s about those quick moments when I need a treat that’s honest, simple, and satisfies that chocolate itch instantly.
Sweet Simplicity in a Bite
- This recipe saved me on busy mornings when I needed something quick and satisfying, no oven required.
- I feel a little nostalgic every time I make these, remembering childhood snacks but with a grown-up twist of rich chocolate.
- There’s a quiet pride in whipping these up from scratch, knowing I can tweak ingredients to suit my mood or pantry.
- Honestly, these bites are my go-to when I crave something sweet but want to keep it wholesome and fuss-free.
The inspiration behind these bites
This recipe came about during a chaotic weekend when I needed a sweet fix fast, but didn’t want to turn on the oven or deal with complicated ingredients. I was rummaging through my pantry, and those oats and chocolate chips caught my eye—simple, honest ingredients that could be transformed into something satisfying without much fuss. It’s a no-fuss solution that saved me from reaching for store-bought treats, and now I keep these bites around for moments when I need a quick, wholesome pick-me-up.
Historical & Cultural Snippets
- These no-bake bites originated as a way to use up leftover oats and chocolate chips during a busy week, turning simple pantry staples into a treat.
- They draw inspiration from traditional energy balls, but with a focus on minimal ingredients and quick assembly, making them perfect for spontaneous cravings.
- Historically, similar no-bake treats gained popularity during times of rationing, where heating appliances were scarce, and quick, hearty snacks became essential.
Ingredient breakdown: key components
- Old-fashioned rolled oats: I love their chewy texture and nutty flavor; if you prefer softer bites, pulse them a bit in the food processor.
- Dark chocolate chips: The oozy meltiness is key—swap with cacao nibs for a crunch or dairy-free chocolate for a different richness.
- Nut butter: I use peanut, but almond or sunflower work well too—adds creaminess and keeps the bites sticking together. Adjust if you want less richness.
- Honey or maple syrup: This binding sweetness is vital—if you want a firmer bite, add a touch more, or for a less sticky texture, cut back slightly.
- Vanilla extract: Just a splash brightens everything—skip if you prefer a more straightforward, chocolate-forward flavor.
- Salt: A pinch enhances the chocolate; if you’re feeling adventurous, sprinkle a tiny bit of flaky sea salt on top after chilling for a salty-sweet crunch.
- Optional add-ins: Nuts, dried fruit, or shredded coconut—mix in for extra texture or flavor bursts, but keep the mixture manageable and not too dry.
Spotlight on key ingredients
Oats & Chocolate Chips:
- Old-fashioned rolled oats: I love their chewy texture and nutty flavor; if you prefer softer bites, pulse them a bit in the food processor.
- Dark chocolate chips: The oozy meltiness is key—swap with cacao nibs for a crunch or dairy-free chocolate for a different richness.
Binding Agents:
- Nut butter: I use peanut, but almond or sunflower work well too—adds creaminess and keeps the bites sticking together. Adjust if you want less richness.
- Honey or maple syrup: This binding sweetness is vital—if you want a firmer bite, add a touch more, or for a less sticky texture, cut back slightly.
Notes for ingredient swaps
- Dairy-Free: Swap regular chocolate chips for dairy-free or cacao nibs—less creamy, more intense chocolate flavor.
- Nut Butter: Use sunflower seed or tahini instead—different flavor, but still creamy and binds well.
- Sweetener: Maple syrup can be replaced with agave or brown rice syrup—each adds a unique depth and sweetness.
- Oats: Gluten-free oats work perfectly—same chewy texture, just suitable for gluten sensitivities.
- Add-ins: Dried fruits or shredded coconut—skip nuts for allergy-friendly bites or for a different chew.
- Salt: Flaky sea salt on top after chilling adds a salty crunch—skip if you want pure chocolate focus.
- Chocolate: White chocolate chips for a sweeter, milky twist—less bitter, more dessert-like.
Equipment & Tools
- Mixing bowl: Combine ingredients evenly
- Spoon or small scoop: Portion and shape the bites
- Spatula: Help lift and transfer bites
- Baking sheet: Hold the bites during chilling
- Parchment paper: Prevent sticking and easy removal
Step-by-step guide to no bake bites
- Gather all equipment: a mixing bowl, a spoon, a spatula, a baking sheet, and parchment paper. The bowl is for mixing, the sheet for chilling, parchment prevents sticking.
- In the mixing bowl, combine 1 ½ cups of rolled oats and ½ cup of chocolate chips. Use a sturdy spoon to distribute evenly.
- Add ½ cup of nut butter—peanut works great—plus ¼ cup of honey or maple syrup. Mix until the mixture looks uniformly sticky and holds together when pressed.
- Stir in 1 teaspoon of vanilla extract and a pinch of salt. These enhance the flavors and balance the sweetness.
- Once mixed, check the consistency: it should be sticky enough to form into bites but not overly wet. If too dry, add a tiny splash more honey; if too wet, sprinkle in a bit more oats.
- Using a tablespoon or small scoop, portion out the mixture and roll into compact balls about 2 inches in diameter. Place each on the prepared parchment-lined baking sheet.
- After all bites are shaped, gently press each to slightly flatten. This helps them set evenly and makes bites easier to eat.
- Place the tray in the fridge for at least 30 minutes. The bites will firm up and develop better texture as they chill.
- Once set, gently lift the bites off the parchment with a spatula or your fingers. Store in an airtight container in the fridge for up to a week, or freeze for up to a month.
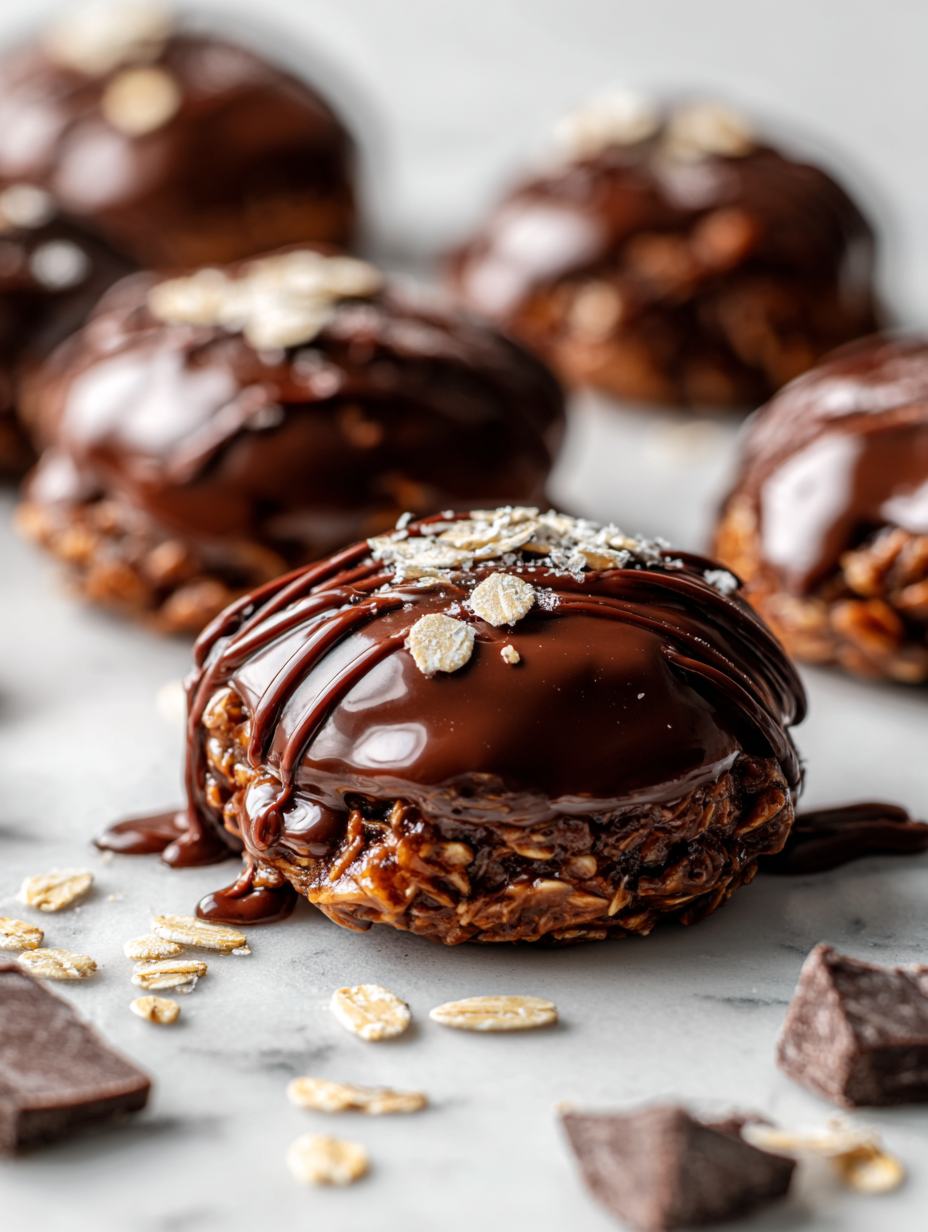
- For best texture, serve directly from the fridge. They should be firm, chewy, with melty chocolate pockets and a nutty aroma.
Chill the bites in the fridge for at least 30 minutes until firm. Serve straight from the fridge for best texture. Store in an airtight container, layered with parchment, for up to a week or freeze for longer storage.
How to Know It’s Done
- Mixture sticks together when pressed but isn’t too greasy.
- Bites hold their shape after rolling and pressing.
- Chilled bites are firm but not hard, with a glossy chocolate appearance.
Chocolate Oat Bites
Ingredients
Equipment
Method
- Gather all your equipment: a mixing bowl, a spoon or small scoop, a spatula, a baking sheet, and some parchment paper. Line the baking sheet with parchment to keep things tidy and prevent sticking.
- Pour the rolled oats and chocolate chips into the mixing bowl. Use your spoon or scoop to distribute them evenly, creating a base for your bites.
- Add the nut butter and honey or maple syrup to the bowl. Stir everything together with your spoon or spatula until the mixture feels thick, sticky, and well combined—this aroma of chocolate and nuts will start to fill the air.
- Stir in the vanilla extract and a pinch of salt to enhance the flavors. Mix thoroughly until everything is evenly coated and the mixture is cohesive.
- Using a tablespoon or small scoop, portion out the mixture and roll it into compact balls about 2 inches in diameter. Place each on the prepared parchment-lined baking sheet, pressing down gently to slightly flatten the tops.
- Once all bites are shaped, pop the tray into the fridge for at least 30 minutes. This chilling time helps the bites firm up, develop a chewy texture, and makes them easier to handle.
- After chilling, carefully lift the bites from the parchment with your spatula or fingers. They should hold their shape well, with a glossy chocolate appearance and a chewy, fudgy texture inside.
- Store any leftovers in an airtight container in the fridge for up to a week. For longer storage, freeze them in a sealed container—just thaw for a few minutes at room temperature before enjoying.
Pro tips for perfect bites
- Melt chocolate gently over low heat or in short bursts in the microwave, stirring frequently to prevent seizing.
- Use slightly underripe or firm oats for a chewier bite, but avoid overly dry or stale oats for best texture.
- When mixing, fold ingredients gently to keep the chocolate chips from melting completely and to maintain distribution.
- Chill the mixture in the fridge for at least 30 minutes; a longer rest helps the bites firm up and set fully.
- When shaping, press bites firmly to ensure they hold together, especially if your mixture is a bit softer.
- Store in an airtight container in the fridge; for a firmer bite, serve straight from cold, but for softer, room-temp is fine.
- To avoid sticky hands, wet your hands slightly before rolling or shaping the bites, making the process cleaner.
Common mistakes and how to fix them
- FORGOT to chill: Bites may be too soft; fix by refrigerating longer, up to 1 hour.
- DUMPED too much: Excess ingredients make bites greasy; reduce nut butter or honey next time.
- OVER-TORCHED chocolate: Melts unevenly, causing bitterness; melt at lower heat, stir often.
- MISSED salt sprinkle: Missing salt dulls flavor; add flaky sea salt after chilling for a crunch.
Quick fixes and pantry swaps
- When mixture is too sticky, splash a little water to loosen it.
- If bites are crumbly, patch with a tiny drizzle of honey and re-chill.
- Splash some hot water on chocolate to melt smoothly and avoid seizing.
- Patch cracks by pressing the mixture back together with wet fingers.
- Shield bites from freezer burn by wrapping tightly or storing in an airtight container.
Prep, store, and reheat tips
- Prepare the mixture ahead by combining oats, chocolate chips, nut butter, and sweetener; it can be stored in the fridge for up to 24 hours, which makes assembly quicker later. The aroma will turn richer and more cohesive as flavors meld.
- Once shaped into bites, store them in an airtight container lined with parchment paper. Keep in the fridge for up to a week—expect them to firm up and develop a chewy, glossy texture.
- For longer storage, freeze the bites in a sealed container for up to a month. They may become slightly denser, but the chocolate will stay melty and satisfying once thawed.
- Reheat by letting chilled bites sit at room temperature for 10 minutes or briefly microwaving for about 10 seconds—look for a soft, slightly warmed center with glossy chocolate hints.
Top questions about no bake bites
1. Can I melt chocolate easily at home?
Yes, you can melt chocolate in the microwave in 20-30 second bursts, stirring well each time, until smooth. Be gentle to avoid burning the chocolate.
2. My mixture is too sticky, what do I do?
If your mixture feels too sticky, add a bit more oats or refrigerate it for 15 minutes before shaping. This firms it up and makes rolling easier.
3. How long should I chill the bites?
Chill the shaped bites in the fridge for at least 30 minutes to help them set and become chewy. They can also be frozen for longer storage.
4. Can I substitute peanut butter?
Yes, using nut butters like almond or sunflower seed butter works well and adds different flavors. Keep in mind they may alter the texture slightly.
5. Can I use a different sweetener?
You can swap honey for maple syrup or agave syrup. Each will slightly change the flavor but still bind the ingredients nicely.
6. My bites are crumbly, how do I fix it?
If your bites are crumbly or falling apart, try pressing them more firmly when shaping and chilling longer to help them hold together.
7. How should I store these bites?
Store the bites in an airtight container in the fridge for up to a week. For longer storage, freeze them in a sealed container for up to a month.
8. Chocolate seizes or isn’t melting well?
If your chocolate isn’t melting smoothly, lower the heat and stir constantly, or melt it in short bursts in the microwave, stirring in between.
9. Can I add nuts or dried fruit?
When adding extras like dried fruit or nuts, fold gently into the mixture to prevent breaking the oats or over-mixing.
10. Can I change the type of chocolate?
For a more intense chocolate flavor, use dark or bittersweet chocolate chips. For a milder taste, white chocolate works nicely.
These no-bake chocolate oat bites are more than just a quick treat; they’re a small act of kindness for yourself on busy days. The rich chocolate flavor paired with chewy oats makes each bite feel like a little reward that’s honest and straightforward. Sometimes, the simplest recipes bring the most comfort, especially when you need something wholesome and satisfying.
In a world that often feels chaotic, these bites remind me to slow down and appreciate the small moments—like the smell of melting chocolate or the satisfying snap of a chilled bite. They’re a reminder that sometimes, the best treats are born from pantry staples and a bit of patience, no oven needed.
Welcome to Proud of This Mess – a place where food, creativity, and a little chaos come together on a plate!
I’m Emily Carter, the founder and heart behind this little corner of the internet. Born and raised in the United States, I’ve always had a passion for cooking, experimenting, and sharing the messy, delicious journey of creating food that brings people together. My philosophy is simple: good food doesn’t have to be perfect, and a little mess makes it memorable.
At Proud of This Mess, we believe that cooking is more than just following recipes—it’s about exploring flavors, discovering new techniques, and making every meal an experience worth savoring. From comforting weeknight dinners to indulgent desserts, our goal is to inspire home cooks of all levels to embrace the joy of food without fear of imperfection.