
What makes a simple no bake energy ball truly addictive isn’t just the ingredients, but the texture dance happening with each bite. I’ve always been fascinated by how the chewy oats clash with the satisfying crunch of nuts and seeds, creating a multi-layered sensory experience that keeps you reaching for just one more. It’s a little chaotic, a little unexpected, but completely addictive in the best way.
These little bites are my go-to for mornings when I need a quick pick-me-up or a snack that feels indulgent without any fuss. The way the textures contrast, from the sticky date paste to the crisp exterior, makes each one feel like a tiny, hand-held treat. It’s a reminder that simplicity in ingredients doesn’t mean sacrificing excitement in every mouthful.
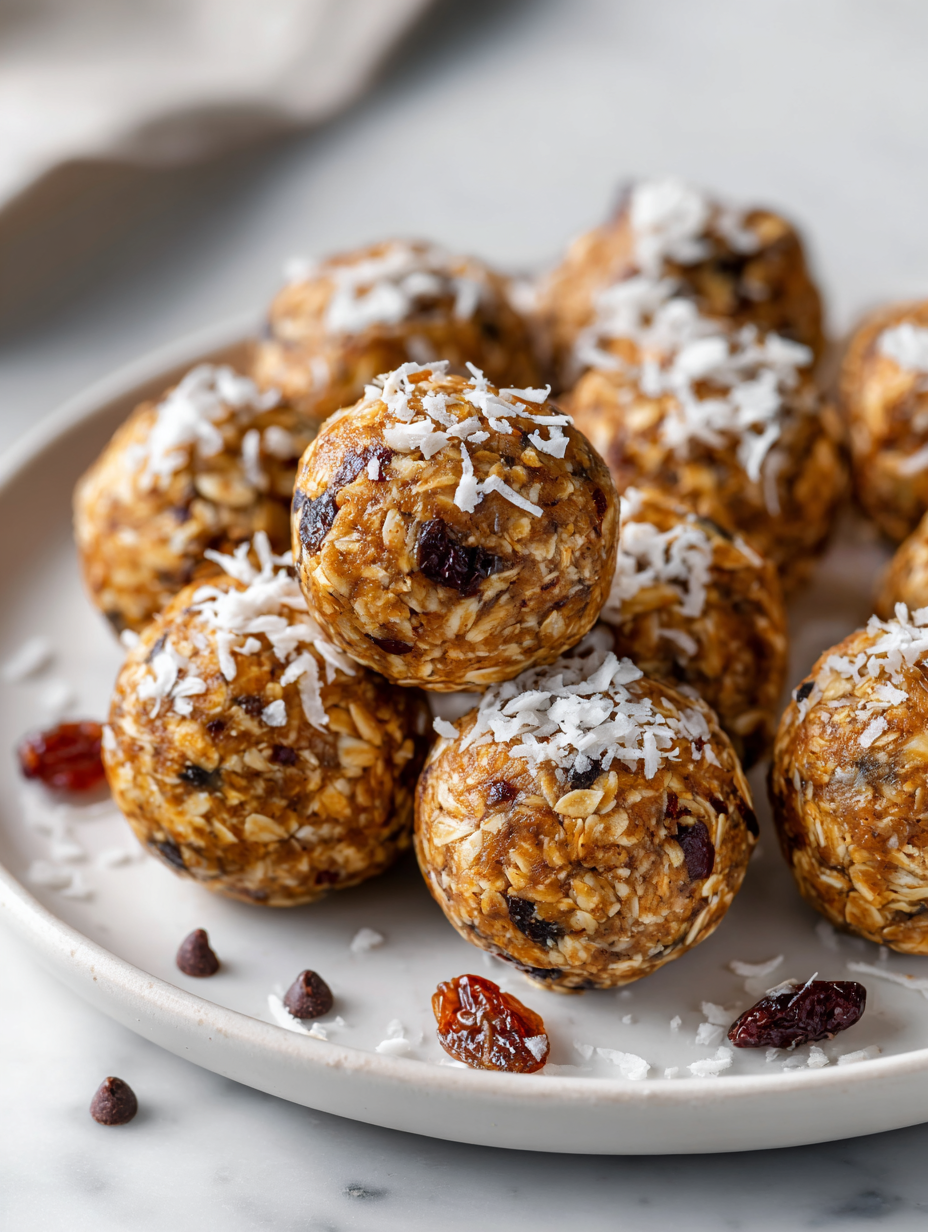
Focusing on the unexpected role of texture contrast in making no bake energy balls irresistibly satisfying, highlighting how the chewiness of oats meets the crunch of nuts for a multi-sensory experience.
Texture as the Unexpected Hero
- Biting into these energy balls feels like a tiny celebration—crunchy nuts giving way to a chewy oat core, it’s oddly satisfying.
- I love how a handful of these keeps me going, especially on mornings when everything feels a little chaotic but these bites stay steady.
- There’s a nostalgic joy in mixing ingredients that remind me of childhood snacks, but with a grown-up twist of texture and richness.
- Every time I make these, I’m reminded that simple ingredients can surprise with their multi-layered, satisfying chew and snap.
- These little bites are my secret weapon for quick energy and a moment of calm amidst a busy day.
The story behind this recipe
- This recipe came about during a particularly hectic week when I needed something quick, nourishing, and honestly, a little exciting. I wanted a snack I could grab and go, but one that also felt satisfying enough to curb those afternoon energy dips. It’s funny how just mixing a few pantry staples can turn into a little ritual that keeps me steady through chaos.
- One evening, I was experimenting with different textures—crunchy nuts, chewy oats, sticky dates—and realized how satisfying it was to bite into something that hits all those notes at once. It’s like a tiny, edible reminder that simplicity often makes for the most comforting bites, especially when they’re easy enough to whip up in minutes.
- heading:
Historical and Cultural Tidbits
- These energy balls gained popularity during the health trend boom of the early 2010s, emphasizing quick, wholesome snacks.
- Originally, they were a way for busy homemakers to use pantry staples like oats, nuts, and dried fruits in a simple, no-fuss form.
- Some say these bites are inspired by traditional energy treats from indigenous cultures, adapted for modern, on-the-go lifestyles.
Key Ingredients and How They Shine
- Oats: I love the chewy texture they add, but if you prefer a softer bite, try briefly soaking them first, then drain well—less dry crunch, more tender chew.
- Dates: They’re the sticky backbone that holds everything together, offering a caramel-like sweetness. For a milder flavor, swap with dried apricots or figs, but watch the moisture content.
- Nut Butter: I prefer almond for its subtle richness, but peanut or cashew work just as well. Warm it slightly for easier mixing and a silkier finish.
- Nuts & Seeds: Crunchy bits like almonds or sunflower seeds bring a satisfying snap. Toast them lightly beforehand for a richer, smoky aroma that wakes up the palate.
- Sweetener: Honey or maple syrup keeps things sticky and sweet. If you want a less sweet version, add a splash of vanilla or a pinch of cinnamon for depth.
- Add-ins: Chocolate chips or dried fruit are optional, but they make each bite more playful. Dry ingredients like coconut flakes or chia seeds can also boost texture.
- Extras: A pinch of sea salt enhances all flavors, especially if your nut butter is on the mild side. Sprinkle on top or mix in for a salty crunch.
Spotlight on key ingredients
Dates:
- I love how they turn sticky and caramel-like when chopped, helping everything bind. For a milder sweetness, swap with dried apricots or figs, but watch the moisture.
- Their oozy, chewy interior is the glue of these bites, offering a rich, caramel aroma that fills the kitchen. They’re a natural sweetener that also adds a bit of fruitiness.
Oats:
- They bring a satisfying chew, and I like to toast them lightly first—adds a nutty aroma and makes the texture even more interesting. Soaking briefly can soften them if you prefer less dry crunch.
- Their nutty scent intensifies when toasted, making each bite more flavorful. They also provide a hearty, chewy base that balances the sweetness and crunch.
Notes for ingredient swaps
- Dairy-Free: Swap traditional honey with agave syrup or coconut nectar. Slightly different sweetness and viscosity, but still sticky and sweet.
- Nut Butter: Use sunflower seed butter or tahini instead. They add a different richness and can enhance the overall flavor profile.
- Sweetener: Maple syrup or agave syrup can replace honey for a plant-based option, bringing a hint of caramel or floral notes.
- Seeds: Chia or flaxseed can be added or swapped for sunflower seeds to boost omega-3s and add different textures.
- Add-ins: Dark chocolate chips can be replaced with cacao nibs or dried cranberries for varied bursts of flavor and texture.
- Oats: Gluten-free oats work well if you need a gluten-free version, though texture remains similar. Soaked oats soften slightly.
- Nuts: Toasted coconut flakes can substitute crunchy nuts for a chewy, tropical crunch that pairs well with the sweetness.
Equipment & Tools
- Mixing bowl: Combine ingredients evenly.
- Spatula: Mix and fold ingredients thoroughly.
- Cookie scoop or spoon: Portion out uniform-sized balls.
- Parchment-lined baking sheet: Prevent sticking and easy cleanup.
- Refrigerator: Set and firm the energy balls.
Step-by-step guide to making energy balls
- Gather all your equipment: a mixing bowl, a sturdy spatula, a small cookie scoop or spoon, and a baking sheet lined with parchment. No oven needed, so keep your stove free for now.
- In a large mixing bowl, combine 1 cup of rolled oats, 1/2 cup of chopped nuts (almonds or walnuts), and 1/4 cup of seeds (sunflower or chia). Mix until evenly distributed.
- Chop 1 cup of dates into small pieces. If they feel too sticky, lightly dust with a bit of flour to prevent sticking. Add to the bowl and stir well to coat the dry ingredients.
- Warm 1/4 cup of nut butter (almond or peanut) in the microwave for about 20 seconds until runny. Pour over the mixture, along with 2 tablespoons of honey or maple syrup. Stir thoroughly.
- Check the mixture: it should be sticky and hold together when pressed. If too dry, add a teaspoon of water or more honey. If too wet, sprinkle in a little more oats.
- Use a small cookie scoop or your hands to portion out the mixture. Roll each into a tight ball about 1 inch in diameter. Place on the prepared baking sheet.
- Once all balls are formed, refrigerate for at least 30 minutes. This helps them set up and makes handling easier.
- After resting, they’re ready to serve. Keep them refrigerated in an airtight container for up to a week or freeze for longer storage.
- For best checkpoints: the balls should be firm but chewy, with a slight shine from the nut butter coating. They shouldn’t crumble or feel overly sticky to touch.
- If the mixture feels too crumbly before rolling, knead in a splash of water or more honey. If it’s too sticky, add more oats gradually.
Refrigerate the balls for at least 30 minutes to set. Serve directly from the fridge, or store in an airtight container. For longer storage, freeze up to 3 months, thawing briefly at room temperature before enjoying.
How to Know It’s Done
- Balls hold shape firmly without cracking when pressed.
- They smell nutty and slightly sweet, indicating proper mixing.
- When refrigerated, they firm up but remain chewy and moist inside.
No Bake Energy Balls
Ingredients
Equipment
Method
- Gather your ingredients: toasted oats, chopped nuts, seeds, chopped dates, nut butter, and honey. Place the dry ingredients into a large mixing bowl and stir to combine evenly.
- Add the chopped dates to the bowl, tossing them with the dry ingredients to coat and distribute evenly.
- Warm the nut butter slightly in the microwave for about 20 seconds until it’s runny and smooth. Pour it over the mixture.
- Add the honey or maple syrup to the bowl. Use a spatula to thoroughly mix everything until the mixture is sticky and well-coated, feeling slightly tacky but holding together when pressed.
- Use a cookie scoop or your hands to portion out the mixture into small, tight balls about 1 inch in diameter. Place each ball on the parchment-lined baking sheet.
- Refrigerate the energy balls for at least 30 minutes to help them set and firm up.
- Once chilled, the energy balls are ready to enjoy. Keep them stored in an airtight container in the fridge for up to a week, or freeze for longer storage.
Notes
Pro tips for perfect energy balls
- Chill the mixture before rolling for better shape and less stickiness.
- Toast nuts and seeds lightly to amplify their aroma and add depth to the crunch.
- Use slightly warm nut butter for easier mixing, which also creates a smoother coating.
- Check texture by pressing a ball—should hold shape without cracking or feeling too crumbly.
- If mixture is too sticky, sprinkle with more oats gradually, mixing well to avoid excess dryness.
- For a more intense flavor, add a pinch of sea salt or a splash of vanilla to the mixture.
- Store energy balls in an airtight container and refrigerate for up to a week to keep them fresh.
Common mistakes and how to fix them
- FORGOT to measure ingredients accurately → Use a scale for consistency.
- DUMPED in too much liquid → Add more oats to absorb excess moisture.
- OVER-TORCHED nuts or seeds → Toast on low heat, stir frequently.
- SKIPPED chilling step → Chill for at least 30 minutes to set properly.
Quick fixes and pantry swaps
- If mixture feels too crumbly → Add a splash of honey or water, then knead briefly.
- When energy balls are too sticky → Toss in more oats until they hold shape.
- Splash of oil for dry nuts → Toast nuts longer to bring out smoky aroma.
- Patch cracked balls → Refrigerate for 10 minutes, then reshape gently.
- Shield from moisture → Keep stored in airtight container, away from humidity.
Prep, store, and reheat tips
- Prepare the mixture ahead of time: combine dry ingredients and refrigerate for up to 24 hours to develop flavors and make shaping easier.
- Store the energy balls in an airtight container in the fridge for up to a week; they stay chewy and fresh, with a nutty aroma intensifying over time.
- For longer storage, freeze the balls in a single layer, then transfer to a zip-top bag; they’ll keep for up to 3 months, maintaining their chewy texture.
- Reheat by letting them sit at room temperature for 10 minutes or briefly warming in the microwave (about 10 seconds); they will soften slightly and smell warm and inviting.
Top questions about no bake energy balls
1. How do I know if my energy balls are the right texture?
They should feel firm but chewy, not dry or overly sticky. If too crumbly, add a splash of honey or water. If too sticky, mix in more oats.
2. What kind of dates work best?
Use fresh dates that are plump and oozy. Chopped dates help bind the mixture better and add natural sweetness.
3. How long do no bake energy balls last?
Store them in an airtight container in the fridge for up to a week, or freeze for longer storage. They stay chewy and fresh.
4. Should I refrigerate the mixture before forming balls?
Chill the mixture for at least 30 minutes before rolling. This helps the balls hold shape and makes them easier to handle.
5. Can I toast the nuts first?
Toast nuts and seeds lightly beforehand to enhance their aroma and add a richer, smoky flavor that makes each bite more interesting.
6. Can I use different nut butters?
Use nut butters like almond, peanut, or cashew. Warm them slightly to make mixing easier and create a smoother coating.
7. Can I customize with other add-ins?
Add-ins like chocolate chips or dried fruit can make the bites more playful. Adjust sweetness if adding extra ingredients.
8. What if my mixture is too dry or too wet?
If mixture is too dry, add a small amount of honey or water. If too wet, sprinkle in more oats gradually.
9. How do I shape the energy balls?
Use a cookie scoop or your hands to form tight, uniform balls. Refrigerate to set them up properly.
10. How can I tell if they’re ready?
They should smell nutty and sweet, with a slight aroma of toasted ingredients. They shouldn’t feel overly sticky or crumbly.
These no bake energy balls are more than just a quick snack; they’re a small act of mindful eating in a busy day. I find comfort in their chewy, crunchy textures that remind me to savor simple pleasures. Plus, they’re a reminder that nourishing yourself can be straightforward and satisfying.
Whenever I reach for one, I’m reminded that sometimes the best recipes are the ones that come together without fuss but deliver in flavor and texture. They’re perfect for keeping in the fridge or freezer, ready for whenever hunger calls or I need a moment of calm.
Welcome to Proud of This Mess – a place where food, creativity, and a little chaos come together on a plate!
I’m Emily Carter, the founder and heart behind this little corner of the internet. Born and raised in the United States, I’ve always had a passion for cooking, experimenting, and sharing the messy, delicious journey of creating food that brings people together. My philosophy is simple: good food doesn’t have to be perfect, and a little mess makes it memorable.
At Proud of This Mess, we believe that cooking is more than just following recipes—it’s about exploring flavors, discovering new techniques, and making every meal an experience worth savoring. From comforting weeknight dinners to indulgent desserts, our goal is to inspire home cooks of all levels to embrace the joy of food without fear of imperfection.