
Adapting sticky toffee pudding for gluten-free eaters feels like a small victory in my kitchen. It’s about preserving that luscious, chewy texture with a tweak here and there, without sacrificing the deep caramel richness that makes this dessert so addictive.
This recipe is my go-to when I want something warm and indulgent but also need it to suit friends with gluten sensitivities. The secret lies in choosing the right gluten-free flour that mimics the soft, sticky crumb of the traditional version, and balancing the sweetness so it still feels like a treat from the old country.
Every time I make it, I’m reminded how a simple swap can open doors—no more missing out on this cozy classic. It’s a little challenge, a little joy, and always a reminder that dessert should be flexible and forgiving, just like good cooking should be.
Focusing on how to adapt Sticky Toffee Pudding for gluten-free diets without losing its rich, comforting texture.
A Cozy Classic with a Gluten-Free Twist
- Making this pudding always brings back my childhood kitchen smells—warm caramel and roasted dates fill the air and make everything feel cozy.
- I love sharing this with friends; seeing their surprised faces when they taste that sticky, rich toffee sauce is pure joy.
- There’s a bit of chaos in the kitchen when I’m trying to get the perfect gooey center, but it’s always worth the mess.
- Every spoonful feels like a small celebration—sweet, sticky, and just a little bit indulgent, especially on chilly nights.
- It’s my secret comfort food, the one I turn to when I need a little sweetness to brighten my day.
The story behind this recipe
This recipe came about one chilly evening, when I had a handful of dates that needed using up and a craving for something warm and comforting. I remembered how my grandmother used to make simple desserts that felt like hugs—rich, sticky, and full of flavor. That nostalgic feeling, combined with a desire to make something that felt indulgent but not overly complicated, pushed me to experiment with a classic British dessert, tweaking the ingredients just enough to make it my own. Every time I make this pudding, I think of those cozy nights and the joy of sharing something homemade with loved ones.
Trivia and Historical Notes
- Sticky toffee pudding originated in Britain, gaining popularity in the 20th century as a comforting dessert after meals.
- The dish’s name comes from its rich, sticky caramel sauce made from simple ingredients like brown sugar, butter, and cream.
- Traditionally served warm with a scoop of vanilla ice cream or a drizzle of extra toffee sauce, it’s a staple in British pubs and family dinners.
- The pudding’s roots are linked to the Victorian era, where rich, sweet desserts became symbols of indulgence and celebration.
- Despite its British origins, variations of sticky toffee pudding now appear in dessert menus worldwide, adapting to local tastes.
Key Ingredients Breakdown
- Dates: I love the natural sweetness and chewy texture they bring; if you prefer a milder flavor, swap with dried apricots but expect a subtler sweetness.
- Brown Sugar: It adds that deep, caramel flavor I crave; if you want a lighter version, try coconut sugar—though it’s a bit less rich.
- Butter: I use good, salted butter for richness; for a dairy-free version, coconut oil works but will add a slight coconut note.
- Flour: All-purpose flour is my go-to for that tender crumb; gluten-free flour blends can work but might change the texture slightly—more crumbly, less chewy.
- Toffee Sauce: I simmer cream, butter, and sugar until it’s rich and velvety; if you’re in a pinch, store-bought caramel sauce can substitute but won’t have quite the same depth.
- Vanilla Extract: I always use real vanilla for that warm aroma; vanilla bean paste could be a fancy swap, adding bits of bean for extra richness.
- Baking Powder: It helps the pudding rise just enough; skip or reduce if you want a denser, more pudding-like texture—just keep an eye on it!
Spotlight on key ingredients
Dates:
- I love their natural, chewy sweetness that becomes gooey and rich when heated; if you prefer a milder flavor, try dried apricots, but expect a subtler sweetness.
- Their soft, caramel-like flavor intensifies during baking, creating a lush, sticky base that’s hard to beat in this dish; avoid over-chopping to keep that luscious texture.
Brown Sugar:
- I rely on its deep, caramel flavor that envelops the pudding; if you want a lighter touch, coconut sugar can work, but it’s less rich and more subtle in sweetness.
- It melts smoothly into the batter, giving that moist, sticky crumb and a warm, toasty aroma that makes every bite comforting.
Notes for ingredient swaps
- Dates: I love the natural sweetness and chewy texture they bring; if you prefer a milder flavor, swap with dried apricots but expect a subtler sweetness.
- Brown Sugar: It adds that deep, caramel flavor I crave; if you want a lighter version, try coconut sugar—though it’s a bit less rich.
- Butter: I use good, salted butter for richness; for a dairy-free version, coconut oil works but will add a slight coconut note.
- Flour: All-purpose flour is my go-to for that tender crumb; gluten-free flour blends can work but might change the texture slightly—more crumbly, less chewy.
- Toffee Sauce: I simmer cream, butter, and sugar until it’s rich and velvety; if you’re in a pinch, store-bought caramel sauce can substitute but won’t have quite the same depth.
- Vanilla Extract: I always use real vanilla for that warm aroma; vanilla bean paste could be a fancy swap, adding bits of bean for extra richness.
- Baking Powder: It helps the pudding rise just enough; skip or reduce if you want a denser, more pudding-like texture—just keep an eye on it!
Equipment & Tools
- Oven: Bake the pudding evenly
- Mixing bowls: Combine ingredients
- Saucepan: Make the toffee sauce
- Whisk or beater: Cream butter and sugar
- Measuring cups and spoons: Accurate ingredient measurement
- Baking dish: Bake the pudding
- Skewer or toothpick: Check doneness
Step-by-step guide to sticky toffee pudding
- Preheat your oven to 180°C (350°F). Grease a 20cm (8-inch) square baking dish with butter and set aside.
- Chop 200g (7 oz) of pitted dates into small pieces. Simmer them in 150ml (2/3 cup) of boiling water with 1 tsp baking soda for about 5 minutes until soft. Let cool slightly.
- In a mixing bowl, cream together 100g (1/2 cup) unsalted butter and 150g (3/4 cup) packed brown sugar until light and fluffy, about 3 minutes. Use a hand or stand mixer on medium.
- Add 2 large eggs one at a time, beating well after each addition. Stir in 1 tsp vanilla extract.
- Sift together 200g (1 2/3 cups) all-purpose flour, 1 tsp baking powder, and a pinch of salt. Fold into the butter mixture in three additions, alternating with the cooled date mixture. Mix until just combined.
- Pour the batter into the prepared dish, spreading evenly. Bake for 30-35 minutes, or until the top is golden and a skewer inserted in the center comes out clean.
- While the pudding bakes, prepare the toffee sauce: In a small saucepan, combine 100g (1/2 cup) dark brown sugar, 100ml (scant 1/2 cup) heavy cream, and 50g (1/4 cup) unsalted butter. Bring to a gentle simmer over medium heat, stirring constantly, for 3-4 minutes until thickened and glossy.
- Once baked, poke the hot pudding all over with a skewer or fork to help soak up the sauce. Pour the warm toffee sauce generously over the pudding.
- Let the pudding rest for 10 minutes before serving. It should be warm, sticky, and fragrant with caramel and date notes.
Allow the pudding to sit for 10 minutes to set slightly. Serve warm, drizzled with extra toffee sauce, and perhaps a scoop of vanilla ice cream or a dollop of whipped cream for contrast.
How to Know It’s Done
- Pudding surface is golden brown and slightly crackled.
- Skewer inserted into center comes out with moist crumbs, not wet batter.
- Toffee sauce is rich, velvety, and coats the back of a spoon.
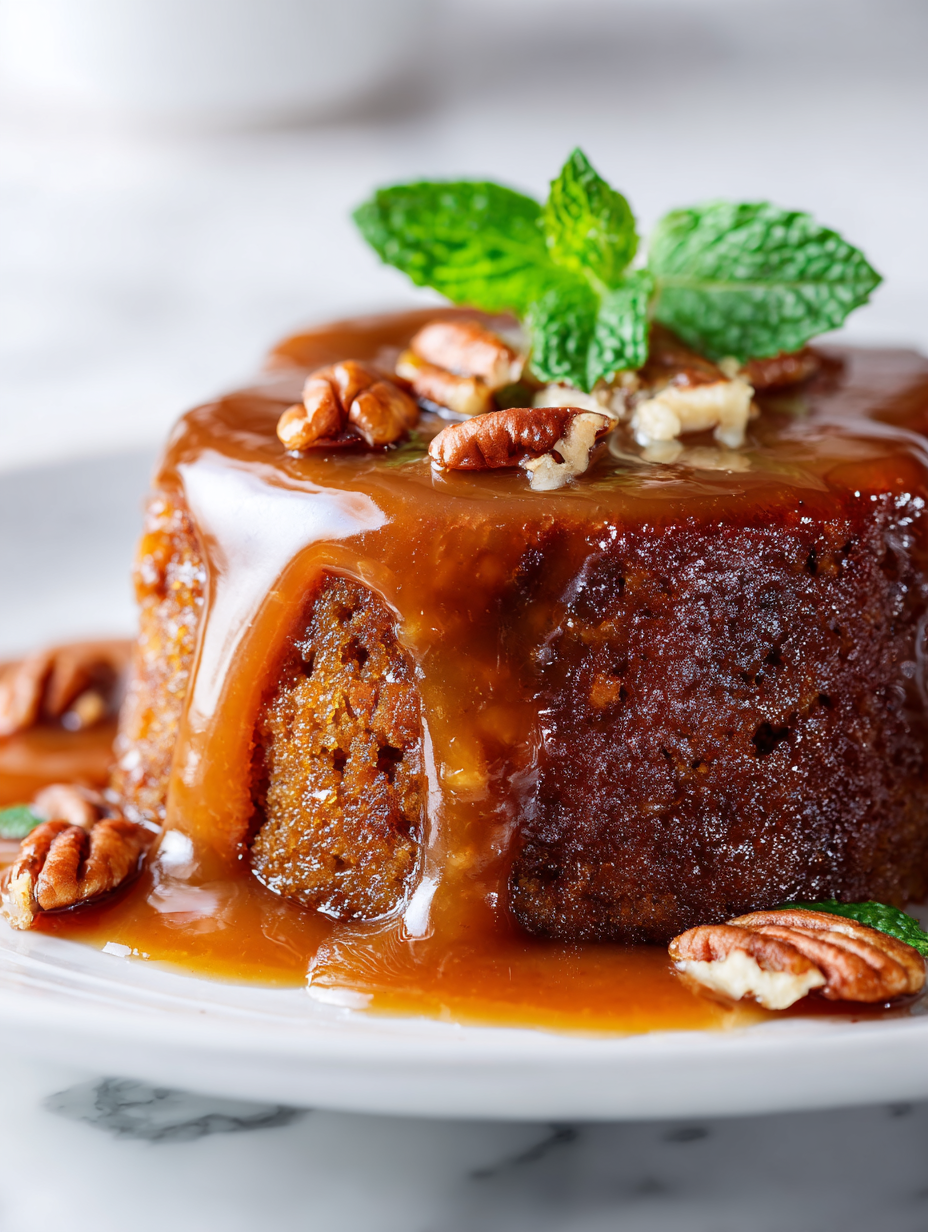
Gluten-Free Sticky Toffee Pudding
Ingredients
Equipment
Method
- Preheat your oven to 180°C (350°F). Grease a baking dish with butter and set aside.
- Chop the dates into small pieces, then place them in a saucepan with boiling water and the baking soda. simmer gently for about 5 minutes until the dates soften and become gooey. Let cool slightly.
- In a large mixing bowl, beat the butter and brown sugar together until the mixture is pale and fluffy, about 3 minutes. Use a whisk or hand mixer for best results.
- Add the eggs one at a time, beating well after each addition, then stir in the vanilla extract. The mixture should be smooth and slightly thickened.
- Sift together the gluten-free flour and baking powder, then gently fold into the wet mixture in three parts, alternating with the cooled date mixture. Fold until just combined, being careful not to overmix.
- Pour the batter into your prepared baking dish, spreading it evenly with a spatula. Bake for 30-35 minutes, until the top is golden and a skewer inserted in the center comes out with moist crumbs.
- While the pudding bakes, make the toffee sauce by combining the heavy cream, butter, and dark brown sugar in a saucepan. Bring to a gentle simmer over medium heat, stirring constantly, until the sauce thickens and becomes glossy, about 3-4 minutes.
- Remove the baked pudding from the oven and poke it all over with a skewer or fork to help soak up the sauce. Pour the warm toffee sauce generously over the hot pudding, allowing it to seep into the sponge.
- Let the pudding rest for 10 minutes so the flavors meld and the sauce thickens further. Serve warm, topped with extra toffee sauce if desired, and enjoy the rich, sticky texture and deep caramel flavor.
Notes
Pro tips for perfect sticky toffee pudding
- Bolded mini-head: Use room temperature butter to ensure a smooth, fluffy batter that mixes easily.
- Bolded mini-head: Soak dates in hot water before chopping to soften them and enhance their natural sweetness.
- Bolded mini-head: When mixing the batter, fold gently to keep it airy and prevent it from becoming dense.
- Bolded mini-head: For a shiny, crackly top, bake just until the pudding is golden and a skewer comes out with moist crumbs.
- Bolded mini-head: Pour warm toffee sauce over the hot pudding for maximum sticky, caramel goodness.
- Bolded mini-head: Rest the pudding for at least 10 minutes before serving to let the flavors meld and set slightly.
Common mistakes and how to fix them
- FORGOT to check oven temperature → Use an oven thermometer for accuracy.
- DUMPED in all ingredients at once → Add ingredients gradually, mixing well after each addition.
- OVER-TORCHED the caramel sauce → Lower heat and stir constantly to prevent burning.
- FAILED to let the pudding rest → Rest for at least 10 minutes before serving to set properly.
Quick fixes and pantry swaps
- When sauce looks grainy, splash in a little warm cream and whisk vigorously.
- If pudding cracks on top, reduce oven temperature slightly and bake a few extra minutes.
- Dumped in too much flour? Add an extra spoon of melted butter to balance the dry crumb.
- Over-baked pudding? Shield edges with foil and lower oven temp to save moistness.
- When sauce shimmers but doesn’t thicken, simmer a bit longer until velvety and rich.
Prep, store, and reheat tips
- Prepare the toffee sauce and refrigerate up to 2 days; warm gently before serving to revive its velvety texture and rich aroma.
- Bake the pudding a day in advance; once cooled, wrap tightly and store at room temperature or in the fridge for up to 24 hours, reheating until warm and sticky.
- Reheat individual portions in the microwave for 20-30 seconds, checking for even warmth and a slight shimmer of sauce on top.
- Freeze leftovers in airtight containers for up to 2 months; thaw overnight in the fridge, then reheat with a splash of cream to restore softness.
- The flavors deepen and the pudding develops a more concentrated caramel richness after resting overnight, making it even more indulgent.
FAQs about Sticky Toffee Pudding
1. How should I serve sticky toffee pudding?
Sticky toffee pudding is best served warm, with a generous drizzle of extra toffee sauce and often a scoop of vanilla ice cream or a dollop of whipped cream. The warm, gooey texture combined with the rich caramel flavor makes it a comforting dessert that’s hard to resist.
2. Can I prepare sticky toffee pudding in advance?
Yes, you can make it ahead. Prepare the pudding and sauce separately, then reheat in the oven or microwave. The flavors deepen overnight, making it even more indulgent, but be careful not to overheat to prevent it from drying out.
3. How do I store leftovers?
Storing leftovers in an airtight container in the fridge for up to 2 days is ideal. Reheat gently in the microwave or oven until warm and sticky again. The pudding may become a bit denser but still delicious.
4. Can I make this gluten-free?
Absolutely. You can substitute gluten-free flour blends for all-purpose flour, but expect a slightly different texture—more crumbly and less chewy. The pudding will still be moist and flavorful, just with a different crumb.
5. How do I tell when the pudding and sauce are ready?
When making the sauce, simmer it until it’s thick, shiny, and coats the back of a spoon. For the pudding, it’s done when the top is golden and a skewer inserted into the center comes out moist but not wet.
6. What’s the best type of dates to use?
Use soft, plump dates for the best flavor and texture. They become deeply caramelized when baked, adding richness. If you prefer a milder taste, dried apricots are a good substitute, but they won’t be as gooey.
7. What if my pudding cracks or the sauce is thin?
If the pudding cracks on top, reduce the oven temperature slightly and bake a few extra minutes. Cover with foil if edges brown too quickly. For sauce that’s too thin, simmer a bit longer until it thickens to a velvety consistency.
8. Any tips for best texture?
Use room temperature butter for a smooth, fluffy batter. Soak dates in hot water before chopping to soften them and enhance sweetness. Gently fold ingredients to keep the batter airy and moist.
9. How do I reheat without losing texture?
When reheating, splash a little cream or milk over the pudding, then microwave for 20-30 seconds until warm and luscious. For sauce, a quick simmer can revive its velvety sheen and deep caramel flavor.
10. What quick fixes can I try for common problems?
If the sauce looks grainy, whisk in a splash of warm cream until smooth. When the pudding is overbaked, cover edges with foil and lower the oven temp. For a sticky top, brush with extra warm toffee sauce just before serving.
Making sticky toffee pudding always feels like a small celebration—rich, sticky, and deeply comforting. It’s one of those desserts that seems simple but holds a world of nostalgia and warmth in every bite.
Sharing it with friends or family brings a quiet joy, especially when the sauce is perfectly velvety and the sponge just melts in your mouth. In these moments, I’m reminded why I love to cook—it’s about creating something soulful, something that lingers long after the last spoonful.
Welcome to Proud of This Mess – a place where food, creativity, and a little chaos come together on a plate!
I’m Emily Carter, the founder and heart behind this little corner of the internet. Born and raised in the United States, I’ve always had a passion for cooking, experimenting, and sharing the messy, delicious journey of creating food that brings people together. My philosophy is simple: good food doesn’t have to be perfect, and a little mess makes it memorable.
At Proud of This Mess, we believe that cooking is more than just following recipes—it’s about exploring flavors, discovering new techniques, and making every meal an experience worth savoring. From comforting weeknight dinners to indulgent desserts, our goal is to inspire home cooks of all levels to embrace the joy of food without fear of imperfection.