
Searing scallops isn’t just about getting a perfect crust; it’s about creating a mindful moment in the kitchen. There’s a quiet rhythm to heating the pan, waiting for that sizzle, and watching the edges turn a rich amber. It’s almost meditative, like a small daily ritual that connects you to the act of cooking itself.
This simple process has become a kind of mindful practice for me—focusing on each step, feeling the heat, hearing the crackle, and smelling that sweet, caramelized aroma. It’s quick enough to fit into a busy evening but demands your full attention, making it a rare moment of presence amid daily chaos.
There’s something grounding about turning just a few ingredients into something so satisfying. It reminds me that good food doesn’t have to be complicated—sometimes, it’s just about respecting the process, staying present, and appreciating the small, beautiful details in cooking.
Focusing on how the simple act of searing scallops can become a meditative, almost ritualistic experience that transforms everyday cooking into a mindful practice.
Mindful Searing of Scallops
- Searing scallops has turned into a quiet, almost sacred ritual for me, a moment to slow down and focus.
- I still get giddy watching that first crackle, like I’ve unlocked a little secret every time.
- Nothing beats that first bite—crisp exterior giving way to tender, sweet meat inside, all in one perfect moment.
- This simple act reminds me that beauty in cooking often comes from patience and paying attention to small details.
- Sharing these scallops with friends feels like a small celebration, a rare pause to savor good food and good company.
Mindful Searing of Scallops
Searing scallops has always felt like a quiet act of focus for me. I remember the first time I got that perfect golden crust—everything else in the kitchen seemed to fade away. It’s a simple dish, but it’s one that demands your attention and respect for the process. That moment of flipping the scallops, hearing the sizzle, and seeing the edges turn a rich amber feels almost meditative, like a small ritual that centers me before a busy evening.
Historical & Cultural Tidbits
- Pan searing shellfish like scallops became popular in French cuisine in the early 20th century, emphasizing quick, high-heat cooking to preserve tenderness.
- The technique of searing seafood on a hot pan dates back to traditional coastal communities where quick, flavorful preparations were essential for freshness.
- Scallops have been a delicacy since ancient times, with oyster and shellfish festivals celebrating their harvest in coastal regions of Europe and Asia.
- In the 1980s, seared scallops gained popularity in American fine dining, partly due to their impressive presentation and quick cooking time.
- The perfect sear was historically a sign of a skilled chef, using specific pans like cast iron or stainless steel to achieve that crust.
Breakdown of Key Ingredients
- Scallops: First-person, I love when they smell briny and fresh, almost like the sea breeze; swap with bay or mussel if you prefer a different shellfish note.
- Salt: I rely on flaky sea salt for that clean, mineral hit; if you’re using table salt, go easy to avoid over-salting, especially since scallops are naturally sweet.
- Black pepper: Freshly cracked pepper adds a subtle spicy aroma; skip if you want a more delicate, understated sear, but don’t skip the heat.
- Oil: I prefer a neutral oil with a high smoke point, like grapeseed or canola, to get that crisp, golden crust without smoky bitterness; olive oil can work but watch the temperature.
- Butter: A splash of butter at the end adds richness and depth; use unsalted to control seasoning, or go for clarified butter for a cleaner sear and no scorching.
- Lemon: Brightens the dish with a burst of citrus; if you don’t have fresh lemon, a splash of vinegar can mimic that tang, but fresh is best for aroma.
- Herbs (optional): A sprig of thyme or parsley can add fresh aroma; skip if you want a minimalist, pure scallop experience, but it really lifts the flavor.
Spotlight on key ingredients
Scallops:
- First-person, I love their briny, sweet aroma—like the ocean in a bite; if unavailable, try bay scallops for a milder flavor.
- They behave quickly, developing a beautiful crust in just 2 minutes; overcooking makes them rubbery, so watch the clock.
Salt:
- I prefer flaky sea salt for that clean mineral burst; table salt works but use sparingly to avoid over-seasoning.
- It enhances the natural sweetness of scallops and helps achieve that crisp exterior during searing.
Notes for ingredient swaps
- Seafood Alternatives: Swapping scallops for bay or sea scallops can change the texture slightly but still give you that lovely sear. Mussels or shrimp work too, if you want different shellfish notes.
- Oil Choices: Use avocado or light vegetable oil if you want a neutral, smoky-free sear. Olive oil adds a fruity aroma but can scorch if the heat’s too high.
- Salt Variants: Flaky sea salt enhances the natural sweetness of scallops. Fine table salt can be used, but add less to avoid over-salting.
- Butter Substitutes: Clarified butter or ghee will give you that rich finish without burning. Regular butter offers more flavor but watch the heat to prevent scorching.
- Acid Brighteners: Lemon juice is classic, but lime or a splash of white wine vinegar can add a different tang if lemon isn’t available.
- Herb Additions: Fresh thyme or parsley brighten the dish. Dried herbs won’t give the same fresh aroma but can be used in the butter sauce for subtle flavor.
- Pepper Alternatives: White pepper provides a milder heat and less visual contrast, perfect if you want a more delicate presentation.
Equipment & Tools
- Heavy skillet: Provides even, high heat for a perfect sear.
- Tongs: Handles the scallops delicately without breaking them.
- Paper towels: Ensures scallops are dry for maximum crust.
- Spoon: For basting with butter and lemon.
Seared Scallops Step Guide
- Gather your tools: a heavy-bottomed skillet (preferably stainless steel or cast iron), tongs, a small spoon, and a paper towel for patting dry.
- Pat the scallops dry thoroughly with paper towels. Moisture is the enemy of a good sear. Season both sides generously with flaky sea salt and freshly cracked black pepper.
- Heat the skillet over medium-high heat until it’s just starting to shimmer—about 2-3 minutes, or around 190°C/375°F. Add a tablespoon of neutral oil like grapeseed or canola, swirling to coat the pan evenly.
- Once the oil shimmers and just begins to smoke, carefully place the scallops in the pan, making sure they aren’t touching. Sear without moving for about 2 minutes, until the edges turn a rich amber and the bottom forms a golden crust.
- Flip the scallops gently using tongs or a fish spatula. Sear the second side for another 1.5-2 minutes. The scallops should be opaque in the center but still tender. If they’re curling or releasing a lot of water, the pan might be too hot or they weren’t dry enough—adjust heat accordingly.
- In the last 30 seconds, add a tablespoon of butter and a squeeze of lemon. Tilt the pan and spoon the melted butter over the scallops for extra richness and shine. Optionally, toss in a sprig of thyme or parsley for fresh aroma.
- Remove the scallops from the pan and let them rest for 1 minute. Resting allows juices to redistribute, keeping them tender inside. Plate immediately, drizzling with pan juices and lemon if desired.
Serve immediately, drizzled with pan juices and a squeeze of fresh lemon. Rest for 1 minute to enhance tenderness and flavor. Pair with a simple salad or crusty bread to soak up the juices.
How to Know It’s Done
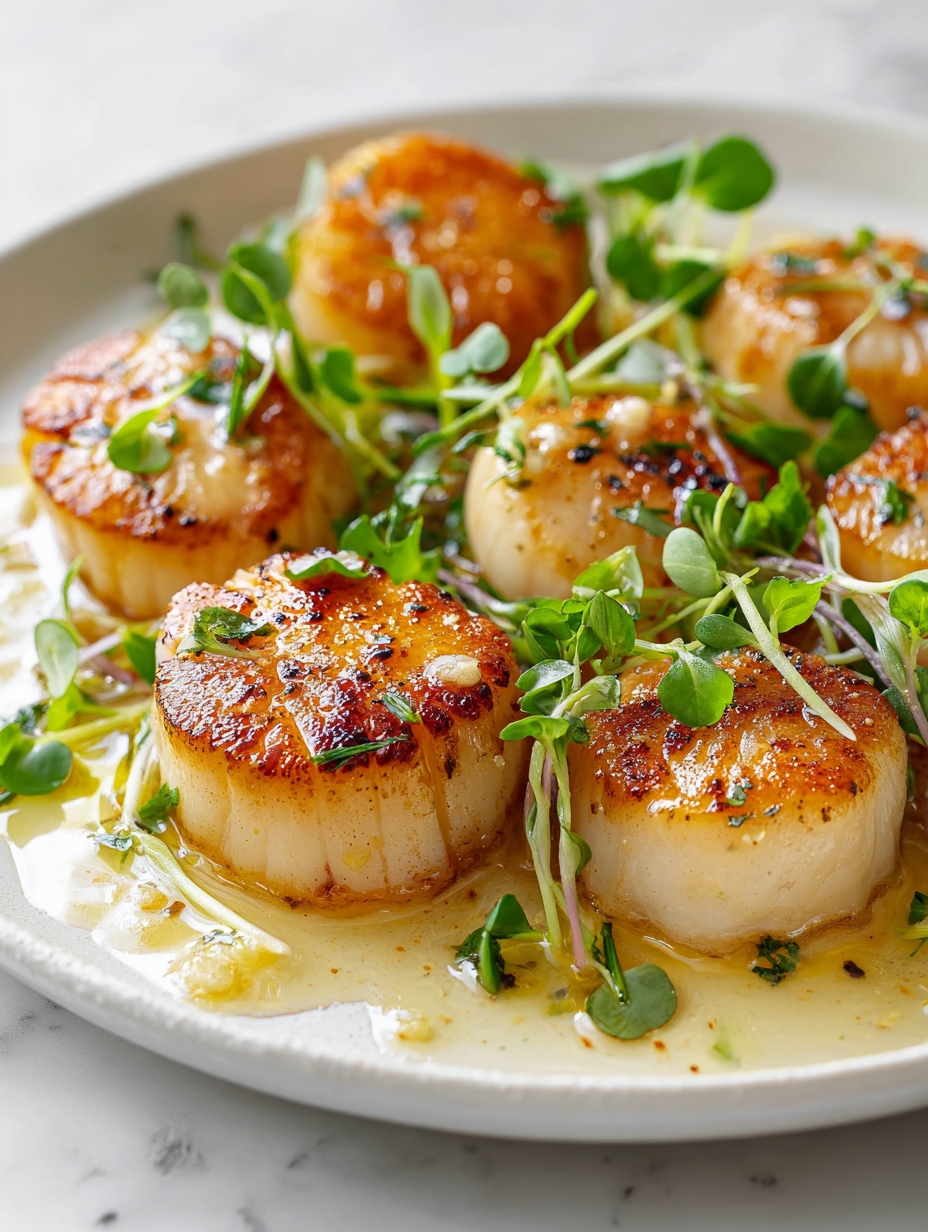
- Edges are caramelized and crusty, with a golden-brown color.
- Centre is just opaque and tender when gently pressed or cut into.
- A fragrant, buttery aroma with a hint of lemon signals readiness.
Mindful Seared Scallops
Ingredients
Equipment
Method
- Pat the scallops thoroughly dry with paper towels to remove any excess moisture, which helps achieve a crisp sear. Season both sides generously with flaky sea salt and freshly cracked black pepper.
- Heat your heavy skillet over medium-high heat until it’s just shimmering, about 2-3 minutes. Add a tablespoon of neutral oil, swirling to coat the pan evenly. When the oil begins to shimmer and just starts to smoke, you’re ready.
- Carefully place the scallops in the hot pan, making sure they aren’t touching each other. Sear without moving them for about 2 minutes, or until the edges turn a rich amber and the bottom develops a golden crust. Listen for a gentle crackle as they cook.
- Gently flip each scallop using tongs or a small spoon, being careful not to tear the delicate meat. Sear the second side for 1.5 to 2 minutes, until the edges are caramelized and the scallops are opaque in the center.
- Add the butter and a squeeze of lemon to the pan. Tilt the pan slightly and spoon the melted butter over the scallops for about 30 seconds to infuse them with richness and aroma. If using, toss in a sprig of thyme or parsley for fresh flavor.
- Remove the scallops from the pan and let them rest for one minute on a plate. Resting helps juices redistribute, keeping the scallops tender and juicy inside.
- Serve immediately, drizzled with the pan juices and a squeeze of fresh lemon for brightness. Enjoy the tender, golden crust contrasting with the sweet, succulent interior.
Notes
Pro tips for perfect scallops
- Preheat properly: Ensure your pan is just shimmering before adding scallops to get that perfect crust.
- Dry scallops thoroughly: Pat them with paper towels; moisture is the enemy of a crisp sear.
- Don’t overcrowd: Leave space between scallops to prevent steaming and ensure even browning.
- Use high-smoke-point oil: Grapeseed or canola oil can handle the heat needed for a golden crust.
- Baste with butter: In the last 30 seconds, tilt the pan and spoon melted butter over for richness and shine.
- Minimize flipping: Sear without moving for about 2 minutes until edges are caramelized before turning.
- Rest briefly after cooking: Let scallops sit for a minute to lock in juices and avoid a rubbery texture.
Common mistakes and how to fix them
- FORGOT to pat scallops dry → They won’t sear properly; ensure absolute dryness before cooking.
- DUMPED oil in the pan → Use enough to coat evenly; too little causes sticking and uneven searing.
- OVER-TORCHED scallops → Lower heat immediately; burnt exterior ruins texture and flavor.
- FORGOT to let scallops rest → Rest for 1 minute after cooking to keep them tender and juicy.
Quick fixes and pantry swaps
- When scallops stick, splash a tiny bit of oil in the pan and gently loosen with tongs.
- If scallops turn grey quickly, reduce heat immediately to prevent overcooking and rubberiness.
- Dump cracked pepper into the pan if you want more aroma; it’s a quick flavor boost.
- Splash lemon juice after searing for bright flavor and to cut through richness.
- Patch a smoky pan with a paper towel and fresh oil; 5 seconds of crackle will return.
Prep, store, and reheat tips
- Pat scallops dry and season them a few hours ahead; keep covered in the fridge to save time during cooking. They won’t lose much flavor and stay ready for a quick sear.
- Store pre-seasoned scallops in an airtight container in the fridge for up to 24 hours. The surface may dry slightly, but they’ll still sear well.
- Cooked scallops can be refrigerated in an airtight container for up to 2 days. Reheat gently in a hot skillet for 30 seconds per side, just until warmed—watch for rubberiness.
- For best flavor and texture, serve scallops immediately after searing. Reheating can dull the crust and make them a bit rubbery. Fresh is always better for that perfect bite.
- If you need to reheat, do so in the pan over medium-high heat, spooning over a little butter or lemon juice. Look for a slight shimmer and aroma of butter when ready.
Top questions about pan seared scallops
1. How can I tell if scallops are fresh?
Look for scallops that are firm, dry, and smell fresh like the ocean. Avoid ones that feel slimy or have a strong fishy odor.
2. Should I dry scallops before searing?
Pat them thoroughly dry with paper towels before cooking. Excess moisture will cause steaming instead of searing, preventing that crisp crust.
3. What oil is best for searing scallops?
Use a high-smoke-point oil like grapeseed or canola. They handle the heat well and won’t burn quickly, giving you a nice golden crust.
4. How long should I sear scallops per side?
Sear each side for about 1.5-2 minutes over medium-high heat until edges are caramelized and the center is opaque.
5. How do I know when scallops are cooked?
Remove scallops from the pan as soon as they turn opaque and feel firm but still tender. Overcooking makes them rubbery.
6. Should I add butter during searing?
Adding butter and lemon at the end enhances flavor and gives a glossy finish. Baste the scallops for extra richness.
7. Should I rest scallops after cooking?
Rest scallops for about 1 minute after cooking to allow juices to redistribute and keep them tender.
8. What kind of pan should I use?
Use a non-stick or stainless steel skillet that’s preheated until shimmering. Proper heat is crucial for a good sear.
9. What if my scallops stick to the pan?
If scallops stick, splash a little more oil and gently loosen with tongs. Avoid forcing, which can tear the delicate meat.
10. How can I prevent overcooking?
Overcooking causes rubbery texture and loss of flavor. Keep a close eye, and aim for a quick, confident flip.
Searing scallops might seem simple, but it’s one of those small acts that reconnects you to the process of cooking. The aroma of browning butter and the sight of that golden crust are honest reminders that good things happen quickly when you pay attention.
In the end, this dish is about savoring the moment—whether alone or with company—and appreciating how a handful of ingredients can deliver a quiet, memorable pleasure. It’s a quick, satisfying reminder that sometimes, the simplest techniques create the most satisfying bites.
Welcome to Proud of This Mess – a place where food, creativity, and a little chaos come together on a plate!
I’m Emily Carter, the founder and heart behind this little corner of the internet. Born and raised in the United States, I’ve always had a passion for cooking, experimenting, and sharing the messy, delicious journey of creating food that brings people together. My philosophy is simple: good food doesn’t have to be perfect, and a little mess makes it memorable.
At Proud of This Mess, we believe that cooking is more than just following recipes—it’s about exploring flavors, discovering new techniques, and making every meal an experience worth savoring. From comforting weeknight dinners to indulgent desserts, our goal is to inspire home cooks of all levels to embrace the joy of food without fear of imperfection.