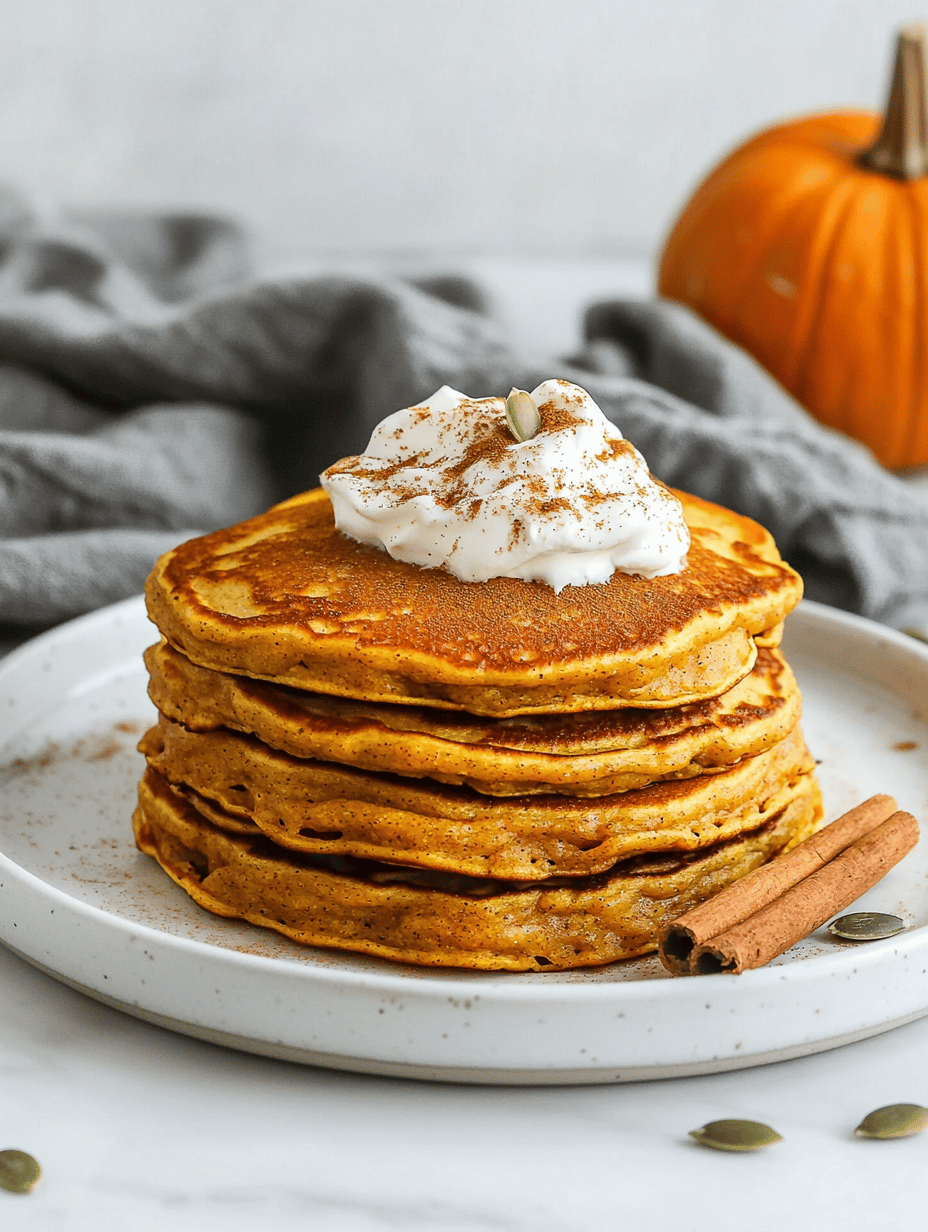
Blog

  • Spooky Delight: Halloween Mummy Hot Dogs That Charmer Kids & Ghouls Alike

    Spooky Delight: Halloween Mummy Hot Dogs That Charmer Kids & Ghouls Alike

    Halloween is prime time for playful foods that spark both joy and chaos in the kitchen. This year, I dared to turn the classic hot dog into a shivering mummy, with wriggly strips of pastry that mimic linen bandages. The aroma of baked dough and smoky sausage wafts through the house, teasing eager noses and nostalgic memories of Halloweens past.

    Creating these mummy hot dogs is a ritual in itself—messy, fun, and oddly satisfying. They turn an everyday snack into a spooky spectacle, perfect for grabbing little hands and big imaginations. The secret is in the details: eyes that pop, dough that shatters just right, and a little dash of chaos that makes it all memorable.

    Halloween Mummy Hot Dogs

    These mummy hot dogs are made by wrapping smokey sausages with strips of puff pastry to resemble bandages, then baking until golden and crisp. They feature playful eyes that add a spooky touch, with a crispy exterior and tender sausage interior, perfect for Halloween festivities.
    Prep Time 15 minutes
    Cook Time 15 minutes
    Total Time 30 minutes
    Servings: 8
    Course: Main Course
    Cuisine: American
    Calories: 180

    Ingredients
      

    • 8 pieces hot dogs or sausages smokey varieties preferred
    • 1 package puff pastry sheets thawed if frozen
    • 1 egg egg for egg wash
    • small black sesame seeds or small candies for eyes
    • 1 tablespoon water for egg wash

    Equipment

    • Baking sheet
    • Parchment paper
    • Kitchen scissors
    • Small spoon or toothpick for eyes

    Method
     

    1. Preheat the oven to 400°F (200°C) and line a baking sheet with parchment paper.
    2. Unroll the puff pastry on a lightly floured surface and cut it into long, thin strips, about 1/4 inch wide. These will be used to wrap the hot dogs like bandages.
    3. Wrap each hot dog tightly with pastry strips, leaving a small space at one end for the ‘head’ and creating a mummy-like appearance with overlapping strips. Slightly stretch the pastry for a snug fit.
    4. In a small bowl, beat the egg with a tablespoon of water to create an egg wash, then brush this over the pastry-wrapped hot dogs for a shiny, golden finish.
    5. Place the wrapped hot dogs on the prepared baking sheet, spacing them evenly apart.
    6. Bake in the preheated oven for about 12-15 minutes, or until the pastry is puffed and golden brown with crisp edges.
    7. While baking, prepare small eyes by placing black sesame seeds or tiny candies on a small spoon or toothpick for easy placement.
    8. Once baked, carefully remove the mummy hot dogs from the oven and give each a pair of eyes, sticking them onto the pastry with a tiny dab of egg wash if needed.
    9. Let the hot dogs rest for a minute or two to let the pastry set slightly, then serve hot with a fun spooky presentation.

    Notes

    Feel free to vary the eye decorations or add extra bandages for a creepier look.
    As the oven timer dings, these mummy hot dogs emerge with crispy pastry that crackles invitingly. Watching kids gobble them up while squealing with delight makes all the prep worthwhile. They’re not just food—they’re a Halloween memory in the making.

    This simple dish captures the heart of the holiday—fun, spooky, and a little bit messy. Plus, they are so easy to adapt with different fillings or toppings, perfect for any Halloween table. Sometimes, it’s the little creations like these that turn an ordinary evening into something truly special.

  • Chilled Coffee Dreams: The Unexpected Twist in Your Coffee Slushie

    Chilled Coffee Dreams: The Unexpected Twist in Your Coffee Slushie

    As the seasons shift and the air turns crisper, I find myself craving a cold treat that isn0t just your ordinary iced coffee. I recently discovered a secret ingredient that transforms a regular coffee slushie into a nostalgic flashback to childhood summers. It0s a little chaotic, a little fun, and absolutely worth trying, especially when you want something refreshingly different.

    Imagine sipping on a smooth, icy coffee blend, topped with a swirl of whipped cream and a sprinkle of cinnamon. It0s perfect for lazy weekends or spontaneous gatherings with friends. The best part? It0s surprisingly easy to whip up, even on your busiest days when you need a quick escape in a glass.

    Creamy Coffee Slushie with Cinnamon Whip

    This chilled coffee beverage is made by blending strong brewed coffee with ice and a secret ingredient to create a smooth, icy texture. Topped with whipped cream and a sprinkle of cinnamon, it has a refreshing and slightly creamy finish that resembles a coffee-flavored dessert.
    Prep Time 10 minutes
    Total Time 10 minutes
    Servings: 2
    Course: Main Course
    Cuisine: American
    Calories: 180

    Ingredients
      

    • 1 cup strong brewed coffee, cooled use a bold brew for flavor
    • 1.5 cups ice cubes
    • 2 tablespoons sweetened condensed milk adds creaminess and sweetness
    • 1 pinch secret ingredient (optional: a dash of vanilla extract)
    • 1 cup heavy cream for the whipped topping
    • 1/4 teaspoon ground cinnamon for garnish

    Equipment

    • Blender
    • Measuring cups
    • Whisk
    • Small bowl

    Method
     

    1. Pour the cooled brewed coffee into the blender, then add the ice cubes and sweetened condensed milk.
    2. Blend on high speed until the mixture is smooth, icy, and frothy, about 30-45 seconds.
    3. Transfer the heavy cream to a small bowl and whisk until soft peaks form, about 2-3 minutes.
    4. Spoon the whipped cream onto each serving of the coffee slushie, forming a generous swirl.
    5. Sprinkle a pinch of ground cinnamon over the whipped cream for a warm, aromatic finish.
    6. Serve immediately with a straw or spoon, enjoying the contrast between the icy coffee and fluffy topping.

    Notes

    For an extra flavor twist, add a dash of vanilla extract to the blended mixture. Adjust sweetness by varying the amount of condensed milk.

    This coffee slushie isn0t just a treat; it0s a small rebellion against the ordinary. A burst of cold coffee along with that familiar jolt of caffeine makes it an ideal companion for lazy mornings or end-of-day relaxations. Plus, it looks just as pretty in a glass as it tastes.

    Sometimes the simplest recipes become our favorites, especially when they evoke a little joy and nostalgia. Keep experimenting with flavors and toppings—all that matters is that first sip, still cold and perfectly sweetened. Cheers to many more spontaneous coffee adventures in your kitchen!

  • Chill Your Summer with a DIY Lemonade Slushie!

    Chill Your Summer with a DIY Lemonade Slushie!

    On a scorching day, nothing beats the ritual of turning simple lemon juice and sugar into a frosty delight. This lemonade slushie isnt just a drink; its a nostalgic escape that takes you back to childhood summers, yet feels refreshingly new with a twist of icy crunch. The secret is in the balance of tart lemon and sweet syrup, blended into a silky, icy treat that cools you from the inside out.

    Most recipes stop at basic lemonades, but I love pushing the boundaries with a hint of mint or a splash of sparkling water for extra zing. Each sip is a burst of bright, cold flavor with a chewable, icy texture that makes every gulp an adventure. Easy to whip up in minutes, this frozen refresher is a lifesaver when the heat is relentless and the freezer is calling.

    Lemonade Slushie

    A lemonade slushie is a frozen beverage made by blending fresh lemon juice, sugar, and ice to create a thick, icy texture. The key ingredients are tart lemon juice and sweet syrup, resulting in a bright, refreshing drink with a smooth, crushed-ice appearance. Sometimes enhanced with mint or sparkling water for added zing, it offers a cool, sweet-tart flavor perfect for hot days.
    Prep Time 5 minutes
    Total Time 5 minutes
    Servings: 2
    Course: Main Course
    Cuisine: International
    Calories: 80

    Ingredients
      

    • 1 cup fresh lemon juice about 4 large lemons
    • 0.5 cup simple syrup adjust sweetness to taste
    • 3 cups ice cubes preferably crushed or small pieces
    • optional to taste fresh mint leaves for garnish or flavor boost
    • sparkling water to taste sparkling water optional for extra fizz

    Equipment

    • Blender
    • Measuring cups and spoons

    Method
     

    1. Juice the lemons until you have about one cup of fresh lemon juice. Strain to remove seeds and pulp if desired for a smoother slushie.
    2. Add the lemon juice to a blender, then pour in the simple syrup, adjusting the sweetness as preferred.
    3. Pour in the ice cubes, filling the blender almost to the top to ensure a thick, icy texture.
    4. Secure the lid tightly and blend on high speed until the mixture becomes slushy and smooth, with a fine icy consistency that is spread evenly and looks frosty.
    5. Optional: add a few fresh mint leaves for a refreshing aroma or splash in sparkling water for extra fizz, then briefly blend again to combine.
    6. Pour the lemonade slushie into chilled glasses, revealing a bright, icy mixture with a slightly granular, crushed-ice appearance.
    7. Garnish with a sprig of mint or a lemon wedge if desired and serve immediately to enjoy its refreshing, icy texture.

    Creating your own lemonade slushie is a small act of rebellion against commercial frozen drinks. Its a simple way to keep cool and enjoy a burst of sunshine flavor anytime. I find myself craving this icy treat on lazy afternoons or when hosting summer gatherings, feeling proud to serve something so effortlessly delicious.

    As the days turn hotter and the sun blazes overhead, this recipe becomes your quick escape. The crisp citrus aroma and the icy crunch are reminders that sometimes, the simplest pleasures are the best. Nothing beats a homemade slushie thats both refreshing and bursting with fresh flavor.

  • Wake Up to Autumn: Pumpkin Spice Overnight Oats That Make Mornings Magical

    Wake Up to Autumn: Pumpkin Spice Overnight Oats That Make Mornings Magical

    Imagine starting your day with the warm embrace of pumpkin spice, but in a way that’s quick, nourishing, and completely your own. These overnight oats are not just a breakfast; they’re a tiny celebration of fall, crafted from pantry staples but whispering cozy season at every bite.

    The magic happens the night before. All you need is a jar, a spoonful of pumpkin, and a sprinkle of cinnamon — wake up, and breakfast is served. It’s a peaceful, no-fuss way to indulge your pumpkin cravings without the fuss of baking or heating.

    Craving something soothing yet festive? These oats blend creamy oat texture with the spicy aroma that feels like a hug from fall’s favorite flavors. Perfect for busy mornings or lazy weekends, they transform simple ingredients into a comfort food that’s just as quick to assemble as it is satisfying.

    Pumpkin Spice Overnight Oats

    These overnight oats are prepared by mixing rolled oats with pumpkin puree, cinnamon, and a touch of sweetener, then chilling overnight to develop a creamy, flavored breakfast. The final dish has a thick, pudding-like texture with a cozy, spiced aroma that is ready to enjoy straight from the jar.
    Prep Time 5 minutes
    Total Time 5 minutes
    Servings: 2
    Course: Main Course
    Cuisine: American
    Calories: 250

    Ingredients
      

    • 1/2 cup rolled oats
    • 1/2 cup pumpkin puree canned or homemade
    • 1 tsp ground cinnamon
    • 1-2 tbsp maple syrup or honey adjust sweetness to taste
    • 1/2 cup milk dairy or non-dairy

    Equipment

    • Mixing bowl
    • Measuring spoons
    • Jar or container with lid

    Method
     

    1. Combine the rolled oats, pumpkin puree, ground cinnamon, and sweetener in a mixing bowl, stirring until well blended and the mixture is uniformly colored and aromatic.
    2. Pour the milk into the bowl and stir again, ensuring all oats are coated and the mixture is evenly moist.
    3. Transfer the oatmeal mixture into a jar or container with a lid, smoothing the top with the back of a spoon.
    4. Seal the jar tightly and place it in the refrigerator overnight, allowing the oats to soak up the flavors and become tender.
    5. In the morning, give the oats a gentle stir to redistribute the flavors and check the consistency; it should be creamy and thick.
    6. Scoop the chilled pumpkin spice oats into a bowl or serve directly from the jar, topped with your favorite add-ins like nuts, seeds, or a drizzle of more maple syrup if desired.

    Notes

    For added texture, sprinkle with chopped nuts or granola just before serving. Adjust sweetness and spice level to your preference.
    With these pumpkin spice overnight oats, you gain permission to slow down while still starting your day on a sweet, spicy note. They’re perfect for those mornings when the world feels a bit chaotic and you need a little taste of peace.

    Every spoonful reminds me how a small ritual can turn a regular morning into something special. Whether it’s the smell of cinnamon wafting through the kitchen or the velvety texture on my tongue, these oats become more than breakfast — they’re a mood. And in this busy season, that’s a gift worth savoring.

  • Chill with a Twist: The Unconventional Charm of Whiskey Slushies

    Chill with a Twist: The Unconventional Charm of Whiskey Slushies

    During the first chill of winter, I stumbled upon a forgotten bottle of bourbon that whispered stories of summer nights. Instead of settling into the usual cozy cocoa routine, I decided to experiment, blending whiskey with icy sweetness to catch that elusive feeling of warm nostalgia bundled in a frozen glass.

    This whiskey slushie isn’t just a beverage; it’s a portal to lazy afternoons, laughter-filled porch talks, and memories of sun-drenched adventures. The slushie’s silky texture and bold kick make it perfect for unexpected warm spells or a lively gathering. It’s an unexpected, playful way to enjoy spirits in the coldest months.

    Whiskey Slushie

    A whiskey slushie is a chilled, icy beverage made by blending bourbon with sweeteners and flavorings to create a smooth, semi-frozen drink. The mixture results in a silky texture with a bold alcoholic kick, perfect for casual gatherings or warm surprises during cold weather. Its appearance is like a thick, frosty cocktail served in a glass or cup.
    Prep Time 10 minutes
    Total Time 10 minutes
    Servings: 2
    Course: Main Course
    Cuisine: American
    Calories: 200

    Ingredients
      

    • 1 1/2 cups bourbon whiskey preferably good quality
    • 1 cup simple syrup or honey to add sweetness
    • 1 cup water hot or cold, to help dissolve sweetener
    • 2 cups ice cubes about 10-12 small cubes
    • 1/2 teaspoon vanilla extract optional for added depth

    Equipment

    • Blender
    • Measuring cups and spoons

    Method
     

    1. Combine the water and sweetener in a small saucepan, and heat gently until the sweetener dissolves completely, creating a simple syrup. Let it cool slightly.
    2. Pour the bourbon into a blender, then add the cooled simple syrup and vanilla extract if using. This mixture forms the flavorful base of your slushie.
    3. Add the ice cubes to the blender, spreading them evenly over the liquid ingredients.
    4. Secure the lid on the blender and pulse a few times to break down the ice, then blend on high until the mixture is thick, slushy, and smoothly blended, about 30-40 seconds. You should see a frosty, semi-frozen mixture.
    5. Stop the blender and check the consistency; if it’s too thick, add a splash of water or more bourbon, then pulse briefly to combine.
    6. Pour the fully blended whiskey slushie into chilled glasses or cups.
    7. Serve immediately while icy and refreshing, garnished with a small citrus wedge or mint sprig if desired.

    Notes

    For a smoother texture, you can pre-freeze the glasses or chill the ingredients beforehand.

    As the ice melts and your glass warms just slightly, the layers of flavors deepen, revealing a complex sweetness underscored by the smoky undertones of the whiskey. It’s a treat that’s best enjoyed slowly, savoring each chilled sip.

    This recipe is a reminder that sometimes, the most delightful creations come from spontaneous experiments. Perfect for parties or solo splurges, it’s a cold drink that sparks a fiery memory of sunny days, even in winter’s grip.

  • Hello world!

    Welcome to WordPress. This is your first post. Edit or delete it, then start writing!