
This no-bake hazelnut bites recipe started as a way to satisfy my craving for something crunchy and rich without firing up the oven. I love how the texture evolves after chilling—those bites become delightfully firm on the outside but still chewy inside, with an unexpected snap of crunch from the chopped hazelnuts. It’s like a little surprise in every bite, perfect for when you want a quick, satisfying treat.
Honestly, I’ve made these more times than I can count, especially during hectic weeks when baking feels like too much. The best part is how adaptable they are—skip the chocolate for a more nutty flavor or add a pinch of sea salt to amp up the richness. They’re my go-to for a snack that’s both easy and a little bit special, no fuss required.
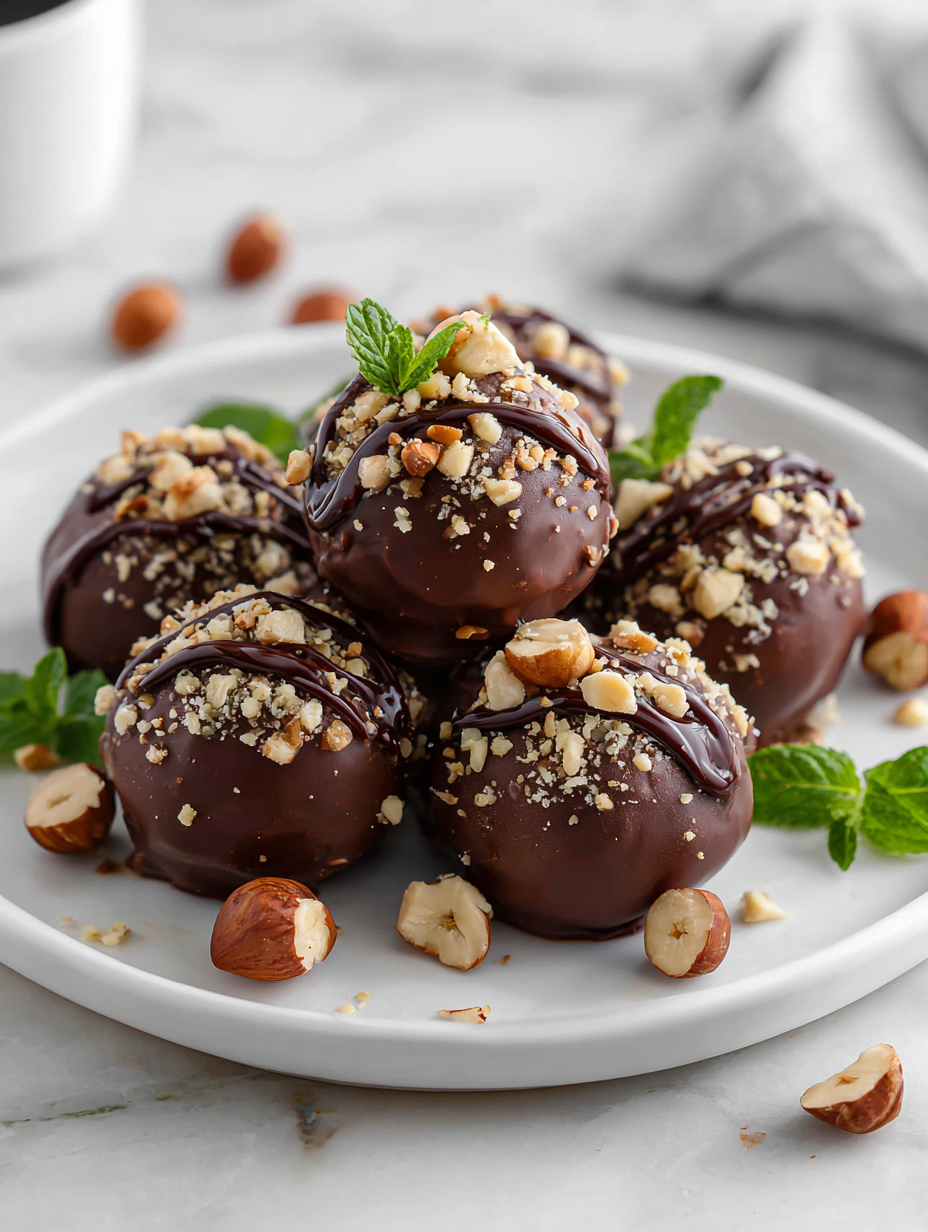
Focusing on the unexpected crunch and richness achieved by chilling these bites, highlighting how texture transforms the typical nut treats into a satisfying, no-fuss snack.
Crunchy contrast in every bite
- These bites remind me of childhood afternoons spent in my grandma’s kitchen, cracking hazelnuts and feeling the rush of sweet, roasted aromas.
- I love how a handful of chopped hazelnuts can turn a simple mixture into something textured and satisfying, like tiny crunchy treasures.
- Sometimes, I crave the richness of chocolate paired with that smoky nutty flavor—it’s a combo that feels indulgent but still straightforward to whip up.
- Baking can feel so overwhelming, but these no-bake bites are a lifesaver when I need something quick, honest, and genuinely tasty.
- There’s a small thrill when I see the bites firm up after chilling—like a little victory in the freezer, ready to be enjoyed.
The story behind this recipe
This recipe came about during a particularly hectic week when I needed a quick fix that wouldn’t require turning on the oven. I remembered those afternoons in my childhood when my grandma would crack hazelnuts and create simple, flavorful treats — that nostalgic smell of toasted nuts filled the air. It struck me how easy it was to turn those memories into a no-fuss snack, just by mixing, chilling, and enjoying. Sometimes, the simplest ideas are the most satisfying, especially when they remind you of slow, cozy days.
Historical & Cultural Roots
- These bites draw inspiration from European pralines, where nuts and chocolate are paired in simple, elegant forms.
- The idea of no-bake treats gained popularity in the early 20th century as a way to make quick, shelf-stable snacks for busy households.
- Hazelnuts have been treasured since ancient times, especially in regions like the Mediterranean, for their rich flavor and versatility in confections.
- Chilling nut-based confections to enhance texture was a technique perfected in French patisserie, influencing modern no-bake recipes.
Ingredient breakdown: key components
- Hazelnuts: I love the roasted, buttery aroma they develop—if you toast them lightly, they get even richer and more fragrant. Skip to the chopped step if your nuts are already roasted.
- Dark chocolate: A deep, velvety finish that melts smoothly—look for good quality chocolate with a shiny surface. If you prefer sweeter bites, swap in milk chocolate, but reduce the sugar a bit.
- Honey or maple syrup: Adds a touch of sweetness and helps everything stick together—use fresh, runny honey for the best binding. For a vegan tweak, try agave nectar.
- Coconut oil: It gives the bites a subtle sheen and helps set the mixture firm—if you want more chew, add a little extra; for a crisper texture, use less.
- Sea salt: Just a pinch enhances the nutty flavor—if you love contrast, sprinkle a tiny bit more on top before chilling, especially if using bittersweet chocolate.
- Vanilla extract: It rounds out the flavors with a warm, sweet note—don’t skip it, even a splash makes a noticeable difference in depth.
- Optional add-ins: Dried cranberries or a pinch of chili powder can add a surprising twist—experiment to match your mood or what’s in your pantry.
Spotlight on Key Ingredients
Hazelnuts:
- Their roasted, buttery aroma fills the kitchen—if you toast them lightly, they become even richer and more fragrant. Chopped nuts add a delightful crunch that surprises with each bite.
- During melting or chopping, they release a smoky, sweet scent that signals they’re ready—watch for a golden hue on toasted nuts for best flavor.
Dark Chocolate:
- Melts into a smooth, shiny coating that sets with a velvety texture. A good quality chocolate has a deep, cocoa-rich smell that intensifies as it melts.
- During melting, it crackles gently and becomes glossy—avoid overheating to prevent a grainy texture or burnt smell.
Notes for ingredient swaps
- Dairy-Free: Swap regular chocolate for dairy-free dark chocolate—your bites will be just as rich, but a little more bitter and intense.
- Nut-Free: Use toasted sunflower seeds or pumpkin seeds instead of hazelnuts—expect a slightly different crunch and a milder nutty flavor.
- Sweetener: Maple syrup can replace honey for a more caramel-like sweetness—note it’s a tad thinner, so it might affect how the bites hold together.
- Oil: Coconut oil can be swapped for a neutral oil like light olive oil—this may mellow the nutty aroma but keep the texture smooth.
- Chocolate Type: Milk chocolate works for a sweeter, creamier taste—just reduce the added sweetener slightly to balance the sweetness.
- Add-ins: Dried cranberries or chopped dried apricots can add tang and chew—try to keep them small to avoid overly sticky bites.
- Salt: Flaked sea salt can be replaced with fine salt—just use a pinch to avoid overwhelming the other flavors.
Equipment & Tools
- Mixing bowl: Combine ingredients evenly.
- Spatula: Stir and fold ingredients.
- Small saucepan: Gently melt chocolate without scorching.
- Parchment paper: Prevent sticking and easy cleanup.
- Baking sheet: Hold formed bites while setting.
Step-by-step guide to no-bake hazelnut bites
- Equipment & Tools: Gather a mixing bowl, spatula, small saucepan, parchment paper, and a baking sheet lined with wax paper for easy cleanup.
- Toast the Hazelnuts: Spread 1 cup of chopped hazelnuts on a dry skillet over medium heat (about 160°C / 320°F). Toast for 5-7 minutes, stirring often, until fragrant and lightly golden. Let cool slightly.
- Chop & Prepare: Once cooled, roughly chop the hazelnuts if they’re whole or larger pieces. Set aside.
- Melt the Chocolate: In a small saucepan over low heat (about 45°C / 113°F), melt 1/2 cup of dark chocolate, stirring constantly until smooth. Remove from heat and add 1 tablespoon of coconut oil, stirring until glossy.
- Mix Ingredients: In the mixing bowl, combine the chopped hazelnuts, melted chocolate, 2 tablespoons honey or maple syrup, and 1 teaspoon vanilla extract. Stir until everything is evenly coated and sticky enough to form into bites.
- Shape the Bites: Using a spoon or your hands, form small clusters or balls about 1 inch in diameter. Place them on the prepared parchment-lined baking sheet.
- Chill & Set: Refrigerate the bites for at least 30 minutes, or until firm and crisp on the outside but still chewy inside. For a quicker set, freeze for 15 minutes.
- Finish & Serve: Once chilled, optionally sprinkle a pinch of sea salt on top. Serve directly from the fridge for the best texture. Keep leftovers in an airtight container in the fridge for up to a week.
Refrigerate for at least 30 minutes until firm. Serve chilled directly from the fridge, or let sit at room temperature for 5 minutes for softer bites. Store in an airtight container in the fridge for up to a week.
How to Know It’s Done
- Chocolate is fully melted and glossy before mixing.
- Bites feel firm but not hard when pressed after chilling.
- Outer surface has a slight sheen, indicating proper setting.
No-Bake Hazelnut Bites
Ingredients
Equipment
Method
- Start by lining a baking sheet with parchment paper and setting it aside.
- Gently toast the hazelnuts in a dry skillet over medium heat for about 5-7 minutes, stirring often until they smell fragrant and turn a light golden brown. Remove from heat and let cool slightly before chopping them into smaller pieces.
- In a small saucepan over low heat, melt the dark chocolate, stirring constantly until smooth and glossy. Remove from heat and stir in the melted coconut oil for added sheen and firmness.
- In a mixing bowl, combine the chopped hazelnuts, melted chocolate mixture, honey or maple syrup, and vanilla extract. Mix well until all ingredients are evenly coated and sticky enough to form into small bites.
- Using a spoon or your hands, shape the mixture into small clusters about 1 inch in diameter. Place each bite on the prepared parchment-lined baking sheet.
- Sprinkle a tiny pinch of sea salt on each bite if desired, then place the tray in the refrigerator to chill for at least 30 minutes until firm and set.
- Once firm, enjoy these bites straight from the fridge for the best chewy and crunchy contrast. Store leftovers in an airtight container in the fridge for up to a week.
Pro tips for perfect bites
- Bolded mini-head: Toast the hazelnuts until fragrant and golden—this amplifies their nutty aroma and adds depth to the bites.
- Bolded mini-head: Use high-quality dark chocolate with a shiny surface—this melts smoothly and sets with a glossy finish.
- Bolded mini-head: Chill the mixture for at least 30 minutes—this helps the bites firm up and become easier to shape.
- Bolded mini-head: When melting chocolate, stir constantly over low heat—avoid scorching and ensure a silky, crackle-free melt.
- Bolded mini-head: For a firmer bite, refrigerate longer; for softer, let sit at room temperature for 5 minutes before serving.
- Bolded mini-head: Incorporate a pinch of sea salt on top before chilling—this enhances the nutty flavor and balances sweetness.
- Bolded mini-head: If the mixture feels too sticky, sprinkle in a little more chopped hazelnuts—this adds crunch and helps with shaping.
Common mistakes and how to fix them
- FORGOT to cool nuts before chopping? Toast them slightly longer for easier handling.
- DUMPED the chocolate mixture too hot? Let it cool slightly before mixing to prevent melting nuts.
- OVER-TORCHED the chocolate? Use a double boiler or microwave in short bursts to avoid burning.
- MISSED the chilling step? Ensure bites are fully set in the fridge for proper firmness.
Quick fixes and pantry swaps
- When mixture feels too sticky, add chopped hazelnuts for better shaping.
- Splash a little hot water on your hands to prevent sticking when forming bites.
- Patch a cracked chocolate coating with a quick re-melt and re-coat.
- Shield bites from freezer burn by wrapping tightly in plastic wrap before freezing.
- If the bites are too soft after chilling, extend refrigeration time or add more chopped nuts.
Prep, store, and reheat tips
- Prepare the mixture up to a day in advance; store it covered in the fridge to keep flavors fresh and textures intact.
- Chilled bites will keep well in an airtight container in the fridge for up to a week; the flavors deepen slightly over time.
- For longer storage, freeze the bites for up to 3 months; wrap individually to prevent freezer burn and preserve crunch.
- Reheat by letting the bites sit at room temperature for 5 minutes or briefly warming in the microwave at low power; they should soften without melting completely, maintaining their chewy texture.
Top questions about hazelnut bites
1. Can I use pre-roasted hazelnuts?
Yes, you can use roasted, unsalted hazelnuts for a richer flavor. Toast them lightly first for extra aroma.
2. Can I substitute milk chocolate?
Absolutely. Swap dark chocolate with milk chocolate for a sweeter, creamier bite. Expect a softer set and more sweetness.
3. Can I use a different sweetener?
Yes, honey or maple syrup work well. Honey adds a floral sweetness, while maple gives a caramel note—adjust quantity based on taste.
4. Can I swap the coconut oil?
You bet. Use coconut oil or neutral oils like light olive oil. Coconut oil gives a slight sheen and subtle nutty aroma.
5. Can I make these seed-based?
Definitely. For nut allergies, try sunflower or pumpkin seeds. They add crunch but have a milder flavor.
6. How should I store leftovers?
Yes. Store in an airtight container in the fridge for up to a week. For longer storage, freeze for 3 months, wrapping individually.
7. Can I prepare these in advance?
Yes, you can make the mixture a day ahead. Keep it covered in the fridge and shape the bites just before chilling.
8. How long to chill the bites?
Refrigerate for 30 minutes to an hour until firm. For a softer bite, let them sit at room temp for 5 minutes before serving.
9. How do I melt chocolate properly?
When melting chocolate, do it slowly over low heat or in short bursts in the microwave. Stir constantly for a smooth finish.
10. What if my bites are too soft or crack?
If the mixture is too sticky, fold in extra chopped nuts. To fix cracked coating, re-melt and re-coat the bites.
Chilling these bites really changes the game—what starts as a soft mixture becomes a firm, satisfying snack with a little crunch. It’s funny how a simple step like that can make all the difference in texture and enjoyment.
In a way, these no-bake hazelnut bites are a reminder that sometimes, the best treats are the easiest to pull together. They’re perfect for those moments when you need something quick but want it to feel a little special. No fuss, just good, honest flavor.
Welcome to Proud of This Mess – a place where food, creativity, and a little chaos come together on a plate!
I’m Emily Carter, the founder and heart behind this little corner of the internet. Born and raised in the United States, I’ve always had a passion for cooking, experimenting, and sharing the messy, delicious journey of creating food that brings people together. My philosophy is simple: good food doesn’t have to be perfect, and a little mess makes it memorable.
At Proud of This Mess, we believe that cooking is more than just following recipes—it’s about exploring flavors, discovering new techniques, and making every meal an experience worth savoring. From comforting weeknight dinners to indulgent desserts, our goal is to inspire home cooks of all levels to embrace the joy of food without fear of imperfection.