
This no bake Greek yogurt cheesecake might seem like just a light dessert, but it’s actually become my secret weapon for busy weeknights. It’s a way to indulge without feeling guilty, especially when I want something cool and tangy that doesn’t demand turning on the oven in the heat. The way the creamy yogurt sets into a firm, cheesecake-like slice feels almost magical, especially since it’s all done in the fridge.
What I love most is how adaptable it is—swap the toppings, add a splash of lemon zest, or even layer in some fresh berries for extra burst. It’s honest, straightforward, and a little bit carefree, much like those summer evenings when the world slows down and just a little sweetness is all you need. It’s the kind of dessert that feels like a small victory, made with simple ingredients and a bit of patience in the fridge.
This cheesecake is my go-to for summer gatherings when I want something cool and satisfying without turning on the oven. It’s a no-fuss recipe that relies on the natural tang of Greek yogurt to make each bite bright and refreshing, especially after a spicy meal or a day in the sun. Plus, it’s a reminder that sometimes, the simplest ingredients can come together in the most unexpected ways, creating a dessert that feels both indulgent and healthy.
Unexpected Charm of Simple Ingredients
- This cheesecake reminds me of lazy summer afternoons on my grandma’s porch, where simple pleasures tasted the sweetest.
- I used to think no-bake desserts were less satisfying, but this one proved me wrong — it’s surprisingly indulgent and fresh.
- There’s a quiet joy in watching the yogurt mixture set overnight, like a small act of patience that pays off beautifully.
- Every time I make this, I feel a bit more relaxed — no oven, no fuss, just creamy tang and a crispy crust to look forward to.
The story behind this recipe
- This recipe was born out of a late-night craving for something creamy and tangy, but I didn’t want to heat up the kitchen. I remember rummaging through my fridge and finding a tub of Greek yogurt that was just begging to be turned into something sweet and simple. The idea of a no-bake cheesecake that’s both satisfying and light felt like a small victory in the chaos of a busy week.
- What started as an experiment turned into my go-to dessert for hot summer days and last-minute gatherings. It’s funny how the simplest ingredients—Greek yogurt, graham crackers, a hint of lemon—can come together so effortlessly and still feel special. It’s a reminder that sometimes, the best recipes are born from necessity and a bit of playful improvisation.
- heading
- story_type
Trivia and Origins
- This recipe harks back to Mediterranean traditions of simple, fresh desserts that highlight yogurt’s natural tang.
- Greek yogurt became popular worldwide in recent decades, inspiring many modern no-bake desserts like this one.
- The idea of a cold, creamy cheesecake without baking gained traction in the health-conscious food scene of the 2010s.
- In Greece, similar chilled desserts often use honey and nuts, adding regional twists to this classic style.
Ingredient breakdown: key components
- Greek yogurt: I love the tang and creaminess it adds, but if you want it richer, blend in a splash of cream cheese or sour cream. Skip if dairy-free, but the texture will be different.
- Graham cracker crust: I press this in tightly for a sturdy base, but for a nuttier flavor, try digestive biscuits or even crushed cookies like Oreos. It’s the crunch that makes the first bite satisfying.
- Sweetener: Honey or maple syrup gives a mellow sweetness, but if you prefer less sugar, use a sugar substitute or reduce the amount. Just taste the mix before setting.
- Lemon zest: Brightens everything with a zingy pop. If you don’t have fresh, a splash of lemon juice works, but zest keeps the flavor fresh and aromatic.
- Gelatin or agar-agar: I use just enough to help the cheesecake set without a wobble. If you skip it, the texture will be softer—more like a mousse. For vegan, try agar-agar, but dissolve it carefully.
- Vanilla extract: Adds warmth and depth, but you can swap for a splash of almond or orange extract for a different aroma. Keep it minimal to avoid overpowering the yogurt’s tang.
- Toppings: Fresh berries or a drizzle of honey make it special. For a crunch, sprinkle some toasted nuts or granola right before serving. The toppings should complement the fresh, tangy base.
Spotlight on key ingredients
Greek yogurt:
- I love how it’s tangy and creamy, almost velvety when whipped. It’s the backbone of this cheesecake, giving it that signature tartness.
- The way Greek yogurt holds its shape when set is fascinating—firm yet smooth, almost like a mousse but with body. It’s the reason this cheesecake slices so neatly.
Graham crackers:
- Their crisp, honey-sweet aroma when crushed makes the crust irresistible. They turn golden and fragrant as they bake or set in the fridge, offering a perfect crunch.
- When pressed into the base, they form a sturdy, crumbly foundation that holds up well, even after a day or two. The texture contrasts beautifully with the creamy filling.
Notes for ingredient swaps
- Dairy-Free: Swap Greek yogurt for coconut yogurt or a thick cashew cream. It’ll be creamier and a touch sweeter, but lose some tang.
- Sweetener: Use honey, maple syrup, or agave instead of powdered sugar. Expect a richer, more floral flavor, and a slightly softer set.
- Crust: Replace graham crackers with digestive biscuits or gluten-free cookies. Nutty and different in texture, but still sturdy enough for a good base.
- Lemon Zest: Skip if you prefer a milder flavor or add orange/lime zest for a different citrus note. Brightness will shift but stay lively.
- Gelatin: Vegan? Try agar-agar. Dissolve carefully and remember it sets faster, so chill promptly to avoid wobbling.
- Toppings: Swap berries for sliced peaches, kiwi, or edible flowers. Toppers can shift the flavor profile and add seasonal charm.
- Texture Boost: Mix in crushed nuts or shredded coconut into the crust for extra crunch and flavor dimension.
Equipment & Tools
- Springform pan: To shape and hold the cheesecake while chilling and serving.
- Food processor or zip-top bag and rolling pin: To crush the graham crackers evenly.
- Mixing bowl: To blend the yogurt mixture smoothly.
- Spatula: To smooth the filling and crust evenly.
- Saucepan: To gently dissolve gelatin or melt butter if needed.
Step-by-step guide to cheesecake
- Gather your equipment: a 20cm (8-inch) springform pan, a mixing bowl, a spatula, a food processor or zip-top bag and rolling pin, and a small saucepan. The pan is for assembling, the processor for crust, and the saucepan for melting butter if needed.
- Make the crust: crush 200g (7 oz) graham crackers finely—use a food processor or put them in a zip-top bag and crush with a rolling pin. Mix with 50g (1/4 cup) melted butter and 1 tbsp sugar. Press the mixture evenly into the bottom of the springform pan. Chill in the fridge for 15 minutes to set.
- Prepare the filling: in a large bowl, combine 400g (1 3/4 cups) Greek yogurt, 150g (about 3/4 cup) powdered sugar, 1 tsp vanilla extract, and the zest of one lemon. Mix until smooth. If using, sprinkle 1 tsp gelatin powder over 2 tbsp cold water, let bloom for 5 minutes, then gently heat in a saucepan until dissolved. Fold into the yogurt mixture. Chill for 10 minutes if needed to prevent setting too quickly.
- Assemble the cheesecake: pour the filling over the chilled crust, smoothing the top with a spatula. Cover loosely with plastic wrap. Refrigerate for at least 4 hours or overnight, until firm and set.
- Check for doneness: the top should be smooth and slightly firm to the touch. It should jiggle slightly in the center when gently shaken, but not be liquid or wobbly. The edges will be slightly pulled away from the pan, and it will smell fresh and tangy.
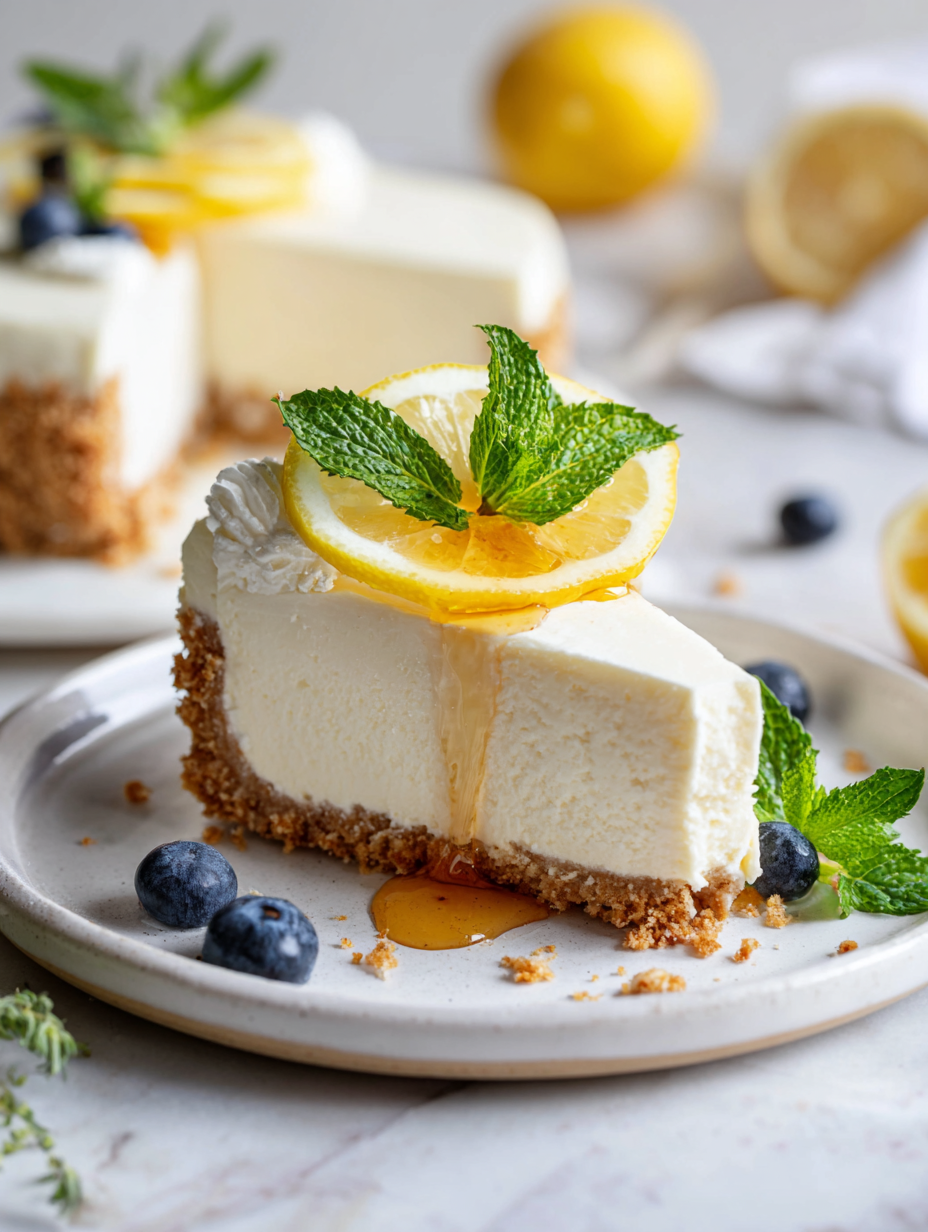
- Finishing touches: gently run a knife around the edge of the pan to loosen, then remove the springform side. Top with fresh berries, a drizzle of honey, or a sprinkle of chopped nuts if desired. Slice with a warm, clean knife for clean slices.
After removing from the fridge, let the cheesecake sit at room temperature for 10 minutes before slicing. Use a warm knife to cut clean slices. Serve directly from the pan or transfer to a plate. Garnish with fresh fruit or toppings as desired.
How to Know It’s Done
- The surface is smooth, firm, and slightly jiggly in the center.
- Edges are clean and slightly pulled away from the pan.
- The aroma is bright with lemon and vanilla, with no liquid or runny spots.
No-Bake Greek Yogurt Cheesecake
Ingredients
Equipment
Method
- Crush the graham crackers into fine crumbs using a food processor or by placing them in a zip-top bag and rolling over with a rolling pin.
- Mix the crushed crackers with melted butter and sugar until evenly combined; the mixture should hold together when pressed.
- Press this crumb mixture firmly into the bottom of a springform pan, creating an even, compact crust. Chill in the fridge for at least 15 minutes to firm up.
- In a small saucepan, sprinkle the gelatin powder over cold water and let it bloom for about 5 minutes. Gently warm the mixture over low heat, stirring until completely dissolved.
- In a large mixing bowl, combine the Greek yogurt, powdered sugar, vanilla extract, and lemon zest. Whisk until smooth and slightly fluffy.
- Pour the dissolved gelatin into the yogurt mixture, folding gently until fully incorporated. The mixture should be uniform and creamy.
- Pour the filling over the chilled crust, smoothing the top with a spatula for an even surface.
- Cover the pan loosely with plastic wrap and place it in the refrigerator. Chill for at least 4 hours, preferably overnight, until the cheesecake is firm and set.
- Once set, run a warm knife around the edges of the pan to loosen the cheesecake, then carefully remove the sides of the springform pan.
- Garnish with fresh berries, lemon zest, or a drizzle of honey if desired, then slice with a warm, clean knife for clean cuts. Serve chilled and enjoy the bright, creamy texture.
Notes
Pro tips for perfect cheesecake
- Use room temperature ingredients for a smoother mix and easier spreading.
- Chill your crust thoroughly to prevent crumbling when adding the filling.
- Dissolve gelatin completely to avoid lumps and ensure a firm set.
- Use a warm knife to slice for clean, neat pieces without tearing.
- Refrigerate for at least 4 hours or overnight to let flavors meld and texture set perfectly.
- Add a splash of vanilla or lemon zest to enhance the tang and aroma.
- Press crust firmly to the edges for a compact base that holds up when sliced.
Common mistakes and how to fix them
- FORGOT to chill crust; fix by refrigerating before filling.
- DUMPED gelatin; dissolve thoroughly to avoid lumps and wobbliness.
- OVER-TORCHED crust; bake at lower temperature or cover if browning too fast.
- MISSED the fridge time; ensure at least 4 hours or overnight for proper set.
Quick fixes and pantry swaps
- When mixture is too thick, splash in a little milk or cream to loosen it.
- If crust crumbles, patch with a quick brush of melted butter and press again.
- Splash some lemon juice on cracks to make them less noticeable.
- Patch cracks with a dab of extra yogurt or whipped cream before serving.
- Shield the edges of the crust with foil if they brown too fast during chilling.
Prep, store, and reheat tips
- Prepare the crust and press it into the pan a day before; it firms up overnight, making assembly easier.
- The cheesecake filling can be made up to 24 hours in advance; keep covered in the fridge to preserve freshness and tang.
- Store the assembled cheesecake covered tightly with plastic wrap; it stays good for up to 3 days, with flavors mellowing slightly.
- Refrigerate thoroughly for at least 4 hours or ideally overnight for optimal set and texture. Let sit at room temp for 10 minutes before slicing for best results.
- To reheat slices, briefly warm in the microwave for 10-15 seconds until just softening; avoid melting the creamy filling for the best sensory experience.
Top questions about no bake Greek yogurt cheesecake
1. Can I use low-fat Greek yogurt?
You can use full-fat Greek yogurt for creaminess or low-fat if you want it lighter. Just keep in mind the texture might change slightly.
2. Can I substitute the sugar with honey?
Yes, you can swap honey or maple syrup for the powdered sugar. It will add a different flavor but still work well.
3. Is this recipe dairy-free?
Absolutely. Use dairy-free yogurt like coconut or almond-based yogurt. The tang might be milder, but it keeps it vegan-friendly.
4. What if my cheesecake doesn’t set?
If the cheesecake doesn’t set, make sure the gelatin dissolved completely. Reheat gently if lumps form or try adding a bit more gelatin next time.
5. How do I get clean slices?
Use a warm, damp knife to cut slices. It slices smoothly and prevents tearing through the creamy filling.
6. Can I make this ahead of time?
You can prepare the crust a day ahead and keep it refrigerated. The filling can be made a day in advance too, just keep it covered.
7. My crust is crumbly; how do I fix it?
If the crust crumbles, gently press it back together with a bit of melted butter or a sprinkle of extra crust crumbs, then chill again.
8. What toppings work best?
Add fresh berries, lemon zest, or a drizzle of honey on top just before serving. They add freshness and flavor contrast.
9. How long does it last in the fridge?
When storing, cover the cheesecake tightly and refrigerate. It stays fresh for up to 3 days, but best enjoyed within 24 hours for peak freshness.
10. My slices are too soft; what can I do?
When slices are too soft, briefly microwave for 10 seconds to soften without melting. For a quick fix, replace toppings with fresh fruit or nuts.
This no-bake Greek yogurt cheesecake offers a fresh take on dessert, especially when you’re short on time or just want something light. The tangy yogurt paired with a crisp crust makes every spoonful feel both satisfying and effortless, perfect for warm days or casual gatherings.
It’s a simple reminder that sometimes, the best recipes are born from needing something quick, honest, and a little bit indulgent. No fuss, no oven, just a creamy, tangy treat that’s easy to customize and always welcome.
Welcome to Proud of This Mess – a place where food, creativity, and a little chaos come together on a plate!
I’m Emily Carter, the founder and heart behind this little corner of the internet. Born and raised in the United States, I’ve always had a passion for cooking, experimenting, and sharing the messy, delicious journey of creating food that brings people together. My philosophy is simple: good food doesn’t have to be perfect, and a little mess makes it memorable.
At Proud of This Mess, we believe that cooking is more than just following recipes—it’s about exploring flavors, discovering new techniques, and making every meal an experience worth savoring. From comforting weeknight dinners to indulgent desserts, our goal is to inspire home cooks of all levels to embrace the joy of food without fear of imperfection.