
This no-bake fudge balls recipe is born from those late-night craving moments when I want something sweet, quick, and satisfying without the fuss of turning on the oven. It’s a bit messy, a little improvisational, but always hits the spot. I love how you can toss together pantry staples—cocoa, oats, a splash of sweetener—and end up with a treat that feels indulgent but is honestly just honest ingredients coming together.
There’s something comforting about the simplicity of these fudge balls. They remind me of childhood, sneaking spoonfuls of chocolate while my mom wasn’t looking, but now I’ve got this no-fuss version I can whip up whenever the craving strikes. Plus, they’re perfect for when you need a quick gift or a snack that’s almost too easy to be true, yet still deeply satisfying.
This recipe is inspired by my late-night snack experiments, where I realized that simplicity and quick fixes can still deliver real comfort. I love how no-bake fudge balls can be whipped up in moments, turning pantry basics into a decadent treat without turning on the oven or waiting long. It’s a reminder that sometimes, the best desserts come from just a few honest ingredients and a bit of messy, joyful improvisation.
A Secret Snack in Minutes
- These fudge balls are my go-to when I need a quick, comforting bite after a long day.
- I still remember the first time I made them—chaotic hands, sticky fingers, but that rich chocolate smell made everything worthwhile.
- There’s a strange pride in turning simple pantry staples into something so indulgent, especially with kids running around.
- Whenever I make these, I think about how easy it is to customize—add nuts, dried fruit, or a splash of espresso for a twist.
The story behind this recipe
- This recipe sprouted from a busy weekend when I needed something sweet but didn’t want to turn on the oven. I remember rummaging through my pantry and finding a hodgepodge of ingredients—cocoa powder, oats, a bit of honey—and thinking, why not mash them together? That impulsive mix turned into these fudge balls, a little messy but incredibly satisfying, especially when I need a quick treat.
- They remind me of those nights when I just want a simple, honest dessert that doesn’t demand extra dishes or waiting. It’s a humble, no-fuss recipe that’s been my secret weapon for unexpected guests or sudden cravings. Making them feels a bit like reclaiming comfort food from the chaos of everyday life.
- heading: ‘The story behind this recipe’
Historical & Cultural Tidbits
- These fudge balls have roots in resourcefulness, using pantry staples during wartime shortages to create sweet treats.
- They gained popularity in the 1970s as a no-bake dessert option for busy households seeking quick indulgence.
- The concept of no-bake confections like this dates back even further, with variations appearing in homemade cookbooks from the early 20th century.
- In some cultures, similar treats were made with local ingredients, adapting to available flavors and textures.
Ingredient breakdown: key components
- Chocolate: I use dark cocoa powder for that deep, rich flavor that makes these fudge balls irresistibly chocolatey. Feel free to swap in melted chocolate, but the powder keeps it quick and fuss-free.
- Oats: Rolled oats add texture and bulk, giving a chewy bite. If you’re gluten-free, try certified gluten-free oats—just make sure they’re not processed with gluten-containing grains.
- Sweetener: I prefer honey or maple syrup for a natural sweetness and a bit of sticky chewiness. You can substitute agave or even a splash of brown sugar syrup, but adjust for moisture.
- Nut Butter: Creamy peanut or almond butter binds everything together. For a nut-free version, sunflower seed butter works well, though it might be a bit thinner.
- Add-ins: Dried cranberries, chopped nuts, or coconut flakes turn these into more than just chocolate bites. Use what you love, but don’t overdo it—too many chunks can make rolling tricky.
- Vanilla Extract: Just a splash lifts all the flavors, making everything smell warm and inviting. Skip if you want a more intense chocolate punch, but I recommend keeping it.
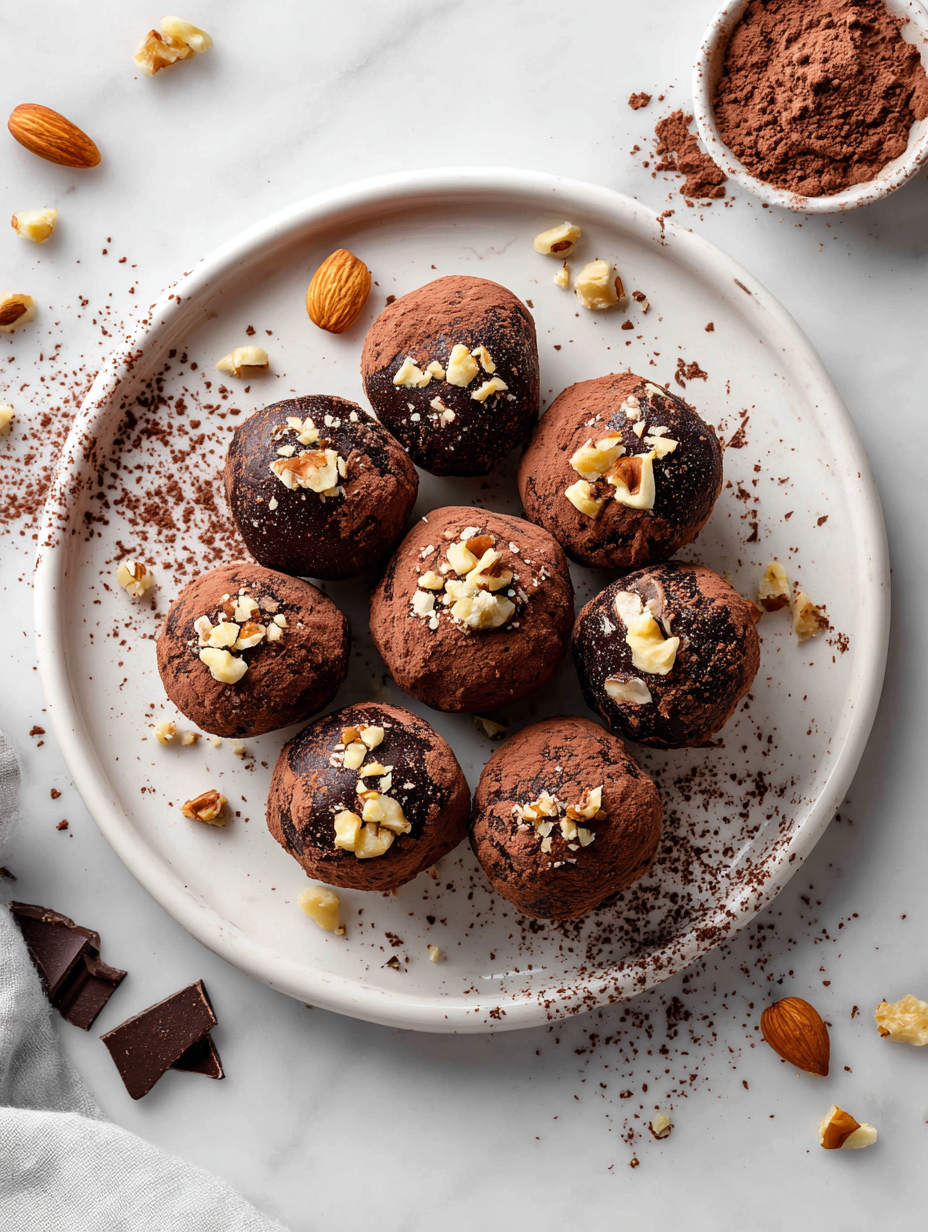
- Optional Coating: Cocoa powder, shredded coconut, or crushed nuts—these give a nice finish and extra flavor. Roll the balls in your choice for texture and visual appeal.
Spotlight on key ingredients
Chocolate:
- I use rich, dark cocoa powder for that deep, slightly bitter flavor that makes these fudge balls feel indulgent. It’s the backbone; skip it, and they lose their punch.
- Oats: Rolled oats give texture and substance, a chewiness that balances the sweetness. When you bite in, it’s that hearty, familiar crunch that makes them satisfying.
Oats:
- Nut Butter: Creamy peanut or almond butter acts as the glue, making everything stick together smoothly. When you smell it melting into the mix, that’s when you know it’s right.
- Add-ins: Dried cranberries or chopped nuts add bursts of flavor and texture. Keep them small; too many can make rolling a nightmare, but just enough for surprise bites.
Notes for ingredient swaps
- Dairy-Free: Swap regular nut butter for coconut or seed butter. It changes the richness slightly, adding a hint of coconut aroma.
- Sweetener: Maple syrup or agave can replace honey for a different sweetness profile. Expect a slightly different sticky texture.
- Oats: Use gluten-free oats if needed; they won’t change much in texture but ensure no cross-contamination for gluten sensitivity.
- Cocoa Powder: Unsweetened dark cocoa gives a deep, bitter chocolate hit—milk powder or cacao nibs can tweak the intensity.
- Add-ins: Dried fruits or chopped nuts can be customized. Keep in mind, too many may make rolling trickier, so adjust accordingly.
- Flavor Boost: A pinch of espresso powder enhances chocolate flavor without overpowering. Skip if you prefer pure chocolate taste.
- Coating: Roll in crushed cookies or candy for a fun, unexpected crunch. It adds flavor and visual pop, but watch the moisture content.
Equipment & Tools
- Mixing bowl: Combine and mix all ingredients.
- Measuring cups and spoons: Ensure accurate ingredient portions.
- Parchment-lined baking sheet: Set the fudge balls as they chill.
- Cookie scoop or tablespoon: Portion out even-sized balls.
- Spatula or mixing spoon: Stir and fold ingredients.
Step-by-step guide to fudge balls
- Gather all ingredients: cocoa powder, oats, honey, nut butter, vanilla, and mix-ins. Prepare a baking sheet lined with parchment for setting the balls.
- In a large mixing bowl, combine 1 cup of rolled oats, 1/2 cup of cocoa powder, and 2 tablespoons of vanilla. Stir until evenly distributed.
- Add 1/2 cup of honey and 1/2 cup of nut butter (peanut or almond). Mix thoroughly until the mixture is sticky but manageable. If it feels too dry, add a splash more honey or a teaspoon of milk to loosen.
- Fold in your chosen mix-ins—dried cranberries, chopped nuts, or shredded coconut. Keep it balanced so the mixture stays tacky but not overly sticky.
- Using a tablespoon or small cookie scoop, portion out the mixture. Roll between your palms into 1-inch balls, pressing firmly to compact the ingredients.
- Place each ball on the prepared parchment-lined sheet. Once all are formed, chill in the fridge for at least 30 minutes to firm up.
- Check the texture: they should be firm but still tender when bitten. If they’re too soft, return to fridge for 10 more minutes.
- For a finishing touch, roll some balls in shredded coconut or crushed nuts for extra flavor and visual appeal.
- Finish by storing in an airtight container in the fridge. They keep well for up to a week or can be frozen for longer storage.
- Before serving, let them sit at room temperature for a few minutes if chilled too hard. They should be slightly soft and melt-in-your-mouth.
Chill the fudge balls in the fridge for at least 30 minutes until firm. Serve directly from the fridge or at room temperature for a softer bite. Store in an airtight container for up to a week or freeze for longer storage.
How to Know It’s Done
- Balls are firm but tender when pressed.
- No excessive sticking to your hands — mixture should hold shape easily.
- Chilled for at least 30 minutes, they hold their shape well.
No-Bake Chocolate Fudge Balls
Ingredients
Equipment
Method
- Gather all your ingredients: oats, cocoa powder, honey, nut butter, vanilla, and any add-ins you like. Line a baking sheet with parchment paper to set the fudge balls.
- In a large mixing bowl, combine the oats and cocoa powder. Stir until evenly mixed, and your kitchen smells rich and chocolatey.
- Add honey, nut butter, and vanilla to the bowl. Use a spatula or spoon to fold everything together, pressing and mixing until the mixture becomes thick, sticky, and slightly glossy.
- If you’re using add-ins like dried fruit or nuts, fold them in now, evenly distributing throughout the mixture.
- Using a tablespoon or cookie scoop, portion out the mixture and gently roll it between your palms into 1-inch balls. The mixture should feel sticky but manageable, and you can wet your hands slightly if it's sticking too much.
- Place each ball onto the prepared parchment-lined sheet. Once all are formed, press them lightly to flatten slightly if desired.
- Chill the fudge balls in the refrigerator for at least 30 minutes. As they cool, they firm up, develop a chewy texture, and the flavors meld beautifully.
- After chilling, the fudge balls should hold their shape firmly but still feel soft and chewy when pressed. If you want, roll them in shredded coconut or chopped nuts for extra flavor and visual appeal.
- Enjoy your homemade no-bake fudge balls directly from the fridge or at room temperature for a softer bite. Store leftovers in an airtight container in the fridge for up to a week or freeze for longer storage.
Tips & Tricks for Best Results
- Bolded mini-head: Use a cold bowl to mix ingredients—keeps fats and nut butters from melting too quickly.
- Bolded mini-head: Slightly damp hands prevent sticking when rolling—keeps the mixture manageable and clean.
- Bolded mini-head: Chill the mixture for at least 30 minutes—this firms it up for easier rolling and better shape.
- Bolded mini-head: Add a pinch more oats if the mixture feels too sticky—this helps achieve the right firm yet tender texture.
- Bolded mini-head: Roll the balls in shredded coconut or nuts right after chilling—adds flavor, texture, and visual appeal.
- Bolded mini-head: Don’t overmix once you add in-ins—keeps the texture from becoming dense or tough.
- Bolded mini-head: Store in an airtight container in the fridge—keeps them fresh and firm for days.
Common mistakes and how to fix them
- FORGOT to chill: let the mixture rest 30 mins; sticky dough is key.
- DUMPED too much liquid: add more oats or cocoa to fix overly soft mixture.
- OVER-TORCHED the chocolate: melt gently over low heat, avoid direct heat.
- MISSED rolling firm: refrigerate balls 15 mins if they fall apart during coating.
Quick Fixes for Fudge Balls
- When mixture feels too sticky → Splash in a bit more oats to firm it up.
- If fudge balls crack while rolling → Chill the mixture 10 more minutes.
- DUMPED too much liquid → Add a spoonful of cocoa powder or oats to balance.
- When fudge balls fall apart → Refrigerate for 15 minutes before coating.
- Splash some vanilla or cinnamon → for an extra flavor boost if smell fades.
Prep, store, and reheat tips
- Prepare the mixture ahead by mixing all ingredients—keeps in the fridge for up to 24 hours, and the flavors meld beautifully overnight, enhancing that rich chocolate aroma.
- Form the fudge balls in advance, then store them in an airtight container in the fridge. They’ll stay good for up to a week, with the texture remaining tender and slightly chewy.
- For longer storage, freeze the balls in a single layer on a baking sheet, then transfer to a sealed bag. They’ll keep for up to 3 months, thawing quickly at room temp.
- Refrigerate or freeze the fudge balls, but avoid leaving them at room temperature for more than 2 hours to prevent spoilage. Reheat gently if desired—let sit at room temp for 5 minutes for optimal softness, or enjoy chilled for a firmer bite.
Top questions about fudge balls
1. How do I prevent the mixture from sticking to my hands?
Use a slightly chilled bowl to mix ingredients, which helps keep fats from melting too quickly and makes mixing easier.
2. Why is my mixture too sticky to roll?
Chill the mixture for at least 30 minutes; this firms it up, making it easier to roll into balls.
3. My fudge balls keep falling apart, what can I do?
Add a bit more oats or cocoa powder if the mixture is too soft or sticky, to help it hold shape.
4. How should I melt chocolate without it burning?
Melt chocolate gently over low heat or in short bursts in the microwave to avoid burning or seizing.
5. How long do fudge balls last in the fridge?
Store the fudge balls in an airtight container in the fridge for up to a week, or freeze for longer storage.
6. Can I serve these warm or at room temp?
For a softer, more melty texture, let the fudge balls sit at room temperature for a few minutes before serving.
7. Can I use a different sweetener?
Yes, you can swap honey for maple syrup or agave; expect a slight change in sweetness and sticky texture.
8. Are gluten-free oats okay to use?
Use gluten-free oats if needed; they won’t alter the texture much but ensure they’re not processed with gluten grains.
9. What add-ins can I include?
Dried fruits, nuts, or shredded coconut can be added for extra flavor and texture, but don’t overload so rolling stays easy.
10. Any tips for rolling the fudge balls smoothly?
Chill the mixture before rolling and coat the balls right after for best shape and appearance.
These fudge balls are a reminder that sometimes, the simplest ingredients can create the most satisfying treats. They’re perfect for when you need a quick, comforting bite without the fuss of baking. Plus, they’re a little messy, a little improvisational, but always honest and truly delightful.
Whenever I make them, I appreciate how versatile and forgiving they are—customize with your favorite mix-ins or coatings. They’re a small, sweet moment of ease, especially now when a little comfort feels more necessary than ever.
Welcome to Proud of This Mess – a place where food, creativity, and a little chaos come together on a plate!
I’m Emily Carter, the founder and heart behind this little corner of the internet. Born and raised in the United States, I’ve always had a passion for cooking, experimenting, and sharing the messy, delicious journey of creating food that brings people together. My philosophy is simple: good food doesn’t have to be perfect, and a little mess makes it memorable.
At Proud of This Mess, we believe that cooking is more than just following recipes—it’s about exploring flavors, discovering new techniques, and making every meal an experience worth savoring. From comforting weeknight dinners to indulgent desserts, our goal is to inspire home cooks of all levels to embrace the joy of food without fear of imperfection.