
This recipe is my go-to when I need a quick, satisfying treat that doesn’t require turning on the oven. It’s a messy, hands-on process that feels almost nostalgic — like childhood, but with a grown-up flavor punch. I love how the combination of creamy peanut butter and rich chocolate makes everything feel a little more manageable, even on chaotic days.
There’s something about the simplicity of mixing melted chocolate with peanut butter and dropping spoonfuls onto parchment that’s oddly soothing. It’s a bit of a therapy session, honestly, especially when I need a sweet fix without the fuss. Plus, the crunch from the peanuts makes every bite a little more special, a perfect balance between indulgence and practicality.
This recipe is my go-to for when I need a quick, satisfying treat that doesn’t require turning on the oven. It’s a messy, hands-on process that feels almost nostalgic — like childhood, but with a grown-up flavor punch. I love how the combination of creamy peanut butter and rich chocolate makes everything feel a little more manageable, even on chaotic days.
Nostalgic No-Bake Comforts
- Making these clusters always feels like a small act of rebellion—no oven needed, just good chocolate and peanut butter.
- I remember sneaking bites of the first batch as a kid, the sweet, salty crunch was pure magic then—and still is.
- There’s a weird comfort in the mess—spoons dripping, chocolate smudges—this recipe is my chaos and calm all in one.
- Every time I make these, I feel a little proud—simple ingredients, big flavor, no fuss, just pure joy.
The story behind this recipe
This recipe came about during a particularly hectic holiday season. I needed something quick, no-fuss, but still satisfying enough to share with friends. The first batch was a happy accident—melting chocolate over peanut butter, then dropping spoonfuls onto parchment, felt like a tiny act of rebellion against the oven’s tyranny. Now, it’s become my go-to for those moments when I crave a sweet, crunchy fix without the fuss.
Historical and Cultural Roots
- These clusters likely originated as a quick, no-fuss treat during wartime rationing when oven use was limited.
- In the 1950s, recipes like these gained popularity because they used pantry staples—chocolate, peanut butter, nuts—that were easy to keep on hand.
- The concept of combining chocolate and nuts in no-bake form dates back to traditional confections in Europe, adapted by home cooks in America for simplicity.
- Peanut butter’s rise in American kitchens in the early 20th century made these clusters a beloved, accessible indulgence.
Key Ingredients Breakdown
- Chocolate: I prefer a good quality semi-sweet bar—melts smoothly and has that rich, deep cocoa flavor. Swap for dark or milk, but watch the sweetness level.
- Peanut Butter: Creamy, natural peanut butter is my go-to—its ooziness and saltiness really shine here. Crunchy works too if you want more texture, just make sure it’s not too stiff.
- Nuts: Roasted peanuts make a noticeable difference—extra smoky and crunchy. Feel free to swap in almonds or cashews for a different vibe, but keep the crunch.
- Sweetener: I add a touch of honey or maple syrup for a subtle gloss and flavor boost. Skip or reduce if you prefer less sweetness or use a sugar-free alternative.
- Add-ins: Dried fruit or toasted coconut can add a chewy or tropical twist. Use sparingly so they don’t overpower the chocolate-peanut combo, but don’t skip the texture.
Spotlight on key ingredients
Chocolate:
- I prefer a good quality semi-sweet bar—melts smoothly and has that rich, deep cocoa flavor. Swap for dark or milk, but watch the sweetness level.
- Peanut Butter: Creamy, natural peanut butter is my go-to—its ooziness and saltiness really shine here. Crunchy works too if you want more texture, just make sure it’s not too stiff.
- Nuts: Roasted peanuts make a noticeable difference—extra smoky and crunchy. Feel free to swap in almonds or cashews for a different vibe, but keep the crunch.
Peanut Butter:
- Chocolate: I prefer a good quality semi-sweet bar—melts smoothly and has that rich, deep cocoa flavor. Swap for dark or milk, but watch the sweetness level.
- Creamy, natural peanut butter is my go-to—its ooziness and saltiness really shine here. Crunchy works too if you want more texture, just make sure it’s not too stiff.
- Nuts: Roasted peanuts make a noticeable difference—extra smoky and crunchy. Feel free to swap in almonds or cashews for a different vibe, but keep the crunch.
Notes for ingredient swaps
- Dairy-Free: Use coconut oil-based chocolate or vegan chocolate chips instead of regular chocolate. The flavor will be slightly richer and less creamy, but still deliciously satisfying.
- Nut-Free: Swap peanuts with roasted sunflower seeds or pumpkin seeds. You’ll get a similar crunch without the allergy worry, though the flavor will be more earthy and less salty.
- Sweetener: Replace honey or maple syrup with agave nectar or a sugar-free syrup. The sweetness level stays the same, but the texture might be a tad thinner or glossier.
- Peanut Butter: Use cashew or almond butter if you want a different nutty flavor or need a nut-free option. The consistency and melting behavior are similar, but the flavor shifts slightly.
- Nuts: If you prefer a softer texture, omit or reduce nuts, or try chopped dried fruit for a chewy contrast. The clusters will be less crunchy but still tasty.
- Add-ins: For a tropical twist, sprinkle in toasted coconut or dried pineapple bits. Keep in mind these can alter the overall texture and intensity of flavor.
- Chocolate Type: Dark, milk, or white chocolate can all work, depending on your mood. Each brings a different sweetness and creaminess, so choose based on your flavor preference.
Equipment & Tools
- Baking sheet with parchment: To hold clusters and prevent sticking.
- Microwave-safe bowl: For melting chocolate evenly.
- Spoon or small cookie scoop: To portion out the mixture neatly.
- Spatula or spoon: For mixing and folding ingredients.
Step-by-step guide to clusters
- Equipment & Tools: Prepare a baking sheet lined with parchment paper, a microwave-safe bowl for melting chocolate, a sturdy spoon or spatula, and a small cookie scoop or teaspoon for portioning.
- In the microwave-safe bowl, melt 2 cups of semi-sweet chocolate in 30-second bursts, stirring each time, until smooth and glossy. About 1.5 minutes total. If overcooked, chocolate can seize—stop and stir immediately.
- Add 1 cup of creamy peanut butter to the melted chocolate. Mix well until fully combined, creating a smooth, oozing mixture. The smell should be rich, chocolaty, with a hint of peanut.
- Fold in 1 cup of roasted peanuts or your choice of nuts, making sure they’re evenly coated. The mixture should be thick but still scoopable. If it’s too stiff, microwave it for 10 seconds and stir again.
- Using a small cookie scoop or teaspoon, drop spoonfuls of the mixture onto the prepared parchment. Space them about 2 inches apart. Press down slightly if you want a flatter cluster.
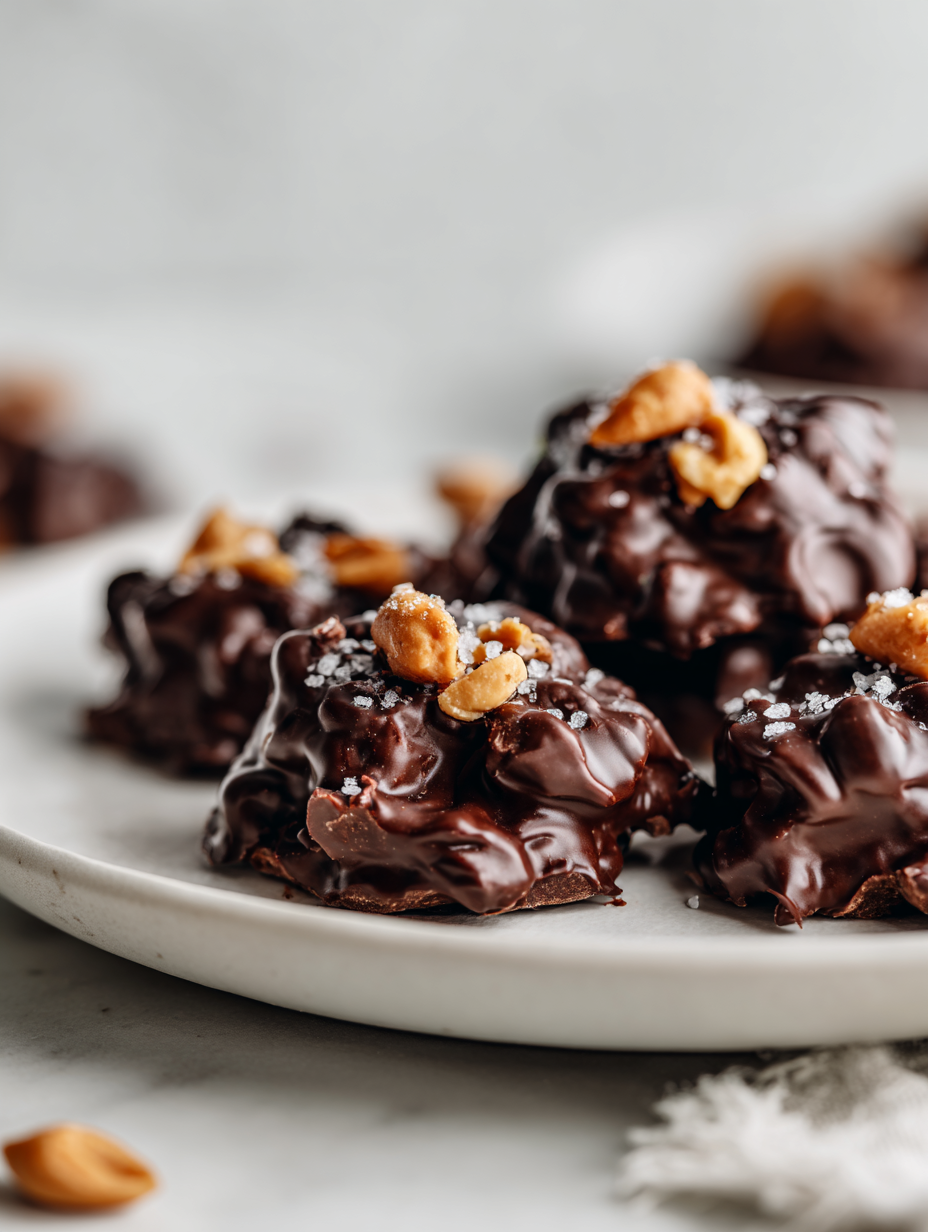
- Chill in the refrigerator for at least 30 minutes until firm. The clusters should be solid and slightly shiny, with a crackly surface. If they feel soft, give them a bit more chill.
- Optional: drizzle with extra melted chocolate or sprinkle a pinch of flaky sea salt on top before chilling for added flavor contrast.
- Resting & Finishing: Let the clusters sit in the fridge until completely set, about 30 minutes to an hour. Serve directly from the fridge for best texture. Store in an airtight container at room temp for up to a week or freeze for longer storage.
- Checkpoints & How to Know It’s Done: The clusters should be firm to the touch, shiny, with a crackly surface. When gently pressed, they shouldn’t be sticky or soft, indicating they’re fully set. The chocolate should have a rich aroma, and the texture should be crunchy yet melt-in-mouth.
Chill the clusters until firm, then serve directly from the fridge or at room temperature. For a prettier presentation, drizzle with more chocolate or sprinkle sea salt before serving. Keep in an airtight container, refrigerated for up to a week, or frozen for longer storage.
How to Know It’s Done
- Clusters are firm and shiny, with a crackly surface.
- Chocolate is fully melted and well mixed with peanut butter.
- Nuts are coated evenly and added before chilling.
No-Bake Peanut Chocolate Clusters
Ingredients
Equipment
Method
- Place the chopped chocolate in a microwave-safe bowl and microwave in 30-second bursts, stirring each time, until smooth and glossy. This should take about 1.5 minutes total.
- Add the peanut butter to the melted chocolate and stir until fully combined and silky. The mixture will be thick and shiny, with a rich aroma of chocolate and peanut.
- Gently fold in the roasted peanuts, ensuring they are evenly coated with the chocolate-peanut butter mixture. The mixture should be thick but scoopable.
- If desired, stir in honey or maple syrup for a touch of extra gloss and sweetness.
- Using a small cookie scoop or teaspoon, drop spoonfuls of the mixture onto the prepared parchment-lined baking sheet, spacing them about 2 inches apart. Gently press down if you prefer flatter clusters.
- Place the baking sheet in the refrigerator and chill for at least 30 minutes until the clusters are firm and shiny, with a crackly surface.
- Once set, optionally drizzle with extra melted chocolate or sprinkle a pinch of flaky sea salt on top for added flavor contrast.
- Serve the clusters chilled or at room temperature. Store leftovers in an airtight container in the fridge for up to a week or freeze for longer storage.
Pro Tips for Perfect Clusters
- Use high-quality chocolate for a smooth melt and richer flavor.
- Warm the peanut butter slightly to make mixing easier and more uniform.
- Fold in nuts gently to keep the clusters from breaking apart.
- Chill the clusters on a cooled surface to prevent melting or sticking.
- Add a pinch of sea salt on top before chilling for a flavor contrast.
- Use a small cookie scoop for uniform clusters and easy portioning.
- Store in an airtight container at room temperature or fridge, but avoid humidity.
Common mistakes and how to fix them
- FORGOT to temper chocolate → Use low heat or microwave in short bursts to avoid seizing.
- DUMPED nuts directly → Toast nuts first for extra flavor and crunch, then fold in.
- OVER-TORCHED chocolate → Remove from heat immediately if it starts smelling burnt or looks dull.
- MISSED chilling time → Let the clusters chill until fully firm; under-chilled clusters are too soft.
Quick fixes and pantry swaps
- When chocolate seizes → Splash in a teaspoon of vegetable oil and stir until smooth.
- If clusters stick to parchment → Patch with a gentle run of warm water underneath and lift edges.
- Over-chilled clusters → Warm slightly at room temp to soften without melting entirely.
- Dumped too many nuts → Swap in toasted coconut or dried fruit for quick flavor boost.
- When mixture is too thick → Microwave in 10-second bursts, stir, then resume scooping for a glossy finish.
Prep, store, and reheat tips
- Prepare the clusters up to the point of chilling; they can be stored in an airtight container in the fridge for up to a week. The chocolate stays glossy and the texture firm.
- If making ahead, keep in the fridge to prevent melting or softening, especially in warm climates. The cold enhances crunch and flavor intensity.
- For longer storage, freeze the clusters for up to a month. Let them thaw slightly at room temperature before serving—sensory note: the chocolate will re-crackle when you bite.
- Reheating isn’t necessary; they’re best served chilled or at room temperature. If you want a softer bite, briefly microwave (5 seconds) until just slightly warm, then let sit for a minute—watch for shiny gloss and a faint aroma of melted chocolate.
Top questions about peanut clusters
1. How do I melt chocolate without burning it?
You want the chocolate to be smooth and glossy, not grainy or dull. Melt it slowly and stir often.
2. What’s the best way to portion these clusters?
Use a sturdy spoon to scoop and drop the mixture onto parchment. It helps keep things neat and manageable.
3. How do I know when they’re ready?
Chill the clusters until they’re firm and shiny—about 30 minutes in the fridge. They should crack when you bite into them.
4. My chocolate seizes, what now?
If your chocolate gets seized or clumpy, add a teaspoon of vegetable oil or milk and stir until smooth again.
5. How should I store these once made?
Store in an airtight container in the fridge for up to a week or freeze for longer. Keep them cool and dry.
6. They’re soft and sticky, what can I do?
If clusters are too sticky, chill them longer or add a bit more melted chocolate to help set them firm.
7. Can I add other ingredients?
Add a pinch of flaky sea salt or a drizzle of extra melted chocolate on top for more flavor contrast.
8. Which nuts work best?
Use crunchy, roasted nuts for maximum flavor and crunch. Toast them beforehand for extra smoky aroma.
9. Can I make this dairy-free?
For a dairy-free version, use vegan chocolate and nut butters. The taste shifts slightly but remains rich.
10. Can I prepare these in advance?
Yes, you can make these ahead and refrigerate or freeze. They taste just as good when chilled or slightly thawed.
Making these clusters is a small act of rebellion—no oven, just good chocolate and peanut butter. Each batch feels like a tiny victory against busy days, with that familiar aroma of melting chocolate filling the kitchen. They’re a quick, satisfying fix that somehow tastes like a warm hug, even when made in a hurried moment.
Once they’re set, there’s a simple joy in breaking off that first crunchy bite, feeling the rich chocolate and salty peanut burst in your mouth. These little treats are more than just snacks—they’re a reminder that sometimes, the best things come together with minimal fuss and a lot of love.
Welcome to Proud of This Mess – a place where food, creativity, and a little chaos come together on a plate!
I’m Emily Carter, the founder and heart behind this little corner of the internet. Born and raised in the United States, I’ve always had a passion for cooking, experimenting, and sharing the messy, delicious journey of creating food that brings people together. My philosophy is simple: good food doesn’t have to be perfect, and a little mess makes it memorable.
At Proud of This Mess, we believe that cooking is more than just following recipes—it’s about exploring flavors, discovering new techniques, and making every meal an experience worth savoring. From comforting weeknight dinners to indulgent desserts, our goal is to inspire home cooks of all levels to embrace the joy of food without fear of imperfection.