
This no-bake chocolate oat slice is my go-to when I need something sweet and satisfying without turning on the oven. It’s like a little secret stash I keep in the fridge—crunchy, fudgy, and just enough chocolate to keep me happy. Honestly, it’s so easy I sometimes make it just for the heck of it, even if I’m not in a rush.
What I love most is how flexible it is—throw in nuts, dried fruit, or even a sprinkle of sea salt if you’re feeling fancy. It’s a recipe born from chaos mornings and lazy afternoons, a quick fix that feels indulgent but doesn’t steal hours from my day. It’s the kind of treat that makes you smile with each bite, no guilt involved.
This recipe is a secret weapon for busy mornings or unexpected guests, offering a quick fix that feels indulgent but is truly no fuss. It’s about the satisfaction of making something from minimal ingredients, with zero oven time, yet still feeling like you’ve pulled off a little treat. The beauty is in its simplicity, proving that sometimes, the easiest recipes are the most memorable.
The story behind this recipe
This recipe came about during a summer heatwave when I was craving something sweet but couldn’t bear the idea of turning on the oven. I remembered making a similar no-bake treat as a kid, sneaking bites of the sticky, chocolatey mixture while my mom wasn’t looking. That nostalgic memory stuck with me, and I started tinkering with it, adding oats and a dash of sea salt to balance the richness. Now, it’s my go-to for those lazy afternoons when I want something comforting without fuss.
Ingredient breakdown: key components
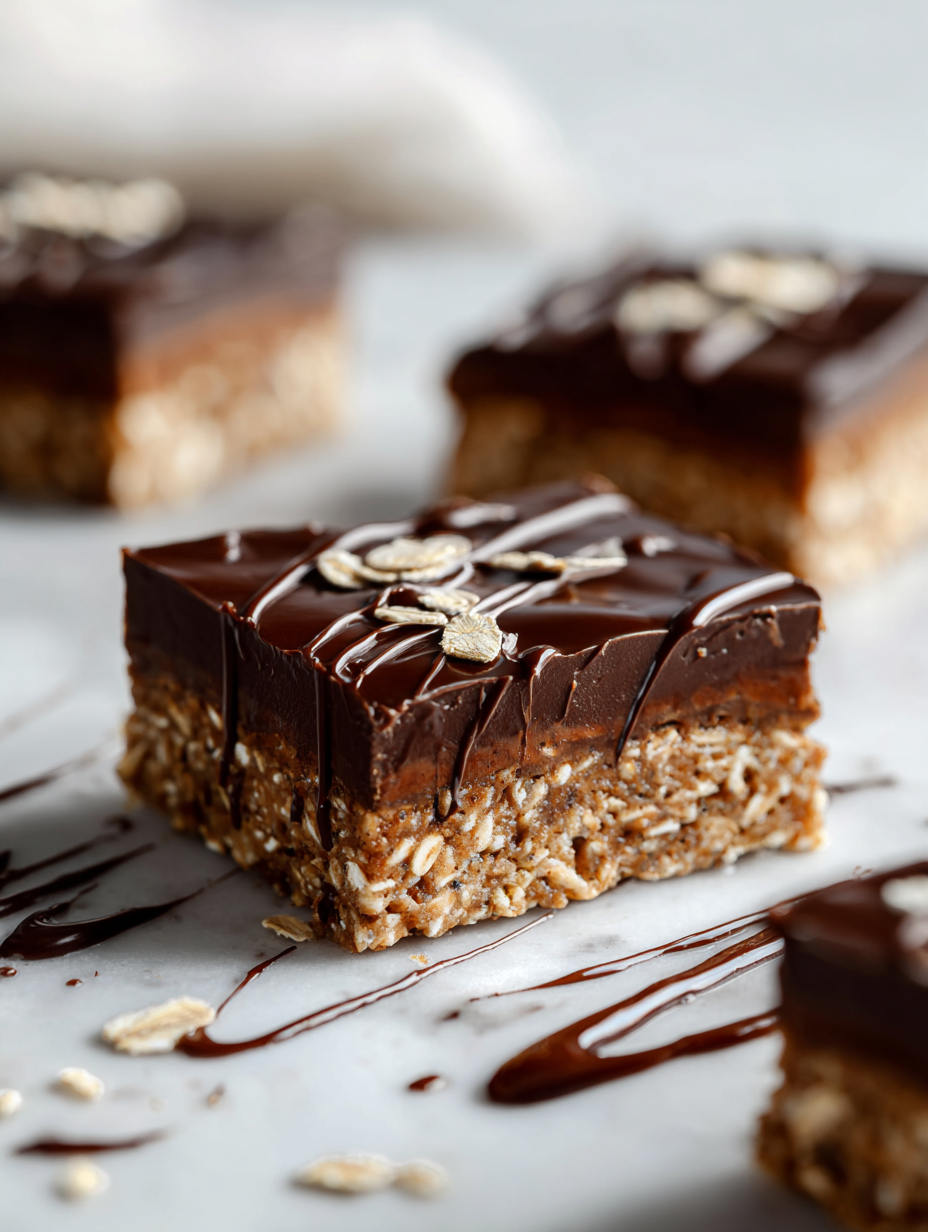
- Rolled oats: I like the texture of hearty oats, but if you want a smoother slice, try quick oats instead.
- Dark chocolate: The rich, slightly bitter flavor makes all the difference; swap it with milk chocolate if you prefer sweeter, but expect less depth.
- Butter: It’s the glue that holds everything together with a melt-in-your-mouth feel; for a dairy-free version, coconut oil works but will add a subtle coconut aroma.
- Honey or maple syrup: I find honey gives a sticky sweetness that balances the chocolate; maple syrup adds a caramel note—both tweak the flavor subtly.
- Vanilla extract: Just a splash enhances everything, making the chocolate pop; skip it if you’re out, but your slice might lack that warm depth.
- Pinch of sea salt: The salt amplifies the chocolate’s richness and adds a hint of brine; if you’re not a salt fan, reduce to a tiny pinch or skip entirely.
- Optional nuts or dried fruit: I love a handful of chopped almonds for crunch, but dried cranberries add a sweet-tart punch—go wild depending on your pantry.
Spotlight on key ingredients
Dark chocolate:
- I love the intense, slightly bitter flavor melting into the oats; it gives that deep, fudgy richness. Swap with milk chocolate for sweetness, but lose some depth.
- Rolled oats: They add chew and texture, absorbing flavors beautifully. Quick oats can be used for a softer bite, but the chew is less pronounced.
Sweeteners (honey/maple syrup):
- Butter: It’s the glue that makes everything silky and rich. When melted, it crackles slightly, releasing a nutty aroma. Coconut oil can replace it for dairy-free, but expect a coconut scent.
- Honey or maple syrup: They sweeten and bind the slice. Honey lends a sticky, floral sweetness, while maple adds caramel undertones—choose based on your flavor mood.
Notes for ingredient swaps
- Dairy-Free: Swap butter for coconut oil or vegan margarine. Expect a slightly coconutty aroma and a softer texture.
- Sweeteners: Use agave syrup or brown rice syrup instead of honey or maple. These will bring different subtle caramel notes.
- Chocolate: Substitute dark chocolate with dairy-free or white chocolate for different flavor profiles, but expect less depth or creaminess.
- Oats: Replace rolled oats with quick oats for quicker mixing, though the texture might be slightly finer and less chewy.
- Add-ins: Dried fruits or nuts can be swapped—try dried apricots or pepitas. They add flavor but can alter the crunch and sweetness.
- Salt: Use Himalayan pink salt or sea salt flakes for a different mineral note. Reducing salt keeps it milder, if preferred.
Equipment & Tools
- 8-inch square dish: Holds the mixture and shapes the slice.
- Saucepan: Melts butter gently without scorching.
- Mixing bowl: Combines wet and dry ingredients smoothly.
- Spatula: Stirs and presses mixture evenly.
- Parchment paper: Prevents sticking and aids removal.
- Sharp knife: Cuts clean slices once firm.
Step-by-step guide to no bake slice
- Gather all equipment: an 8-inch square dish, a saucepan, a mixing bowl, a spatula, and parchment paper. Line the dish with parchment for easy removal.
- Melt the butter: place 100g of butter in the saucepan over low heat. Stir gently until just melted, about 2 minutes. Watch for a faint shimmer and a nutty aroma.
- Mix the wet ingredients: in a large bowl, combine the melted butter with 2 tablespoons of honey or maple syrup, and 1 teaspoon vanilla extract. Whisk until smooth and integrated.
- Add dry ingredients: stir in 2 cups rolled oats, 1 cup chopped dark chocolate, and a pinch of sea salt. Mix thoroughly until the oats are evenly coated and the chocolate is distributed.
- Press the mixture: transfer to the prepared dish. Use the back of a spatula or your fingers to press evenly into the pan, creating a compact layer. Aim for a smooth top.
- Chill the slice: place in the fridge for at least 2 hours, or until firm. For quicker setting, pop it in the freezer for about 1 hour. It should feel solid and slightly crack when pressed.
- Cut into portions: remove from fridge, lift out using the parchment, and slice into squares or rectangles with a sharp knife. Clean the knife between cuts for cleaner edges.
- Finish and serve: present on a plate, maybe dust with a little cocoa powder or a sprinkle of sea salt. Serve chilled or at room temperature for a fudgy texture.
Chill the slice until completely firm, at least 2 hours. Slice with a sharp knife and serve directly from the fridge for a fudgy bite or at room temp for a softer texture. Store leftovers covered in the fridge for up to a week.
How to Know It’s Done
- Chocolate is shiny and slightly oozy when mixed in.
- Pressing the mixture should feel firm, not sticky or loose.
- The slice cracks slightly when cut, indicating it’s set properly.
No-Bake Chocolate Oat Slice
Ingredients
Equipment
Method
- Line your 8-inch square dish with parchment paper, leaving some overhang for easy removal.
- Place the butter in a saucepan over low heat and gently melt it, stirring occasionally until it just shimmers and smells nutty.
- Pour the melted butter into a large mixing bowl, then stir in the honey or maple syrup and vanilla extract until smooth and combined.
- Add the rolled oats to the wet mixture and stir well to coat every grain evenly, creating a sticky, textured base.
- Stir in the chopped dark chocolate and a pinch of sea salt, mixing until the chocolate is evenly distributed throughout the mixture.
- If using, fold in nuts or dried fruit to add extra crunch or sweetness.
- Transfer the mixture to the prepared dish and press it down firmly with the back of a spatula or your fingers, smoothing out the surface for an even layer.
- Place the dish in the fridge and chill for at least 2 hours, or until the slice is firm and set. For quicker results, freeze for about an hour.
- Once set, lift the slice out of the dish using the parchment paper overhang, and transfer to a cutting board.
- Use a sharp knife dipped in hot water to cut the slice into squares or rectangles, wiping the blade between cuts for clean edges.
- Serve your chocolate oat slice chilled or at room temperature, enjoying the chewy, fudgy texture with a burst of rich chocolate flavor.
Pro tips for perfect slices
- Bolded mini-head: Use high-quality dark chocolate for a rich, intense flavor that melts smoothly and coats the oats evenly.
- Bolded mini-head: Melt butter gently over low heat until just shimmering, then remove from heat to avoid searing and bitterness.
- Bolded mini-head: When pressing the mixture into the pan, use the back of a spatula or damp fingers for a compact, even layer.
- Bolded mini-head: Chill the slice in the fridge for at least 2 hours until it feels firm and slightly crackles when pressed, ensuring clean cuts.
- Bolded mini-head: For a cleaner slice, wipe your knife with a damp cloth between cuts to prevent sticking and uneven edges.
- Bolded mini-head: Add a pinch of sea salt just before pressing to enhance the chocolate’s richness and add a subtle briny note.
- Bolded mini-head: If the mixture feels too loose, sprinkle in a little more oats or press firmly to help it set better.
Common mistakes and how to fix them
- FORGOT to measure ingredients precisely? Use a scale for accuracy.
- DUMPED in too much chocolate? Reduce and add more oats to balance.
- OVER-TORCHED the mixture? Lower heat and stir constantly.
- FAILED to chill long enough? Extend chilling time until firm and set.
Quick fixes and pantry swaps
- If the mixture feels dry, splash in a little more melted butter or honey.
- When the slice cracks unevenly, patch with a small amount of warm chocolate and smooth over.
- Splash cold water on your knife if sticking occurs, for cleaner cuts.
- Shield the slice from humidity to prevent melting or sogginess; store in a cool place.
- When in doubt, rescue a sticky mixture by chilling it briefly before pressing into the pan.
Prep, store, and reheat tips
- Prepare the mixture up to a day in advance; keep it covered in the fridge to meld flavors and make pressing easier.
- Store the sliced pieces in an airtight container in the fridge for up to a week. The chocolate intensifies and the oats stay chewy.
- For longer storage, freeze slices wrapped tightly in plastic wrap and then in foil; they keep well for up to a month and retain their fudgy texture.
- Reheat slices briefly in the microwave (10-15 seconds) until just soft and warm, or serve chilled for a firmer bite. Expect the chocolate to soften and aroma to perk up.
Top questions about no bake slices
1. Can I substitute dark chocolate with milk chocolate?
Yes, you can use milk chocolate, but it will be sweeter and less bitter, changing the depth of flavor.
2. Can I make this dairy-free?
Absolutely. Coconut oil works well for a dairy-free version, but it adds a subtle coconut aroma and a softer texture.
3. How long should I chill the slice?
To keep it firm and clean-cut, chill the slice for at least 2 hours, or freeze for about an hour for quicker setting.
4. Can I add nuts or dried fruit?
Yes, adding nuts or dried fruit introduces crunch and sweetness, but too many can make it harder to slice cleanly.
5. How do I get clean slices?
Use a sharp knife dipped in hot water for clean cuts, and wipe it between slices to prevent sticking.
6. How should I store the slices?
Store leftovers in an airtight container in the fridge for up to a week, or freeze for longer storage.
7. What if the mixture is too crumbly?
If the mixture seems too dry, splash in a little more melted butter or honey to help it hold together better.
8. Can I use quick oats instead of rolled oats?
Using quick oats will give a softer, less chewy texture, while rolled oats provide more bite and hearty feel.
9. Should I add salt?
Adding a pinch of sea salt enhances the chocolate flavor and balances sweetness, but reduce if you prefer milder taste.
10. Can I reheat the slices?
You can reheat slices briefly in the microwave for a softer, fudgier experience or serve chilled for firmness.
This no-bake chocolate oat slice is more than just a quick treat; it’s a reminder that simplicity can deliver the most satisfying moments. The rich chocolate aroma and the chewy oats make it a comforting, familiar bite that feels indulgent without the fuss.
Whenever I need a little something sweet that I can whip up in minutes, this recipe is my go-to. It’s honest, unpolished, and always hits the spot—no oven required, just good ingredients and a bit of patience in the fridge.
Welcome to Proud of This Mess – a place where food, creativity, and a little chaos come together on a plate!
I’m Emily Carter, the founder and heart behind this little corner of the internet. Born and raised in the United States, I’ve always had a passion for cooking, experimenting, and sharing the messy, delicious journey of creating food that brings people together. My philosophy is simple: good food doesn’t have to be perfect, and a little mess makes it memorable.
At Proud of This Mess, we believe that cooking is more than just following recipes—it’s about exploring flavors, discovering new techniques, and making every meal an experience worth savoring. From comforting weeknight dinners to indulgent desserts, our goal is to inspire home cooks of all levels to embrace the joy of food without fear of imperfection.