
Making no-bake chocolate oatmeal cookies isn’t just about satisfying a sweet tooth; it’s about finding a quiet, rhythmic moment in a hectic day. The act of stirring thick, gooey chocolate mixture and shaping the cookies offers a meditative rhythm that grounds me, even when life feels chaotic. It’s a small act of mindfulness, a tiny pocket of calm I can hold onto.
There’s something almost ritualistic about the process—measuring, mixing, shaping—and that simplicity makes it feel special. These cookies don’t demand oven time or fancy ingredients, just good chocolate, oats, and a little patience. In a way, they remind me that sometimes, the best comfort comes from straightforward, honest kitchen moments that slow everything down for just a bit.
Focusing on the therapeutic act of making these cookies without any heat, highlighting the meditative rhythm of stirring and shaping, and how that process offers a quiet moment of mindfulness in busy lives.
Mindful Baking with No Heat
- Making these cookies feels like a small act of rebellion—no oven, no fuss, just pure chocolate and oats.
- I love how the process of stirring and shaping these cookies turns meditation into something delicious and tangible.
- There’s a nostalgic rush when I remember making these with my grandma, the kitchen filled with sweet, smoky chocolate scents.
- These cookies remind me that sometimes, the simplest ingredients create the most comforting moments in life.
The story behind this recipe
- This recipe came about during a chaotic week when I needed a quick fix for my chocolate cravings that wouldn’t add more heat to an already overheated kitchen. I remembered how my grandma used to toss oats and chocolate into a bowl, no fuss, no oven, just instant gratification. That simple act of mixing and shaping felt like a small rebellion against the hassle of baking, a way to keep my hands busy without turning on the stove.
- Over time, I found comfort in the meditative rhythm of stirring those gooey ingredients, shaping each cookie with my hands, feeling the cool oats and melting chocolate warm under my fingertips. It’s become a little ritual—an act of mindfulness I return to when I need a break from the noise. These cookies aren’t just a treat; they’re a reminder that sometimes, simple moments make the biggest impact.
- heading: ‘The story behind this recipe’
Historical & Cultural Trivia
- These cookies gained popularity during the Great Depression when oven availability was limited, making no-bake options a practical choice.
- They often appeared in community cookbooks as a quick, economical treat using pantry staples like oats and chocolate.
- Some believe the earliest versions originated in rural America, where resourcefulness turned simple ingredients into comforting desserts.
- The combination of chocolate and oats was thought to have been inspired by traditional rustic recipes for hearty, energy-boosting snacks.
- Over the years, variations have popped up worldwide, adapting local ingredients but keeping the core no-bake charm.
Ingredient breakdown: key components
- Chocolate: I prefer a good dark chocolate bar, it melts smoothly and gives that rich, slightly bitter punch. Swap with semi-sweet chips if you want a milder flavor.
- Oats: Old-fashioned rolled oats are my go-to—they hold shape well and add that satisfying chew. Steel-cut oats? Too hearty, skip them here.
- Butter: Unsalted butter makes the chocolate shine, but coconut oil can work if you want a dairy-free option—just keep an eye on the texture.
- Sweetener: Brown sugar adds a caramel note, but honey or maple syrup can be used for a slightly different, more floral sweetness. Adjust for moisture.
- Vanilla: A splash of pure vanilla extract elevates everything, but almond extract can add a deeper, nutty aroma if you’re feeling adventurous.
- Cocoa Powder: Unsweetened is best for that deep chocolate flavor. Dutch-processed? It’s a bit milder, so use less if you mix with regular cocoa.
- Add-ins: Nuts, dried fruit, or coconut flakes—whatever you love. Just stir them in last, but don’t overload so the cookies stay firm.
Spotlight on key ingredients
Chocolate:
- I prefer a good dark chocolate bar, it melts smoothly and gives that rich, slightly bitter punch. Swap with semi-sweet chips if you want a milder flavor.
- Oats: Old-fashioned rolled oats are my go-to—they hold shape well and add that satisfying chew. Steel-cut oats? Too hearty, skip them here.
- Butter: Unsalted butter makes the chocolate shine, but coconut oil can work if you want a dairy-free option—just keep an eye on the texture.
Oats:
- Old-fashioned rolled oats are my go-to—they hold shape well and add that satisfying chew. Steel-cut oats? Too hearty, skip them here.
- Chocolate: I prefer a good dark chocolate bar, it melts smoothly and gives that rich, slightly bitter punch. Swap with semi-sweet chips if you want a milder flavor.
Notes for ingredient swaps
- Dairy-Free: Replace butter with coconut oil or vegan butter. Expect a slightly different richness and a hint of coconut aroma.
- Sweetener: Swap brown sugar with honey or maple syrup. This will add a floral or caramel note and might make the mixture a bit softer.
- Chocolate: Use dairy-free dark chocolate or cacao nibs. They melt similarly but may alter the intensity of chocolate flavor.
- Oats: Try quick oats for a softer texture or gluten-free oats if needed. Steel-cut oats are too hearty here—skip them.
- Add-ins: Nuts, dried fruit, or coconut flakes work well. Adjust quantity to prevent cookies from becoming too crumbly or overly dense.
- Cocoa Powder: Dutch-processed cocoa for a milder, less acidic flavor; regular cocoa for a more robust chocolate punch.
- Flavor Extracts: Almond or peppermint can replace vanilla for a different aromatic profile—use sparingly to avoid overpowering.
Equipment & Tools
- Medium saucepan: For melting and cooking the chocolate mixture.
- Spoon or scoop: For portioning and shaping the cookies.
- Parchment-lined baking sheet: To prevent sticking and for easy cleanup.
- Spatula or mixing spoon: For stirring ingredients thoroughly.
Step-by-step guide to no bake cookies
- Gather your equipment: a medium saucepan, a spoon or spatula, a baking sheet lined with parchment, and a scoop or spoon for shaping. Purpose: tools for melting, mixing, shaping, and setting the cookies.
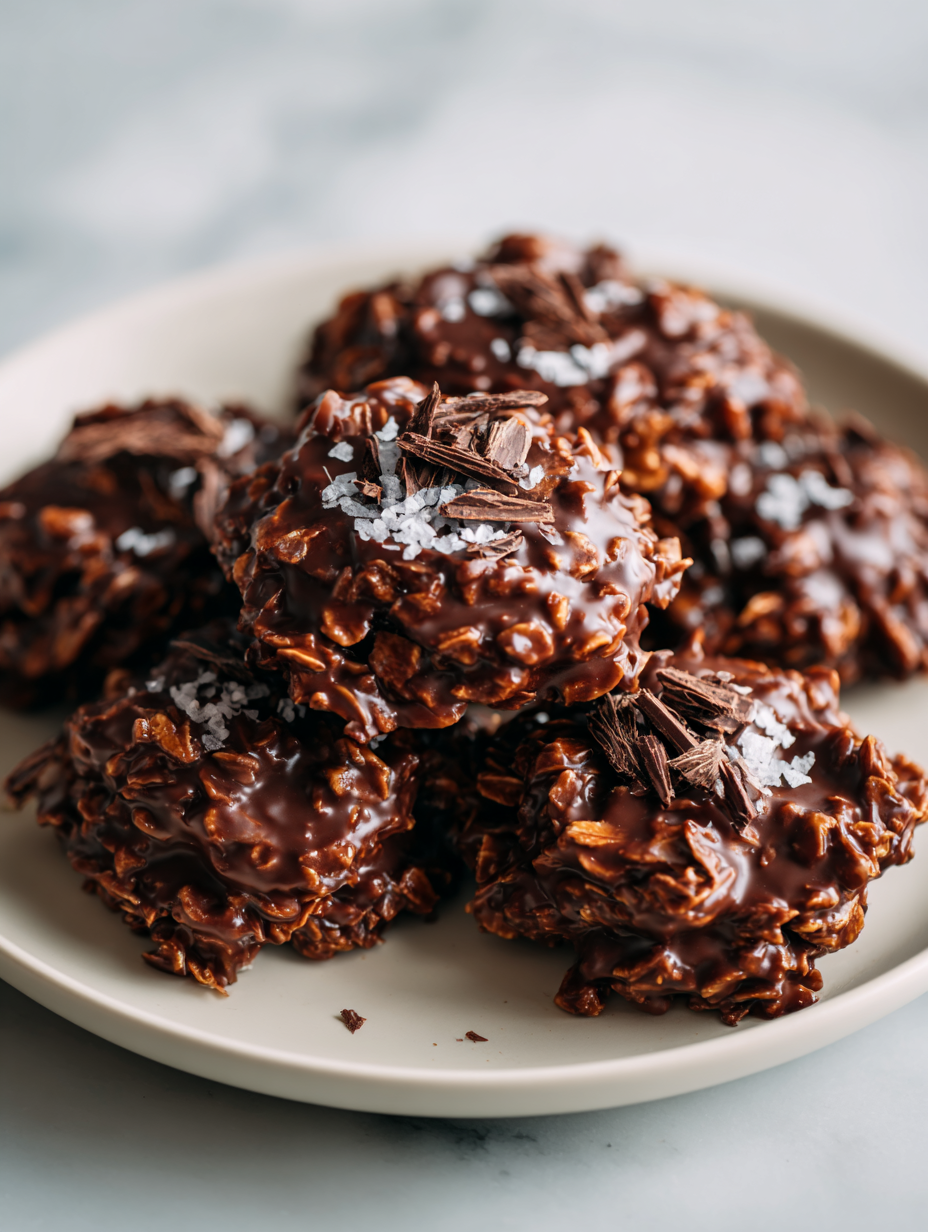
- Combine 1/2 cup (115g) unsalted butter, 2 cups (150g) sugar, 1/2 cup (45g) unsweetened cocoa powder, and 1/2 cup (120ml) milk in the saucepan. Heat over medium heat, stirring constantly. Wait until the mixture comes to a rolling boil, about 2-3 minutes. This is when it turns glossy and thickens.
- Remove from heat and stir in 2 teaspoons vanilla extract. Add 3 cups (240g) rolled oats and 1 cup (150g) semi-sweet chocolate chips. Mix until fully combined and the oats are coated in the chocolate mixture. The mixture should be thick and sticky, with a rich aroma of cocoa and vanilla.
- Using a spoon or scoop, portion the mixture onto the prepared baking sheet. Shape into cookies with your hands if desired, pressing lightly to flatten. Aim for uniform size for even setting. The cookies should hold their shape but still be soft to touch.
- Let the cookies rest at room temperature for at least 30 minutes, or until they set and firm up. If you’re in a rush, pop them in the fridge for 15-20 minutes. They should feel firm and no longer sticky when ready to eat.
- Once set, serve immediately or store in an airtight container. These cookies are best enjoyed within 3-4 days for optimal freshness and chewiness. Reheat briefly if you want the chocolate to shimmer, about 10 seconds in the microwave.
- For a firmer texture, refrigerate for an hour or until completely chilled. For softer cookies, serve at room temperature. The chocolate should be glossy, and the oats should have a chewy, hearty bite. The smell should be warm and inviting—rich cocoa and vanilla.
Let the cookies cool at room temperature until set, about 30 minutes. Store in an airtight container for up to 4 days. For best texture, serve at room temp or chilled as preferred.
How to Know It’s Done
- Chocolate mixture is glossy and thickens after boiling.
- Cookies hold shape when portioned and pressed lightly.
- Cookies are firm and no longer sticky after resting.
No-Bake Chocolate Oat Cookies
Ingredients
Equipment
Method
- Gather your tools: a medium saucepan, a spoon or spatula, and a parchment-lined baking sheet.
- Combine the butter, sugar, cocoa powder, and milk in the saucepan over medium heat. Stir constantly with your spatula until the mixture begins to bubble and turn glossy, about 2-3 minutes.
- Remove the saucepan from heat and stir in the vanilla extract. The mixture will be shiny and thicken slightly as it cools just a bit.
- Quickly fold in the rolled oats and chocolate chips until evenly coated and the mixture is thick and sticky. The oats should be well combined and the chocolate starting to melt into the mixture.
- Using a spoon or a small scoop, portion the mixture onto your prepared baking sheet, shaping each into a rough cookie shape. Press lightly to flatten if desired.
- Let the cookies sit at room temperature for at least 30 minutes to set and firm up, or refrigerate for 15-20 minutes for quicker results. They should be firm but chewy when ready.
- Once set, serve immediately or store in an airtight container at room temperature for up to 3 days. The cookies will have a fudgy, chewy texture with a deep chocolate aroma.
Notes
Pro tips for perfect cookies
- Use high-quality chocolate: The better the chocolate, the richer and smoother your cookies will be. Melts evenly and enhances flavor.
- Measure oats accurately: Using old-fashioned rolled oats ensures the right chew and firmness. Too fine or quick oats change the texture.
- Control the boil time: Boil the mixture for exactly 2-3 minutes to develop the glossy, thick consistency without burning the chocolate.
- Chill before shaping: Let the mixture cool slightly to avoid sticky fingers and create firm, well-formed cookies. A brief fridge rest helps.
- Avoid over-mixing: Mix just until ingredients are combined; over-stirring can make the cookies dense or cause the chocolate to seize.
- Use parchment paper: Lining your sheet prevents sticking and makes cleanup easier, ensuring cookies hold their shape when cooled.
- Adjust sweetness: Taste the mixture before spooning out; if it’s too sweet or bitter, tweak with a pinch more vanilla or a dash of salt.
Common mistakes and how to fix them
- FORGOT to measure ingredients precisely → Use a scale for accuracy.
- DUMPED in all ingredients at once → Add ingredients gradually for even mixing.
- OVER-TORCHED the mixture → Remove from heat immediately to prevent bitterness.
- MISSED the cooling step → Let the mixture cool slightly before shaping to avoid sticky fingers.
Quick fixes and pantry swaps
- If mixture is too sticky → Splash in a little more oats to absorb excess moisture.
- When cookies crackle and shimmer → Shield with a light hand of gentle pressing to prevent breaking.
- Splash cold water on your spoon → Rescue sticky chocolate from sticking excessively.
- When ingredients seem dull → Swap semi-sweet chips with a handful of chopped dark chocolate for richer flavor.
- When in doubt, refrigerate briefly → Chill for 5 minutes to firm up the mixture before shaping.
Prep, store, and reheat tips
- You can prepare the chocolate mixture a day in advance; keep it in an airtight container in the fridge. Expect a firmer texture, but the chocolate flavor will deepen overnight.
- Cookies should be stored in an airtight container at room temperature for up to 3 days. The oats will soften slightly, and the chocolate aroma becomes even richer.
- For longer storage, refrigerate for up to 5 days or freeze in a sealed container for up to a month. When ready, let them thaw at room temperature for 10 minutes to regain softness.
- Reheat cookies briefly in the microwave—about 10 seconds—until just warm. The chocolate should shimmer and the oats soften slightly, but avoid overheating to prevent melting.
Top questions about no bake cookies
1. How long do no bake chocolate oat cookies last?
You can keep these cookies in an airtight container at room temperature for up to 3 days. They tend to soften and become more flavorful over time.
2. Can I make these cookies dairy-free?
Yes, you can substitute coconut oil for butter. It might give the cookies a slight coconut aroma and a softer texture.
3. Can I use quick oats instead of rolled oats?
Using quick oats will make the cookies softer and less chewy. Old-fashioned oats give that hearty, chewy bite.
4. How do I prevent the mixture from being too sticky?
Chilling the mixture in the fridge for 15-20 minutes helps it firm up, making shaping easier and cookies more stable.
5. What if my mixture is too runny or too thick?
If the mixture is too runny, add a bit more oats. If it’s too thick, stir in a splash of milk or a little more melted chocolate.
6. How do I avoid over-mixing the ingredients?
Stirring the mixture just until combined prevents the chocolate from seizing and keeps the cookies tender.
7. Can I add other ingredients?
You can add nuts, dried fruit, or coconut flakes. Just stir them in at the end, but don’t overload for best shape.
8. Can I reheat these cookies?
These cookies are best enjoyed within 3-4 days for optimal freshness. Reheat briefly if you want the chocolate to shimmer.
9. Can I freeze the cookies?
Yes, you can freeze the shaped cookies in an airtight container for up to a month. Thaw at room temperature before eating.
10. What if my mixture is too hot or melts too fast?
If the mixture is too hot, it can cause the chocolate to seize or the oats to become mushy. Let it cool slightly before shaping.
These cookies are more than just a treat; they’re a quiet ritual that grounds me in busy days. The simple act of stirring, shaping, and waiting for that firm set feels like a small moment of mindfulness I cherish.
In a season filled with hectic schedules and fleeting calm, these no-bake cookies offer a tangible reminder that some of the best comforts come from honest, straightforward kitchen moments. They’re imperfect, cozy, and just right for right now.
Welcome to Proud of This Mess – a place where food, creativity, and a little chaos come together on a plate!
I’m Emily Carter, the founder and heart behind this little corner of the internet. Born and raised in the United States, I’ve always had a passion for cooking, experimenting, and sharing the messy, delicious journey of creating food that brings people together. My philosophy is simple: good food doesn’t have to be perfect, and a little mess makes it memorable.
At Proud of This Mess, we believe that cooking is more than just following recipes—it’s about exploring flavors, discovering new techniques, and making every meal an experience worth savoring. From comforting weeknight dinners to indulgent desserts, our goal is to inspire home cooks of all levels to embrace the joy of food without fear of imperfection.