
These no bake chocolate coconut cookies are like a warm hug from childhood, wrapped in a simple, no-fuss recipe. The best part? No oven needed, just a bit of stovetop magic and patience. They’re perfect for those days when you want something sweet but don’t want to turn on the heat.
I remember making these with my grandma—the smell of melting chocolate and toasted coconut filling the kitchen. It’s a recipe that brings back chaos and comfort all at once, especially when the kids are bouncing around and you need something quick and satisfying. It’s honest, straightforward, and a little bit nostalgic, just like a good memory in cookie form.
Focusing on the nostalgic comfort of childhood treats, this recipe is about reclaiming simple joy with minimal effort, perfect for busy days or when you crave that familiar, indulgent bite without turning on the oven.
A nostalgic shortcut for sweet comfort
- Making these cookies always takes me back to lazy Saturday afternoons with my siblings, laughter filling the air.
- I love how quickly I can whip up these treats when friends drop by unexpectedly, and the smell of chocolate instantly wins them over.
- There’s a quiet pride in knowing I can satisfy that sweet tooth with just a few simple ingredients and no oven fuss.
- Every batch reminds me of my first apartment—learning to cook with whatever was in the pantry, these became my go-to comfort.
- Sometimes, I sneak an extra handful of toasted coconut just because it adds that perfect, slightly smoky crunch.
The story behind this recipe
These cookies first came about during a hectic summer when I needed something quick, sweet, and satisfying without firing up the oven. I was also craving that deep, toasted coconut flavor that reminds me of tropical vacations and lazy afternoons. It’s a recipe that started as a necessity but turned into a little tradition I keep coming back to when I want comfort fast.
Historical & Cultural Snippet
- These cookies likely originated in the mid-20th century, as a quick alternative to traditional baked treats, especially during wartime shortages.
- The no-bake method became popular in homes without reliable ovens, making sweet snacks accessible during busy or resource-scarce times.
- Coconut and chocolate combinations have long been favored in tropical regions, blending local flavors with Western convenience.
- This recipe is a modern revival of older no-bake confections, adapted for today’s busy lifestyles and minimal kitchen tools.
- Historically, recipes like these were shared among communities as a simple, portable treat, perfect for picnics and potlucks.
Key ingredients and tips
- Coconut flakes: I prefer toasted for that smoky, nutty aroma that really makes these cookies pop. If you don’t toast, they’ll be softer but still flavorful.
- Dark chocolate: I use semi-sweet because it balances sweetness without overpowering the coconut. Swap with milk chocolate for a sweeter, creamier taste—just be aware it melts faster.
- Sweetened condensed milk: It’s the glue that holds everything together, adding richness and chewiness. For a dairy-free version, try coconut cream—less sweet, but still luscious.
- Butter: I melt it gently to help the ingredients combine smoothly. Skip or reduce if you want a slightly firmer cookie, but it might be less tender.
- Vanilla extract: Adds depth and warmth—don’t skip it. You can swap with vanilla bean paste for a more intense, aromatic flavor.
- Salt: Just a pinch enhances all the sweet and chocolate notes. If you love a salty-sweet combo, sprinkle a tiny bit more, but be careful not to overdo it.
- Optional add-ins: A handful of chopped nuts or dried cherries can add crunch and burst of flavor—experiment to make it your own.
Spotlight on key ingredients
Coconut flakes:
- I prefer toasted for that smoky, nutty aroma that really makes these cookies pop. If you don’t toast, they’ll be softer but still flavorful.
- Sweetened shredded coconut: It provides that chewy, slightly crunchy texture and a natural sweetness that’s hard to beat. Skip or reduce if you want a milder coconut flavor.
Dark chocolate:
- I use semi-sweet because it balances sweetness without overpowering the coconut. Swap with milk chocolate for a creamier, sweeter taste—just watch it melt faster and be careful not to scorch.
- Chocolate: Look for good-quality, melting chocolate or chips. The better the chocolate, the richer and more glossy your final cookies will be.
Notes for ingredient swaps
- Coconut flakes: I prefer toasted for that smoky, nutty aroma that really makes these cookies pop. If you don’t toast, they’ll be softer but still flavorful.
- Dark chocolate: I use semi-sweet because it balances sweetness without overpowering the coconut. Swap with milk chocolate for a sweeter, creamier taste—just be aware it melts faster.
- Sweetened condensed milk: It’s the glue that holds everything together, adding richness and chewiness. For a dairy-free version, try coconut cream—less sweet, but still luscious.
- Butter: I melt it gently to help the ingredients combine smoothly. Skip or reduce if you want a slightly firmer cookie, but it might be less tender.
- Vanilla extract: Adds depth and warmth—don’t skip it. You can swap with vanilla bean paste for a more intense, aromatic flavor.
- Salt: Just a pinch enhances all the sweet and chocolate notes. If you love a salty-sweet combo, sprinkle a tiny bit more, but be careful not to overdo it.
- Optional add-ins: A handful of chopped nuts or dried cherries can add crunch and burst of flavor—experiment to make it your own.
Equipment & Tools
- Medium saucepan: Melts chocolate and butter gently
- Mixing bowl: Combines ingredients evenly
- Spoon or cookie scoop: Portioning cookies
- Parchment paper: Prevents sticking and makes cleanup easy
- Refrigerator: Cooling and setting cookies
Step-by-step guide to no bake cookies
- Gather all your ingredients and equipment. You’ll need a medium saucepan, mixing bowl, and spoon. No oven required, so keep everything handy.
- In the saucepan over low heat (about 120°C / 250°F), melt the butter gently. As it starts to shimmer, add the chopped dark chocolate. Stir until smooth and glossy—about 2 minutes. Smell the rich cocoa aroma filling your kitchen.
- Remove the saucepan from heat. Stir in the sweetened condensed milk and vanilla extract until well combined. The mixture should be thick and shiny, like a glossy caramel.
- Add the toasted coconut flakes and a pinch of salt. Mix until evenly coated and the coconut is visibly glossy with chocolate. If it looks too dry, a splash more condensed milk helps it come together.
- Line a baking sheet with parchment paper. Using a tablespoon or cookie scoop, drop spoonfuls of the mixture onto the sheet. Flatten each slightly with the back of the spoon or your fingers—aim for about 2 inches diameter.
- Place the tray in the fridge for at least 30 minutes. During this time, the cookies firm up and the flavors meld. The coconut will toast slightly more as it chills, adding a smoky crunch.
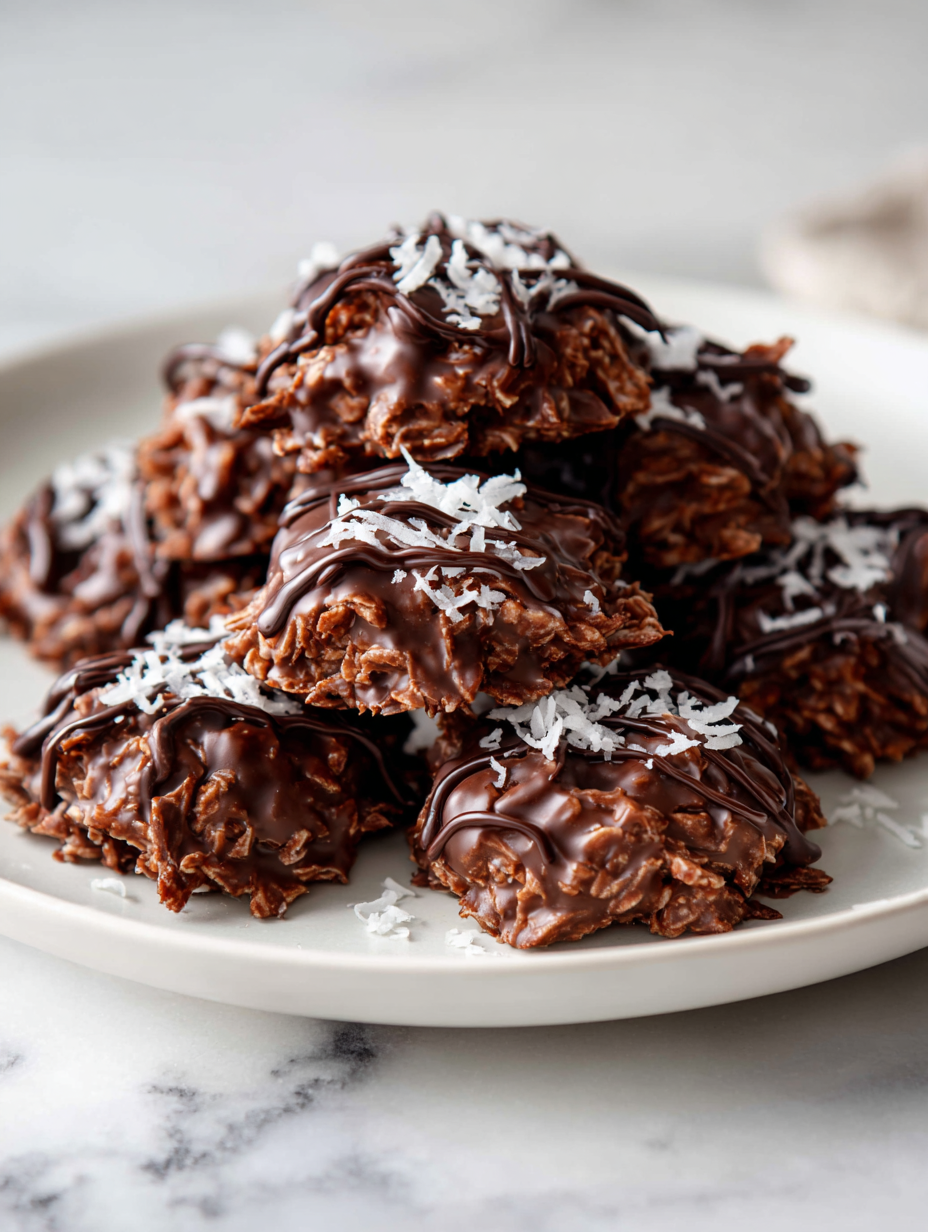
- Check the cookies: they should be firm to the touch, hold their shape, and have a crackly surface. The chocolate should be set but still slightly chewy when bitten into.
- Once firm, transfer to a plate or container. Keep refrigerated—these cookies are best enjoyed chilled, with that initial crunch giving way to a chewy, chocolatey center.
Let the cookies rest in the fridge until firm, about 30 minutes. Serve directly from the fridge for best texture. Store leftovers in an airtight container in the fridge for up to a week.
How to Know It’s Done
- Chocolate is glossy and fully melted, with no lumps.
- Mixture is thick enough to hold shape when scooped.
- Cookies are firm and set after refrigeration, with a shiny, crackly surface.
No Bake Chocolate Coconut Cookies
Ingredients
Equipment
Method
- Begin by toasting the coconut flakes in a dry skillet over medium heat, stirring frequently until golden and fragrant. Set aside to cool.
- In a medium saucepan, melt the butter over low heat until it starts to shimmer and become smooth.
- Add the dark chocolate chips to the melted butter, stirring constantly until fully melted and glossy, about 2 minutes. Smell the rich cocoa aroma filling the kitchen.
- Remove the saucepan from heat and stir in the sweetened condensed milk along with the vanilla extract until the mixture is smooth and thick.
- Add the toasted coconut flakes and a pinch of salt to the chocolate mixture, folding gently until everything is evenly coated and glossy.
- Line a baking sheet with parchment paper. Using a spoon or cookie scoop, drop spoonfuls of the mixture onto the sheet, pressing them down slightly to shape them into disks about 2 inches wide.
- Place the tray in the refrigerator and chill for at least 30 minutes until the cookies are firm and set, with a shiny, crackly surface.
- Once set, remove the cookies from the fridge and serve directly, enjoying their chewy texture and rich coconut-chocolate flavor.
Pro tips for perfect cookies
- Bolded mini-head: Use low heat → Melting chocolate slowly prevents burning and keeps it glossy.
- Bolded mini-head: Toast coconut → Achieve smoky, nutty aroma that enhances flavor and texture.
- Bolded mini-head: Chill thoroughly → Refrigerate until firm for clean, crackly surface and easy handling.
- Bolded mini-head: Measure accurately → Ensures the right consistency; too much condensed milk makes it sticky.
- Bolded mini-head: Mix quickly → Combine ingredients swiftly for even coating and smooth texture.
- Bolded mini-head: Flatten cookies → Slightly pressing down helps them set evenly and creates a uniform shape.
- Bolded mini-head: Use parchment → Prevents sticking and makes cleanup effortless, keeping cookies intact.
Common mistakes and how to fix them
- FORGOT to toast coconut → Toast coconut until golden for smoky flavor.
- DUMPED too much salt → Use sparingly; taste and adjust for balance.
- OVER-TORCHED chocolate → Melt on low heat, stir constantly to prevent burning.
- SKIPPED refrigerating step → Chill until firm for proper texture and shape.
Quick kitchen fixes
- When mixture looks too dry → Splash in a tiny bit of milk, stir until glossy.
- If cookies crack when flattening → Dampen fingers slightly, then press gently.
- Splash hot water on chocolate to loosen it if it seizes → Stir until smooth again.
- Dumped too much salt → Rinse the mixture briefly under cold water, then re-mix with less salt.
- When coconut isn’t toasted enough → Toast a few extra minutes, then fold in for smoky crunch.
Prep, store, and reheat tips
- You can prepare the mixture a day ahead; keep it covered in the fridge to prevent drying out, and the flavors will meld beautifully.
- Store the assembled cookies in an airtight container in the fridge for up to a week. The coconut keeps its chewy texture, and the chocolate remains glossy.
- For best texture, let cookies come to room temperature for about 10 minutes before serving—sensory-wise, they should be slightly softer, with a rich aroma.
- Reheat gently in the fridge for 10 seconds in the microwave if you prefer softer, slightly melty cookies. Watch for melting chocolate and toasted coconut aroma.
Top questions about no bake cookies
1. How long do no bake chocolate coconut cookies last?
You can store these cookies in an airtight container in the fridge for up to a week. They stay chewy and chocolatey, just keep them chilled before serving for the best texture.
2. Can I make these vegan?
Yes, you can swap the butter for coconut oil or vegan margarine. The texture might be slightly different, but they will still set well and taste good.
3. My mixture is too sticky or dry, what do I do?
If your mixture seems too dry, add a splash of milk or coconut cream to loosen it up. If it’s too sticky, a little more shredded coconut helps firm it up.
4. Can I use different types of chocolate?
Using semi-sweet chocolate balances richness and sweetness. For more intense flavor, try dark chocolate; for milder, milk chocolate works too.
5. Should I toast the coconut?
Yes, toasting the coconut flakes adds a smoky, nutty aroma that enhances the flavor and adds a bit of crunch. Skip if you prefer a softer coconut texture.
6. How do I know when the cookies are ready?
Chill the cookies until firm, about 30 minutes in the fridge. They should be crackly on top and hold their shape when gently pressed.
7. Can I make these with unsweetened coconut?
You can substitute sweetened shredded coconut with unsweetened if you want less sweetness. Just add a bit more condensed milk or honey to balance the flavor.
8. How do I melt chocolate without burning it?
To prevent melting or seizing chocolate, melt it on low heat and stir constantly. Using good-quality melting chocolate also helps.
9. Can I prepare these in advance?
You can prepare the mixture a day ahead, keep it covered in the fridge, then scoop and chill the cookies when ready to serve.
10. What if my mixture is too stiff or too soft?
When mixture is too stiff, add a tiny splash of milk. When too soft, chill it longer or add more coconut flakes for firmness.
These cookies are a quick, honest way to satisfy a sweet tooth without fuss or oven time. They bring back memories of lazy afternoons and simple pleasures, especially when you need something comforting fast. Sometimes, the best recipes are the ones you can make with your hands and a bit of patience, letting flavors meld naturally in the fridge.
In the end, it’s about those small moments—smelling toasted coconut, hearing that satisfying crack when you bite in—that make this recipe worth keeping around. No matter how hectic life gets, these cookies offer a little bit of nostalgic calm, one chilled bite at a time. Nothing fancy, just honest, good stuff in every batch.
Welcome to Proud of This Mess – a place where food, creativity, and a little chaos come together on a plate!
I’m Emily Carter, the founder and heart behind this little corner of the internet. Born and raised in the United States, I’ve always had a passion for cooking, experimenting, and sharing the messy, delicious journey of creating food that brings people together. My philosophy is simple: good food doesn’t have to be perfect, and a little mess makes it memorable.
At Proud of This Mess, we believe that cooking is more than just following recipes—it’s about exploring flavors, discovering new techniques, and making every meal an experience worth savoring. From comforting weeknight dinners to indulgent desserts, our goal is to inspire home cooks of all levels to embrace the joy of food without fear of imperfection.