
This no-bake chocolate coconut bar recipe is a throwback to lazy afternoons spent in the kitchen, where the only tools needed are a bowl and a spoon. I love how simple ingredients like coconut, chocolate, and a touch of salt come together without turning on the oven, making it an almost instant treat. It’s honest, messy, and perfect for when you crave something sweet but don’t want to fuss.
What makes this recipe special isn’t just the ease, but how it taps into those nostalgic moments of childhood—sticky fingers, the smell of melting chocolate, and the satisfying crunch of toasted coconut. It’s a recipe I reach for when I want a quick fix that feels indulgent yet isn’t weighed down by complicated steps. Plus, it’s flexible enough to tweak with whatever bits you have lying around.
This recipe is inspired by childhood days when my hands would get sticky with sweet coconut and chocolate, and I’d feel a rush of comfort from something so simple yet indulgent. It’s about reclaiming those messy, honest moments in the kitchen—no oven required, just good ingredients and a bit of patience.
The story behind this recipe
- This recipe came about on a lazy afternoon when I was rummaging through my pantry, looking for something sweet but quick. I remember the smell of toasted coconut filling the kitchen, a little smoky and warm, triggering memories of my grandmother’s treats. I wanted something I could whip up without turning on the oven, just using what I had. It’s become a go-to when I need a fuss-free dessert that still feels indulgent.
- I once made these for a last-minute gathering, and they vanished faster than I expected—proof it’s a crowd-pleaser.
- The idea struck me after a failed attempt at a layered cake—sometimes simplicity wins, especially when it’s rich and chewy like this.
Ingredient breakdown: key components
- Coconut flakes: I prefer toasted for a richer, slightly smoky flavor and crunch; skip this step if you want softer bars.
- Dark chocolate: I love using 70% cocoa for depth, but milk chocolate makes it sweeter and milder—choose what suits your mood.
- Coconut oil: Adds shine and helps melt the chocolate smoothly; if you skip it, the chocolate might be thicker and less glossy.
- Sweetener: Honey or maple syrup brings a subtle caramel note—if you want less sweetness, reduce or omit it, but taste as you go.
- Salt: Just a pinch enhances everything—if your chocolate is super sweet, a little more salt can balance that out.
- Vanilla extract: A splash brightens the flavor, making the coconut and chocolate pop—omit if you prefer a more straightforward taste.
- Optional add-ins: Dried fruit, nuts, or seeds—add them into the mixture for texture and extra flavor, but don’t overload so it stays manageable.
Spotlight on key ingredients
Coconut flakes:
- I prefer toasted for a richer, slightly smoky flavor and crunch; skip this step if you want softer bars.
- Dark chocolate: I love using 70% cocoa for depth, but milk chocolate makes it sweeter and milder—choose what suits your mood.
- Coconut oil: Adds shine and helps melt the chocolate smoothly; if you skip it, the chocolate might be thicker and less glossy.
Dark chocolate and coconut oil:
- Dark chocolate: It melts with a crackle and gives a deep, bitter-sweet flavor that’s essential for that rich bite.
- Coconut oil: When melted, it turns silky and glossy, making the chocolate coating smooth and luscious during mixing.
- Both ingredients: Their behavior during melting and setting is crucial—watch for that shiny, crackly finish as a sign it’s ready.
Notes for ingredient swaps
- Dairy-Free: Use coconut yogurt or cashew butter instead of butter for creaminess without dairy, though it may alter the richness.
- Sweetener: Swap honey for agave syrup or coconut nectar for a different flavor profile; keep in mind they may be slightly less sticky.
- Chocolate: Replace dark chocolate with dairy milk or vegan chocolate to change the sweetness and creaminess, making it milder or richer.
- Coconut: Use finely chopped dried apricots or chopped nuts instead of coconut flakes for varied texture and flavor.
- Oil: Substitute with avocado oil for a milder, buttery note; or use less to keep the bars firm but slightly less glossy.
- Add-ins: Incorporate chopped nuts, dried fruit, or seeds—adjust quantity to prevent mixture from becoming too dry or crumbly.
- Salt: Use smoked sea salt or Himalayan pink salt to add a different dimension, just be cautious with quantities to avoid overpowering.
Equipment & Tools
- Parchment paper: To line the dish for easy removal and cleanup.
- Large mixing bowl: To combine ingredients evenly.
- Small saucepan: To melt coconut oil smoothly.
- Spatula or spoon: To mix ingredients and press the mixture into the dish.
- Sharp knife: To cut the set bars cleanly.
Step-by-step guide to no bake bars
- Line a 20cm (8-inch) square baking dish with parchment paper, leaving some overhang for easy removal.
- In a large mixing bowl, combine 2 cups (150g) coconut flakes with 1 cup (170g) dark chocolate chips. Mix well.
- In a small saucepan over low heat (around 50°C/122°F), melt 1/4 cup (60ml) coconut oil until smooth, about 2-3 minutes.
- Pour the melted coconut oil into the bowl with the chocolate and coconut. Add 2 tablespoons honey or maple syrup, and 1 teaspoon vanilla extract.
- Stir everything together until the chocolate and coconut are evenly coated, and the mixture is sticky and glossy.
- Transfer the mixture into the prepared dish. Use a spatula or the back of a spoon to press it evenly into the corners and smooth the top.
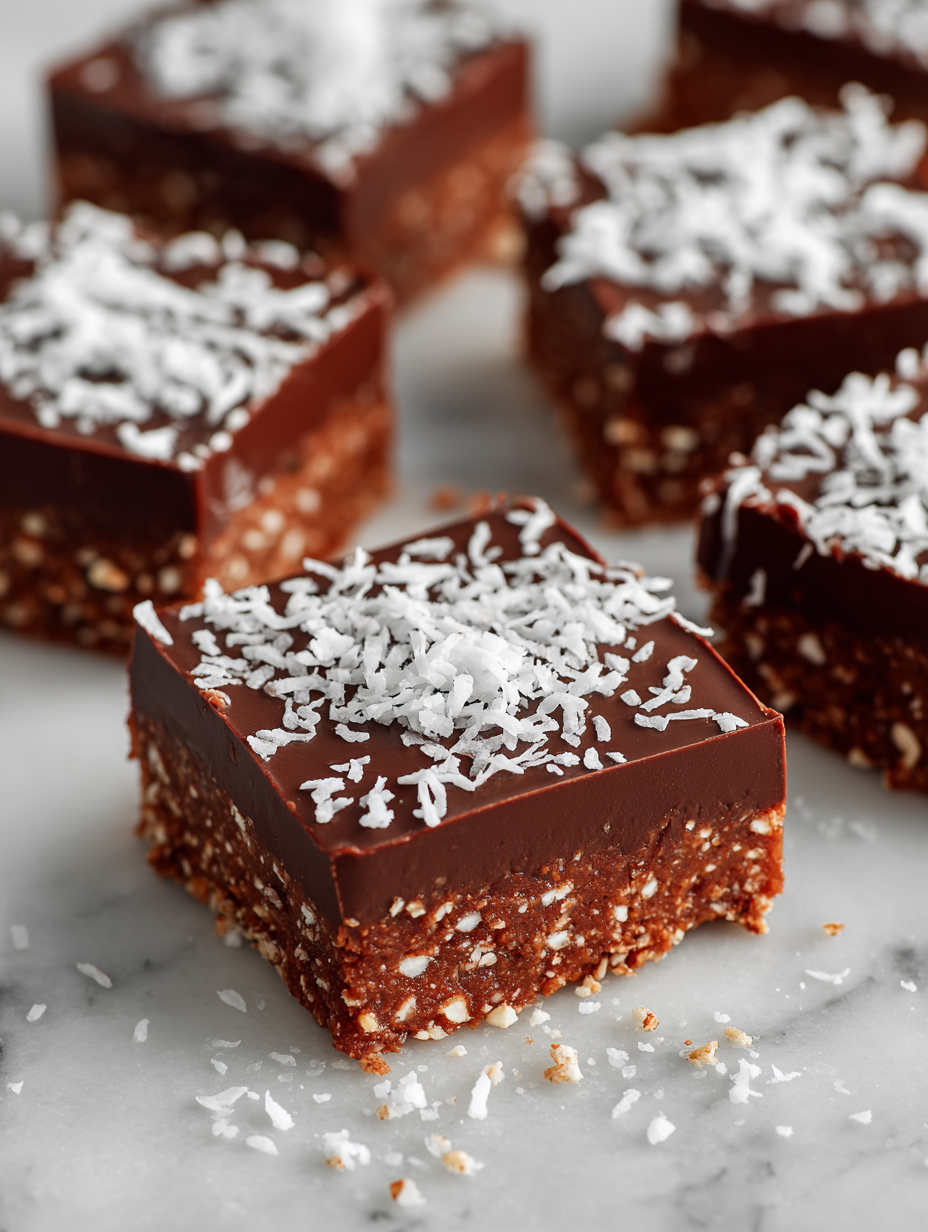
- Sprinkle extra toasted coconut flakes or sea salt on top if desired for texture and flavor contrast.
- Place the dish in the refrigerator for at least 2 hours, or until firm. For best results, overnight is ideal.
- Once set, lift the block out using the parchment overhang. Cut into squares or bars with a sharp knife.
- Serve immediately or store in an airtight container.
Refrigerate the bars until fully firm—at least 2 hours. Use the parchment overhang to lift out easily. Slice into squares and serve chilled or at room temperature. Store leftovers in an airtight container in the fridge for up to a week.
How to Know It’s Done
- Chocolate mixture is shiny and fully melted before pouring.
- Bars are firm and hold shape when cut, not crumbly.
- Surface is glossy with a slight sheen, indicating proper setting.
No-Bake Chocolate Coconut Bars
Ingredients
Equipment
Method
- Line your square dish with parchment paper, leaving some overhang on the sides to make removing the bars easier later.
- In a large mixing bowl, combine the coconut flakes and chocolate chips, stirring them together so they’re evenly distributed.
- In a small saucepan over low heat, melt the coconut oil gently until it’s smooth and shimmering, about 2-3 minutes. Keep an ear out for a gentle bubbling sound.
- Pour the melted coconut oil into the bowl with the coconut and chocolate mixture. Add the honey and vanilla, then stir everything together until the mixture is glossy and well coated.
- Transfer the sticky mixture into your prepared dish. Use a spatula or the back of a spoon to press it firmly into the corners and smooth the surface for even thickness.
- If desired, sprinkle a pinch of sea salt or toasted coconut flakes on top for added flavor and crunch. Gently press them into the surface.
- Place the dish in the refrigerator and chill for at least 2 hours, or until the mixture is firm and set. For best results, leave it overnight.
- Once set, lift the block from the dish using the parchment overhang. Use a sharp knife to cut into squares or bars of your preferred size.
- Serve the bars chilled or at room temperature. Store leftovers in an airtight container in the fridge for up to a week or freeze for longer storage.
Notes
Pro tips for perfect bars
- Melt chocolate slowly in a double boiler or low, steady heat to prevent seizing and keep that glossy shine.
- Toast coconut flakes until golden and fragrant—this intensifies flavor and adds a satisfying crunch.
- Use room temperature coconut oil for smoother melting and easier mixing; cold oil can cause clumping.
- Press the mixture firmly into the pan to avoid gaps or crumbly bars—use the back of a spatula or the bottom of a glass.
- Chill the bars until just firm for clean cuts; over-chilling can make them too hard, under-chilling leads to sticky edges.
- For a more even chocolate coat, pour melted chocolate over the set bars and spread with a spatula—add a sprinkle of sea salt for contrast.
- Work quickly but carefully when melting ingredients to prevent overheating; stop heat as soon as the chocolate is smooth and shiny.
Common mistakes and how to fix them
- FORGOT to level ingredients → Use a scale for accuracy.
- DUMPED in too much liquid → Add more coconut flakes or chill to thicken.
- OVER-TORCHED the chocolate → Remove from heat immediately, stir until smooth.
- MISSED the chilling step → Chill for at least 2 hours for firm bars.
Quick fixes and pantry swaps
- When chocolate seizes, splash in a bit more coconut oil and stir gently.
- If bars crumble, patch with a quick drizzle of melted chocolate and refrigerate briefly.
- Dumped too much salt? Rinse the mixture lightly and add fresh coconut for balance.
- Over-torched chocolate? Speedily stir in a spoonful of coconut oil to soften the flavor.
- Splash cold water on your hands when slicing for cleaner cuts and less sticking.
Prep, store, and reheat tips
- Prepare the mixture ahead by melting chocolate and mixing with coconut—store in the fridge for up to 24 hours to keep it fresh and firm.
- The bars can be refrigerated for 1 week or frozen for up to 3 months; wrap tightly to prevent freezer burn and preserve flavor.
- For best texture, let chilled bars come to room temperature for 10–15 minutes before serving—this enhances the chocolate sheen and coconut aroma.
- Reheat slightly by placing in a warm (not hot) oven or microwave for a few seconds until just soft and glossy—watch for melting edges and aroma.
Top questions about no bake bars
1. Can I use shredded coconut instead of flakes?
Use shredded coconut instead of flakes for a softer texture, but keep an eye on moisture levels.
2. How do I know when the mixture is ready to cut?
Chill the mixture until it’s firm and glossy; it should crack slightly when you cut it.
3. Can I melt the chocolate in the microwave?
Yes, melting chocolate gently in a double boiler or microwave prevents burning and keeps it shiny.
4. How long do these bars last?
Store these bars in an airtight container in the fridge for up to a week, or freeze for longer.
5. Can I use a different type of chocolate?
Use dark chocolate with at least 70% cocoa for richness; milk chocolate makes it sweeter and milder.
6. Should I toast the coconut?
Toast the coconut flakes until golden for a deeper flavor; skip if you want a softer, milder taste.
7. Can I reduce the sweetness?
Adjust the sweetener to taste—less honey or syrup for a less sticky, more coconut-forward bar.
8. How do I get clean, sharp edges?
Press the mixture firmly into the pan to avoid crumbly, uneven bars.
9. My chocolate is crackling when melting—what should I do?
If the chocolate cracks or seizes, stir in a little coconut oil to loosen it up.
10. Should I serve these cold or at room temperature?
Refrigerate the bars until firm, then let sit at room temp for 10 minutes before slicing for best texture.
These no-bake chocolate coconut bars are a reminder that simplicity can be deeply satisfying. They come together quickly but taste like a treat you’ve spent hours perfecting. Every bite carries that familiar, nostalgic coconut and rich chocolate flavor that just feels right for right now.
They’re perfect for spontaneous gatherings or quiet afternoons when you need a little sweetness without the fuss. No matter how many times I make them, I still get that little thrill when I see the glossy finish and hear the satisfying snap when I cut into one. Sometimes, the simplest recipes hold the most comforting moments.
Welcome to Proud of This Mess – a place where food, creativity, and a little chaos come together on a plate!
I’m Emily Carter, the founder and heart behind this little corner of the internet. Born and raised in the United States, I’ve always had a passion for cooking, experimenting, and sharing the messy, delicious journey of creating food that brings people together. My philosophy is simple: good food doesn’t have to be perfect, and a little mess makes it memorable.
At Proud of This Mess, we believe that cooking is more than just following recipes—it’s about exploring flavors, discovering new techniques, and making every meal an experience worth savoring. From comforting weeknight dinners to indulgent desserts, our goal is to inspire home cooks of all levels to embrace the joy of food without fear of imperfection.