Category: Beverages

  • The Secret to a Perfect Mango Slushie on a Hot Day

    The Secret to a Perfect Mango Slushie on a Hot Day

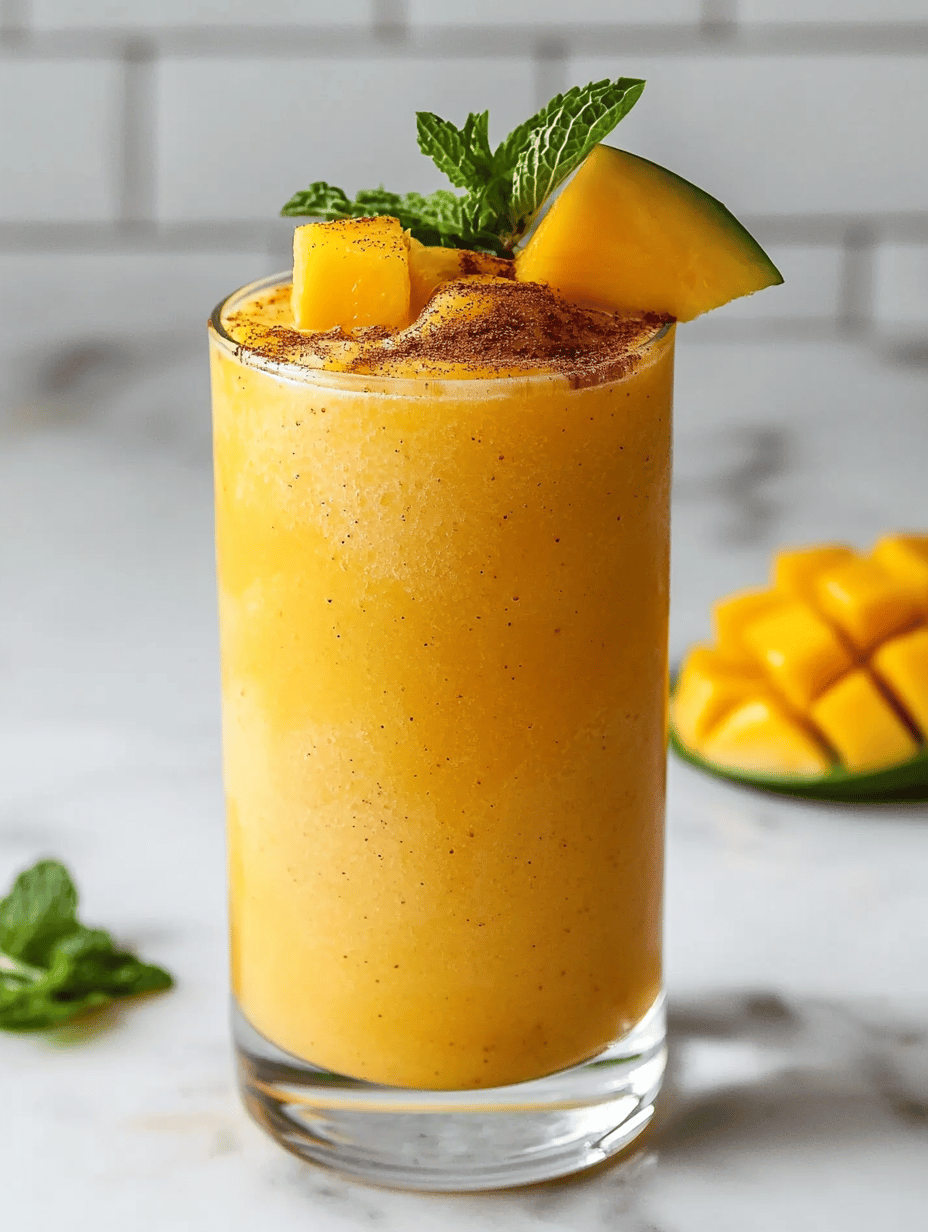
    Few things beat the burst of sweetness from a ripe mango on a scorching afternoon. But what if you could elevate that simple pleasure with a twist of unexpected flavors? This mango slushie dives into the world of flavor contrasts, balancing intense tropical fruit with a hint of spice or herbal freshness—perfect for those who crave more than just sweet.

    As a culinary experiment, I love playing with textures, adding crunchy toppings or swirls of coconut cream that melt into the chilled mango. It’s a beverage, yes, but also an experience that’s both refreshing and surprising. And honestly, I can’t think of a better way to cool down while your kitchen smells like a tropical paradise.

    Spiced Mango Slushie

    This mango slushie combines ripe mango chunks blended with a touch of spice and herbal flavorings, resulting in a vibrant, icy beverage with a smooth, frosty texture. The blend of fruit, spices, and optional coconut cream creates a refreshing treat with an aromatic twist and a slightly creamy finish.
    Prep Time 10 minutes
    Total Time 10 minutes
    Servings: 2
    Course: Main Course
    Cuisine: tropical
    Calories: 150

    Ingredients
      

    • 2 cups ripe mango chunks fresh or frozen
    • 1/2 teaspoon ground cinnamon
    • 1/4 teaspoon ground ginger
    • 1 tablespoon honey or agave syrup optional for sweetness
    • 1/2 cup coconut water or cold water for blending
    • 1 tbsp fresh mint leaves optional for herbal freshness
    • 3 tbsp coconut cream for optional swirl or topping

    Equipment

    • Blender
    • Measuring cups and spoons

    Method
     

    1. Add the mango chunks, ground cinnamon, ground ginger, honey, and half a cup of coconut water into your blender. Drop in the fresh mint leaves if using.
    2. Blend on high until the mixture is smooth and frosty, about 30-40 seconds, with a thick, icy texture that you can feel vibrating through the blender.
    3. Taste the slushie and add more honey if you’d like it sweeter; blend again briefly to combine.
    4. Pour the blended mango mixture into glasses, creating a vibrant, orange-colored beverage with a thick, slushy consistency.
    5. If desired, gently spoon some coconut cream on top to create a creamy dollop or swirl for added richness.
    6. Garnish with a sprig of mint or a small slice of mango for a colorful, tropical presentation, and enjoy immediately while chilled and refreshing.

    Notes

    For a thicker slushie, use frozen mango chunks. Adjust sweetness and spice levels to taste. The coconut cream adds richness but is optional for a lighter drink.

    In a world obsessed with quick fixes, this mango slushie offers a moment to pause and enjoy something vibrantly fresh. It’s about turning a fruit into a celebration, a cool escape that’s also visually stunning. Whether you’re hosting friends or just need a solo treat, this recipe keeps things simple yet unforgettable.

    Every sip is a reminder of summer’s endless possibilities—think ripened mangoes, a splash of lime, maybe a dash of chili powder. It’s a palette of flavors that sings on your tongue, leaving you eager for the next cold, sweet rush. Keep this one in your back pocket; it’s a sure way to beat the heat with style and a little flare.

  • Enchanted Elixir: The Halloween Black Magic Margarita

    Enchanted Elixir: The Halloween Black Magic Margarita

    Enter a world where Halloween meets mixology in a potion inspired by dark nights and mystic charms. The Black Magic Margarita combines the traditional tang with a mysterious charcoal hue that feels like casting a spell with every sip. Its eerie glow and bold flavor are perfect for late October celebrations or a moonlit gathering with friends.

    This recipe isn’t just about looks; it’s about unleashing a daring flavor profile that surprises and delights. The smoky undertones from the black salt rim and the subtle bitterness of activated charcoal make it a conversation starter. Prepare for an intoxicating mix of chaos and charm in every glass.

    Black Magic Margarita

    The Black Magic Margarita is a cocktail that combines tequila, citrus juice, and a hint of smoky flavor, all tinted a striking black hue with activated charcoal. It features a smooth, icy texture with a bold, mysterious appearance, finished with a salt rim that adds contrast and depth.
    Prep Time 10 minutes
    Total Time 10 minutes
    Servings: 2
    Course: Main Course
    Cuisine: fusion
    Calories: 200

    Ingredients
      

    • 3 oz tequila preferably blanco
    • 1 oz fresh lemon juice about one lemon
    • 0.5 oz simple syrup adjust to taste
    • 1 pinch activated charcoal food grade, for color and subtle flavor
    • salt black salt or sea salt for rimming the glass

    Equipment

    • Cocktail shaker
    • Juice squeezer
    • Strainer
    • Small plate for salt rim
    • Rimming glass

    Method
     

    1. Start by preparing the salt rim: pour black salt onto a small plate. Rub a lime wedge around the rim of your glasses and gently dip them into the salt to coat evenly.
    2. Fill your cocktail shaker with ice, then pour in the tequila, fresh lemon juice, and simple syrup.
    3. Add a pinch of activated charcoal to the shaker. This will give the cocktail its striking black color and a slight smoky undertone.
    4. Secure the lid on the shaker and shake vigorously for about 15-20 seconds until the mixture is well chilled and the color is evenly darkened.
    5. Place a strainer over the shaker and pour the cocktail into the prepared glasses, ensuring a smooth, dark liquid flows through.
    6. Garnish each glass with a twist of lemon or a lime wedge if desired, and serve immediately to enjoy its icy coolness and striking appearance.

    Notes

    For a milder smoky flavor, adjust the amount of activated charcoal. Always use food-grade activated charcoal intended for culinary use.

    This cocktail captures the spirit of Halloween — a little spooky, a little sophisticated. It’s a perfect way to toast under the flickering jack-o’-lanterns or simply add a dash of magic to your night. The Black Magic Margarita isn’t just a drink; it’s an experience that makes the season even more unforgettable.

    Enjoy mixing up this dark delight and let the mysterious aroma and haunting hue spark joy in your celebration. It’s a reminder that sometimes, the quirkiest ideas turn out to be the most memorable moments of the season.

  • Tropical Twist: The Ultimate Pineapple Slushie Experience

    Tropical Twist: The Ultimate Pineapple Slushie Experience

    As the summer sun blazes, I find myself dreaming of a cool escape—sometimes it’s just a icy sip away. Pineapple, with its bright aroma and slightly tangy sweetness, transports me straight to a sun-kissed beach, even if I’m just in my backyard. This pineapple slushie isn’t just a drink; it’s a miniature vacation in a glass, perfect for when the heat makes everything else sluggish.

    The best part? It’s surprisingly simple but beautifully vibrant. With every sip, you get a burst of tropical flavor that dances on your tongue, awakened by that subtle zing of lime or mint. It’s fast to whip up, fuss-free, and perfect for unexpected summer guests or a quiet moment of self-indulgence.

    **WHY I LOVE THIS RECIPE?**

    • The smell of ripe pineapple always lifts my mood. This drink captures that essence perfectly.
    • It’s a quick, refreshing escape—no blender battle or complicated ingredients needed.
    • Every time I make this, it reminds me of childhood summers filled with sticky fruit and laughter.
    • The vivid yellow color makes any table feel cheerful and festive.

    **AVOID MY DISASTER (You’re Welcome)**

    • FORGOT to chill the pineapple? Use ice cubes instead for instant refreshment.
    • DUMPED too much lime juice? Add more pineapple or a splash of water.
    • OVER-TORCHED the sugar syrup? Rinse gently with cold water to stop the caramelizing.
    • SCRATCHED my blender blade? Carefully use a spoon to push ingredients down the sides.

    **QUICK FIXES THAT SAVE YOUR DAY**

    • When the slush isn’t icy enough, add a handful of frozen pineapple chunks.
    • SPLASH in some coconut water if the flavor feels flat.
    • PATCH the sweetness by mixing in a teaspoon of honey or agave syrup.
    • SHIELD your blender from overheating with short bursts of blending.
    • When in doubt, crush some ice manually for that satisfying crunch.

    Pineapple Slushie

    This pineapple slushie is a refreshing cold beverage made by blending ripe pineapple chunks with crushed ice and citrus flavors. It has a vibrant yellow color, silky smooth texture, and a tart-sweet taste that captures tropical essence in each sip.
    Prep Time 10 minutes
    Total Time 10 minutes
    Servings: 2
    Course: Main Course
    Cuisine: tropical
    Calories: 120

    Ingredients
      

    • 2 cups ripe pineapple chunks fresh or frozen
    • 1 cup crushed ice adjust for desired consistency
    • 1 tbsp lime juice freshly squeezed
    • 1 tsp honey or agave syrup optional for extra sweetness
    • a few leaves fresh mint for garnish (optional)

    Equipment

    • Blender
    • Measuring cups
    • Knife
    • Cutting board

    Method
     

    1. Begin by preparing your ingredients—if using fresh pineapple, chop it into small chunks and measure out two cups. Gather crushed ice, lime juice, and honey or agave syrup. Feel the pineapple’s bright aroma as you prep.
    2. Add the pineapple chunks into your blender, making sure to include any juices released from chopping. Pour in the lime juice and honey or agave syrup to bring out the tropical flavors.
    3. Top the mixture with crushed ice—this will help create that icy, slushie texture. You can add more or less depending on how thick and cold you like your slushie.
    4. Secure the lid on the blender and blend on high speed until the mixture is smooth, frosty, and the ice is finely broken down. You should see a vibrant yellow color and hear a consistent whir as the ingredients combine.
    5. Stop and check the texture—if it’s too thick, blend in a splash of water or coconut water for easier pouring. If you prefer it icier, add a handful of frozen pineapple chunks and pulse briefly.
    6. Pour the chilled, frosty slushie into glasses. The consistency should be silky and thick enough to hold a slight mound when pouring.
    7. Garnish with a few fresh mint leaves or a small pineapple wedge if desired. The bright yellow color and refreshing aroma are ready to enjoy immediately.

    Notes

    For an extra summery touch, rim the glasses with sugar or coconut flakes before pouring the slushie. Use frozen pineapple for an extra icy texture or fresh pineapple for a more pronounced flavor.
    Making this pineapple slushie is a quick tribute to bright, sunny days—no matter the season. It’s a reminder that simple ingredients, combined thoughtfully, can lift spirits and cool down a busy mind. Plus, the clean, sweet aroma of pineapple is enough to make anyone smile.

    In a world that often rushes by, this drink offers a tiny, tasty pause. It’s perfect for pairing with lazy afternoons, spontaneous gatherings, or just a moment of personal treat. Keep a jar of frozen pineapple handy, and summer’s happiness is always within reach.

  • Chill Out with a Frozen Margarita Slushie: A Surprising Chill for Summertime Sizzle

    Chill Out with a Frozen Margarita Slushie: A Surprising Chill for Summertime Sizzle

    Forget the usual frozen drinks filled with overly sweet mixes. Imagine a margarita slushie that balances tart lime zest, a splash of orange liqueur, and the perfect icy texture, reminiscent of a wintry mountain snowfall—only in summer! This recipe transforms a classic cocktail into a refreshing, almost dessert-like treat that cools you down instantly.

    The secret? Freezing freshly made margarita in a single layer, then blitzing it to a velvety smoothness. It’s as exhilarating as finding a hidden cool spot on a hot day—unexpected, satisfying, and just a little bit rebellious. Guests will always be surprised by how eye-catching and delicious this frozen twist can be.

    WHY I LOVE THIS RECIPE?

    • I adore how it captures that perfect balance of tangy citrus and smooth alcohol—no cloying sweetness here.
    • The freezing process makes it look like a glamorous, boozy snow cone—instant photo moment.
    • It’s my go-to when friends drop by unannounced; everyone loves its icy charm.
    • The texture is like biting into a crisp, frozen cloud—more fun than regular drinks.
    • It reminds me of summer vacations, carefree, with a hint of salty sunscreen in the air.

    AVOID MY DISASTER (You’re Welcome)

    • FORGOT to freeze the margarita mixture overnight—end up with slushy soup instead of ice-cold bliss.
    • DUMPED the blender’s contents too quickly—causes splatter and waste; blend slowly for silky consistency.
    • OVER-TORCHED the rim of the glass with a spice-rimmed salt—caused bitterness; use a damp finger to control.
    • SALTED the rim before freezing—salt crystals stuck unevenly, mess and clumps—add salt just before serving.

    QUICK FIXES THAT SAVE YOUR DAY

    • When my slushie melts too fast, I just splash more lime juice—restores its zing and chills.
    • Patch a watery mixture by blending in a handful of frozen pineapple for extra thickness and flavor.
    • Shield against melting by serving in a chilled glass—frosty and ready to go.
    • If the blender stalls, pulse in a few ice cubes—shreds the ice without overloading.
    • When frosting on the rim melts, quickly dry with a paper towel—prevents running and clumping.

    This frozen margarita slushie feels like a secret handshake with summer. Its icy bite quenches, comforts, and elevates a simple happy hour or backyard gathering. Right now, as the heat shimmers off the pavement, it’s the coolest trick in the book.

    Every sip delivers a refreshing escape, a little splash of joy that’s easy to make and impossible to forget. Sometimes, the simplest changes to a classic turn into the most memorable moments—this slushie is proof. Keep chill, sip slow, and enjoy the season’s brightest burst of flavor.

    Frozen Margarita Slushie

    This frozen margarita slushie is made by blending a mixture of lime juice, orange liqueur, and tequila that has been frozen until solid. The result is a velvety, icy cocktail with a tart, citrusy flavor and a snow-like appearance, perfect for hot summer days.
    Prep Time 10 minutes
    Total Time 10 minutes
    Servings: 2
    Course: Main Course
    Cuisine: fusion
    Calories: 200

    Ingredients
      

    • 1 cup fresh lime juice preferably freshly squeezed
    • 1/2 cup orange liqueur such as Triple Sec or Cointreau
    • 1 cup tequila silver or blanco tequila
    • 2 cups ice cubes for blending
    • 1 tbsp sugar optional, to enhance sweetness

    Equipment

    • Freezer
    • Blender

    Method
     

    1. Pour lime juice, orange liqueur, tequila, and sugar into a baking dish or a shallow container.
    2. Place the mixture in the freezer for at least 4 hours, until it’s fully frozen solid.
    3. Break the frozen mixture into smaller chunks using a spoon or spatula to help it blend smoothly.
    4. Add the frozen chunks to a blender along with ice cubes.
    5. Blend on high until the mixture is velvety, smooth, and ice-crystal free, about 30-60 seconds.
    6. Stop the blender and check the texture—if it’s too thick, add a splash of lime juice to loosen it slightly and blend again.
    7. Pour the slushie into chilled glasses, garnish with lime wedges if desired, and serve immediately for the best icy texture.

    Notes

    For an extra festive touch, rim glasses with salt or sugar before pouring the slushie. You can also add fresh fruit or herbs for flavor variation.

    So, next time the temperature rises, remember a margarita doesn’t have to be a drink—sometimes, it’s the frozen burst your day needs. The process of blending icy citrus acidity with a hint of salt and sweetness is what makes this recipe stand out from typical cocktails. It’s a cool little secret waiting to be discovered in your freezer.

    Whether for a lazy weekend afternoon or a lively get-together, this slushie bridges the gap between refreshing and indulgent. It’s a testament to how simple ingredients, frozen just right, can turn an ordinary moment into a mini celebration. Cheers to staying cool and savoring every icy sip that brings a little extra sparkle to summer.

  • The Secret Art of Watermelon Slushie Crafting: A Summer Refresh with a Twist

    The Secret Art of Watermelon Slushie Crafting: A Summer Refresh with a Twist

    Every summer, I find myself craving something cool and unexpected. Instead of the usual lemonade or iced tea, I dive into a watermelon slushie, but with a surprising twist—adding fresh basil and a splash of lime. This combination awakens my senses in ways a typical frozen treat never could.

    It’s not just about cooling down; it’s about rediscovering the juicy kick of summer through simple ingredients. As the blender whirls, I can smell the sweet watermelon mingling with aromatic basil, a scent that instantly transports me to lazy afternoons in my childhood backyard. Making this slushie feels like a secret ritual that turns ordinary days into little celebrations.

    Watermelon Basil Lime Slushie

    This frozen beverage combines ripe watermelon blended with fresh basil and a splash of lime juice, creating a vibrant, icy treat. The smoothie-like texture is cool and refreshing, with bits of basil and a bright citrus flavor throughout. It’s perfect for hot summer days and easy to prepare in a blender.
    Prep Time 5 minutes
    Total Time 5 minutes
    Servings: 2
    Course: Main Course
    Cuisine: American
    Calories: 90

    Ingredients
      

    • 4 cups cubed watermelon seedless preferred
    • 10 leaves fresh basil roughly chopped
    • 1 lime lime juice freshly squeezed
    • 2 teaspoons honey optional, for extra sweetness

    Equipment

    • Blender
    • Knife
    • Cutting board

    Method
     

    1. Start by chopping the basil leaves into smaller pieces to help them blend smoothly later.
    2. Place the seedless watermelon cubes into the blender, ensuring there’s enough space for blending.
    3. Add the chopped basil and freshly squeezed lime juice to the blender.
    4. If desired, drizzle in honey to sweeten the slushie slightly.
    5. Secure the lid on the blender and blend everything on high until the mixture is smooth and completely combined, about 30 seconds.
    6. Check the texture; it should be icy and slushy with bits of basil visible.
    7. Pour the refreshing watermelon basil lime slushie into glasses.
    8. Garnish with a small basil sprig or a lime wedge for an appealing presentation.
    9. Serve immediately with a straw and enjoy this vibrant, cool summertime drink.

    Notes

    For a thicker consistency, add more watermelon or freeze the mixture briefly before serving.

    Effortless and vibrant, this watermelon slushie is a perfect way to embrace warmer days. It’s quick to assemble and refreshingly different, making it a staple for spontaneous gatherings or quiet evenings of self-indulgence. The bright, juicy flavor is a testament that sometimes, simplicity shines brightest.

    Whenever I need a cooling boost or a nostalgic punch of summer, this drink always delivers. It’s a reminder that joy can be found in the simplest of ingredients, transformed by a little creativity and a dash of love. Cheers to embracing the best of summer in every sip.

  • Chill Out with This Unexpected Kool Aid Slushie Twist

    Chill Out with This Unexpected Kool Aid Slushie Twist

    Normally, Kool Aid is just a quick splash of flavor for kids’ drinks or a cheat at the dessert table. But lately, I’ve been craving how its vibrant colors and tangy punch can really shine in icy form. Turning Kool Aid into a slushie feels like reliving summer memories, but with a cheeky adult upgrade.

    There’s something oddly satisfying about watching that syrupy red or neon green turn into a frosty mountain of refreshment. It’s almost like a secret recipe for chaos and nostalgia, all in one glass. Plus, it opens a door for fun experiments—think swirls, layers, or even adding a splash of booze for grown-up weekend treats.

    Kool Aid Slushie

    This Kool Aid slushie is a frozen beverage made by mixing flavored Kool Aid syrup with ice and blending until smooth. The result is a colorful, icy drink with a tangy taste and a refreshing, granular texture perfect for hot days or nostalgic treats.
    Prep Time 5 minutes
    Total Time 5 minutes
    Servings: 2
    Course: Main Course
    Cuisine: American
    Calories: 80

    Ingredients
      

    • 1 packet Kool Aid flavoring syrup preferably in bright color like red or green
    • 1 cup ice cubes
    • ½ cup cold water to help blend
    • 2 tsp sugar (optional) for extra sweetness if desired

    Equipment

    • Blender
    • Measuring cups and spoons

    Method
     

    1. Pour the Kool Aid syrup into the blender. Add the cold water and sugar if using, then blend briefly to combine and dissolve the sugar.
    2. Add the ice cubes to the blender. Secure the lid tightly and begin blending on a high setting, watching as the mixture transforms from slushy to smooth and icy.
    3. Continue blending until the mixture is thick, frosty, and achieves a granular, snow-like texture. This should take about 30-60 seconds, and the sound will be a consistent whir with the ice crushing smoothly.
    4. Stop the blender and check the consistency; it should be icy and slushie-like. If it’s too thick, you can add a splash more water and blend briefly again.
    5. Pour the vibrant Kool Aid slushie into glasses, allowing some of the icy particles to spill over for a colorful presentation.
    6. Serve immediately with fun straws or garnishes like fruit slices to enhance the visual appeal and preserve the icy texture.

    Notes

    For an adult twist, add a splash of alcohol such as rum or vodka before blending.
    Whether it’s the blazing heat or a spontaneous craving, this Kool Aid slushie is your go-to remedy. It’s quick to make, painfully cheerful to look at, and wonderfully satisfying to sip on a lazy afternoon. No matter how many times you make it, it’s guaranteed to bring a smile and a splash of summer in every glass.

  • Unusual Vodka Slushie Hacks You Haven’t Tried

    Unusual Vodka Slushie Hacks You Haven’t Tried

    Finding new ways to enjoy vodka in the heat can be a delight, especially when you rediscover childhood’s icy treats with a grown-up twist. Vodka slushies can be transformed into a playful chaos of flavors, textures, and boozy chills that are perfect for unexpected warm days.

    Today, I want to share a perspective on these icy delights that might seem a little quirky. Think beyond the typical berry or citrus options and explore some unexpected ingredients that make your frozen cocktail stand out. It’s all about turning simple ingredients into a sensory adventure with a hint of nostalgia.

    Vodka Ice Cream Slushies

    This recipe combines vodka with creamy ice cream and unique flavorings to create a frozen, slushy cocktail-like treat. The ingredients are blended until smooth and frosty, resulting in a textured, scoopable icy beverage that captures both the chill of a frozen dessert and the kick of alcohol.
    Prep Time 10 minutes
    Total Time 10 minutes
    Servings: 4
    Course: Main Course
    Calories: 250

    Ingredients
      

    • 2 cups vanilla ice cream
    • ½ cup vodka chilled for better blending
    • ¼ cup lemon juice freshly squeezed
    • 2 tablespoons honey for sweetness
    • ½ cup fresh mint leaves optional for flavor
    • a handful ice cubes

    Equipment

    • High-speed blender
    • Measuring cups and spoons
    • Serving glasses

    Method
     

    1. Add the vanilla ice cream, chilled vodka, lemon juice, honey, fresh mint leaves, and ice cubes into a high-speed blender.
    2. Secure the lid and blend on high until the mixture is smooth, thick, and frosty, about 30-40 seconds. You should see the ice break down into tiny, cold particles.
    3. Stop the blender and check the texture; if it’s too thick, add a splash more vodka or lemon juice and blend briefly to incorporate.
    4. Pour the icy slurry into chilled glasses, using a spoon or spatula to help scoop out the thick mixture if needed.
    5. Garnish with additional mint leaves or a lemon wedge for presentation, if desired.
    6. Serve immediately with a straw or a small spoon, enjoying the cool, boozy, and refreshing texture.

    Notes

    For a non-alcoholic version, omit the vodka and add more ice and flavorings as desired.

    Whipping up a vodka slushie isn’t just about cooling down—it’s about embracing the playful chaos that summer can bring. These recipes are quick, fun, and perfect for those spontaneous moments when you crave a special icy treat.

    By experimenting with unconventional flavors, I find new joy in summer gatherings or even quiet evenings. Cheers to frozen chaos and the little surprises that keep our summer bright and chilly.

  • Savor the Unexpected: The Irresistible Charm of Caramel Slushies

    Savor the Unexpected: The Irresistible Charm of Caramel Slushies

    Imagine a hot summer day when the sun blazes overhead, and you crave something cool but with an intriguing twist. A caramel slushie delivers that perfect blend of icy refreshment and deep, sweet richness. Its velvety caramel aroma fills the air as you prepare to indulge in something both nostalgic and delightfully unexpected.

    This recipe isn’t your average frozen treat. It invites you to embrace a little chaos—perhaps a splash of extra caramel or a dash of sea salt—to make each sip uniquely yours. The secret lies in balancing the sweetness with a hint of saltiness to achieve that irresistible, mouthwatering finish.

    Caramel Slushie

    A caramel slushie is a cold, icy beverage made by blending caramel-flavored syrup, ice, and milk or cream until smooth and slushy. The final texture is velvety and frozen, with a rich caramel aroma and a balance of sweetness and a hint of saltiness for added depth.
    Prep Time 5 minutes
    Total Time 5 minutes
    Servings: 2
    Course: Main Course
    Cuisine: International
    Calories: 200

    Ingredients
      

    • 1 cup milk or cream chilled
    • 1/4 cup caramel syrup plus extra for drizzling
    • a pinch sea salt optional, to enhance flavor

    Equipment

    • Blender
    • Measuring cups and spoons
    • Ice tray

    Method
     

    1. Add the chilled milk or cream to your blender, followed by the caramel syrup and a pinch of sea salt if using.
    2. Scatter the ice cubes into the blender basket, making sure they’re evenly distributed over the liquid ingredients.
    3. Secure the lid tightly and blend on high speed until the mixture is smooth, thick, and frosty, about 30-40 seconds.
    4. Pause the blender and check the consistency; it should be velvety and very cold, with tiny ice particles fully incorporated.
    5. Taste the slushie and add a little extra caramel syrup if you’d like more sweetness, then blend briefly to mix.
    6. Pour the caramel slushie into glasses, creating a slightly frosty and inviting appearance.
    7. If desired, drizzle additional caramel syrup over the top and sprinkle a tiny pinch of sea salt for added flavor complexity.
    8. Insert straws or spoons, then serve immediately to enjoy the icy, creamy texture with a rich caramel aroma.

    Notes

    For an extra salty kick, sprinkle sea salt just before serving. Adjust sweetness by adding more caramel syrup according to taste.

    Making this caramel slushie is a simple joy that transforms a regular summer into a small celebration. The cooling burst of caramel flavor can brighten any day, whether you’re alone with your ingredients or sharing with friends. It’s a reminder that sometimes, the most delightful moments come from unexpected pairings.

    Enjoy this recipe as a little escape from the heat, or as a luscious treat after a long day. The rich, creamy texture combined with icy coldness creates a sensory escape you’ll want to revisit. Keep this one in your back pocket for those spontaneous sweet tooth cravings.

  • Chill Out with a Surprising Twist: The Spiced Chocolate Slushie

    Chill Out with a Surprising Twist: The Spiced Chocolate Slushie

    On scorching summer days, nothing cools the brain quite like a frosty beverage. But what if your usual ice cream or icy drinks get a little dull after a while? Enter the chocolate slushie—revamped with an unexpected hint of warming spices that make each sip feel like a cozy secret amid the heat.

    This recipe isn’t just about blending chocolate with ice; it’s about awakening your taste buds with a dash of cinnamon and a whisper of chili powder that balance sweetness and heat. It transforms a simple cold treat into a curious conversation starter, perfect for lazy afternoons or spirited gatherings. The texture is velvety, the aroma intoxicating, and the flavor unexpectedly thrilling.

    Chocolate Spiced Slushie

    A chilled beverage made by blending melted chocolate with ice, infused with cinnamon and chili powder to add warming spices. The result is a velvety, icy drink with a balanced mix of sweetness, heat, and aromatic spices, featuring a smooth, frosty appearance.
    Prep Time 10 minutes
    Cook Time 5 minutes
    Total Time 15 minutes
    Servings: 2
    Course: Main Course
    Cuisine: fusion
    Calories: 210

    Ingredients
      

    • 1/2 cup water for melting chocolate
    • 1 cup semi-sweet chocolate chips or chopped chocolate
    • 2 cups ice cubes
    • 1 teaspoon ground cinnamon adds warmth and depth
    • 1/4 teaspoon chili powder for a subtle spicy kick
    • 1 tablespoon sugar optional, to enhance sweetness

    Equipment

    • Blender
    • Saucepan

    Method
     

    1. Heat water in a small saucepan over low heat until just simmering.
    2. Add the chocolate chips to the hot water and stir until completely melted and smooth, creating a chocolate syrup.
    3. Pour the warm chocolate mixture into the blender and add the ice cubes.
    4. Add ground cinnamon, chili powder, and sugar to the blender.
    5. Blend on high speed until the mixture is smooth, icy, and velvety—about 30-40 seconds. You should see the ice break down completely, and the drink should have a thick, frosty texture.
    6. Pour the chilled chocolate spiced slushie into glasses. The mixture should look rich, smooth, and chilled with a slightly icy surface.
    7. Enjoy immediately with a straw or garnish with a sprinkle of cinnamon if desired. The drink will be velvety, refreshingly cold, with a hint of warming spice in every sip.

    Notes

    For an extra kick, sprinkle a pinch more chili powder on top before serving.

    There’s something enchanting about crafting a beverage that surprises yet comforts. This spiced chocolate slushie stands out as a delightful way to beat the heat while indulging in rich, layered flavors. It’s perfect for those who crave a little adventure in their icy treats.

    As summer stretches on, having a recipe like this up your sleeve can turn an average day into a special occasion. Cool, spicy, and utterly satisfying—this drink is a reminder that sometimes, the best surprises are in the simplest ingredients. Cheers to refreshing discoveries.

  • The Art of Chilling: Oreo Slushie Secrets You Never Knew

    The Art of Chilling: Oreo Slushie Secrets You Never Knew

    Imagine holding a glass of deep, icy blackness, the sweet aroma of Oreo cookies wafting up with each chilled sip. My obsession with this Oreo slushie started during a sticky summer, when I craved something both nostalgic and shockingly refreshing. It’s the kind of treat that feels like a secret weapon against relentless heat.

    This recipe isn’t just about blending cookies and ice—it’s about capturing a moment of pure, frosty delight that awakens childhood memories. Every sip gives you that satisfying crunch of crushed Oreos combined with smooth, cold creaminess, a perfect harmony of flavor and texture. It’s funny how such simple ingredients can turn into a magic potion in no time.

    Oreo Slushie

    The Oreo slushie is a cold, frosty blended beverage made with crushed Oreo cookies, ice, and milk, resulting in a smooth and creamy texture with crunchy cookie bits. It is prepared by combining ingredients in a blender until thick and icy, then serving chilled. The final appearance features a dark, speckled drink with a rich, indulgent aroma.
    Prep Time 10 minutes
    Total Time 10 minutes
    Servings: 2
    Course: Main Course
    Cuisine: global
    Calories: 250

    Ingredients
      

    • 8 cookies Oreo cookies preferably chilled
    • 2 cups ice cubes adjust for desired thickness
    • 1 cup milk cold, preferably whole or 2%
    • 2 tbsp sugar optional, for added sweetness

    Equipment

    • Blender
    • Measuring cups and spoons

    Method
     

    1. Place the Oreo cookies into the blender and pulse a few times until finely crushed, releasing their chocolatey aroma.
    2. Add the ice cubes to the crushed Oreos, then pour in the cold milk. Drizzle in sugar if you want extra sweetness.
    3. Secure the lid on the blender and blend on high speed until the mixture is thick, creamy, and well combined, about 30-45 seconds. You should see a frosty, slightly chunky texture with tiny cookie bits visible.
    4. Stop the blender and check the consistency; blend a few seconds more if you prefer it smoother, or less if you’d like more cookie crunch.
    5. Pour the Oreo slushie into glasses, feeling the cold frost on the outside as you do so. The dark, speckled drink should be thick and icy, with bits of Oreo visible throughout.
    6. Serve immediately, garnished with a whole Oreo or a drizzle of chocolate syrup if desired. Enjoy the rich, crunchy, and creamy treat right away.

    Notes

    For a creamier texture, use less ice or blend for a longer time. Adjust sweetness by varying sugar or adding flavored syrups.
    The beauty of this Oreo slushie lies in its simplicity. It’s perfect for quick gatherings or solo indulgence on a hot afternoon. Plus, it’s a breeze to customize—add a shot of milk for extra creaminess or a dash of cocoa powder for a richer flavor.

    Whether you’re reminiscing about carefree summer days or just need a quick weekend pick-me-up, this recipe fits right in. It’s all about celebrating the little joys that keep us cool and smiling through everyday chaos.