
Sometimes, life demands quick sweets that don’t require turning on the oven or fussing over ingredients. This no-bake peanut butter ball recipe is my go-to when I want something rich, satisfying, and ready in just minutes. It’s a little messy, a little nostalgic, and totally forgiving—perfect for those chaotic afternoons or last-minute cravings.
There’s something about the combination of peanut butter, chocolate, and a hint of vanilla that just hits differently when you’re short on time but still need a sweet punch. I love how these little bites remind me of childhood treats, but with a modern, no-mess twist that makes them so easy to whip up. No bake doesn’t mean no flavor—these are deeply satisfying without a single hot oven involved.
In my kitchen, these peanut butter balls are the unsung heroes of snack time, especially when I want something quick, portable, and genuinely homemade. They’re perfect for sharing, freezing for later, or simply keeping on hand for that instant sweet fix. Honestly, they’re as much about the process as the final treat—messy hands, good laughs, and a batch that disappears way too fast.
This recipe is my secret weapon for when I need a quick, no-fuss treat that hits all the right comfort notes without turning on the oven. It’s perfect for those chaotic afternoons or unexpected guests, providing a homemade sweet fix in minutes. I love how it combines nostalgic flavors with a modern, effortless approach that anyone can master—even on their busiest days.
Unexpected Depth in Simplicity
- I love how these bites take me back to childhood afternoons spent sneaking peanut butter from the jar.
- There’s a quiet pride in making something so simple yet deeply satisfying without turning on the oven.
- Sometimes, I need a quick treat that doesn’t require a fuss, and these hit that sweet spot every single time.
- The chaos of mixing, rolling, and tasting these little balls is oddly therapeutic after a hectic day.
- Sharing these with friends always sparks nostalgic conversations and smiles, reminding me how comforting good sweets can be.
The story behind this recipe
- This recipe started as a way to use up leftover peanut butter and a handful of chocolate chips when I was in a rush. I wanted something that felt indulgent but didn’t require any baking or fuss. Turns out, these little bites are perfect for when I need a quick fix that’s still homemade and satisfying.
- One lazy afternoon, I was experimenting in the kitchen, feeling too tired to turn on the oven. I threw together some peanut butter, oats, and a dash of honey, rolled them into balls, and dipped them in chocolate. The result was unexpectedly delicious, and now I keep a batch in the freezer for those moments when cravings strike.
- heading: ‘Unexpected Depth in Simplicity’
Historical tidbits about peanut butter balls
- These peanut butter balls trace back to mid-20th century home kitchens, where simplicity and convenience reigned supreme.
- They gained popularity during the 1960s as a quick, no-bake treat for busy families craving something sweet and satisfying.
- Originally, recipes used crushed graham crackers or oats for binding, making them accessible with pantry staples.
- The combination of peanut butter and chocolate became a nostalgic comfort in American households, especially during holidays.
- Today, they’re a favorite for potlucks, school snacks, and instant indulgence, echoing a timeless, easy-to-make charm.
Ingredient breakdown: key components
- Creamy peanut butter: I prefer a natural, unsweetened variety for a richer, nuttier flavor that shouts in every bite. Swap with almond or cashew butter if you like a different nutty punch.
- Chocolate chips: I love semi-sweet for balance, but dark chocolate adds a smoky depth. For dairy-free, coconut oil-coated chips melt smoothly without losing that oozy charm.
- Oats: Old-fashioned rolled oats give texture and chew. If you’re gluten-free, make sure they’re certified GF or try crushed rice cereal for a similar crunch.
- Honey or maple syrup: I lean towards honey for that floral sweetness, but maple syrup keeps it vegan and adds a deeper, caramel note. Adjust for sweetness—start small.
- Vanilla extract: Just a splash brightens everything up. Skip or replace with a pinch of cinnamon for a warm twist or skip entirely if you prefer pure peanut flavor.
- Optional add-ins: Sea salt, chopped nuts, or dried fruit—these can elevate or personalize your bites. Just don’t overdo the mix-ins; keep the texture balanced.
- Optional coating: Extra chocolate for dipping or sprinkling, or even a dusting of crushed nuts—adds crunch and makes these little treats look fancy.
Spotlight on key ingredients
Peanut Butter:
- Creamy peanut butter: I prefer a natural, unsweetened variety for a richer, nuttier flavor that shouts in every bite. Swap with almond or cashew butter if you like a different nutty punch.
- Chocolate chips: I love semi-sweet for balance, but dark chocolate adds a smoky depth. For dairy-free, coconut oil-coated chips melt smoothly without losing that oozy charm.
Sweetener & Oats:
- Old-fashioned rolled oats: They give texture and chew. If you’re gluten-free, make sure they’re certified GF or try crushed rice cereal for a similar crunch.
- Honey or maple syrup: I lean towards honey for that floral sweetness, but maple syrup keeps it vegan and adds a deeper, caramel note. Adjust for sweetness—start small.
Notes for ingredient swaps
- Dairy-Free: Use coconut oil-based chocolate chips for a smooth melt without dairy, but expect a slightly different flavor profile.
- Nut Butter Alternatives: Swap peanut butter for almond or cashew butter for a subtler, sweeter nuttiness. Natural or roasted varieties work best.
- Sweetener Options: Maple syrup or agave nectar can replace honey. They add a different depth of sweetness and slightly thinner texture.
- Oats: Gluten-free oats are a must if you’re sensitive. You can also try crushed rice cereal or quinoa flakes for crunch and binding.
- Chocolate Coating: Carob chips are a good substitute if you want a caffeine-free, slightly less bitter chocolate flavor, but they melt differently.
- Add-ins: Dried cranberries, chopped nuts, or coconut flakes can be mixed in for extra texture. Adjust the quantity to avoid overwhelming the core flavor.
- Flavor Enhancers: A pinch of sea salt or a sprinkle of cinnamon in the mixture can boost flavor depth without complicating the process.
Equipment & Tools
- Mixing bowl: Combine ingredients evenly
- Large spoon or spatula: Mix ingredients thoroughly
- Small cookie scoop or tablespoon: Portion the mixture into uniform balls
- Baking sheet with parchment or silicone mat: Hold the formed balls for chilling
- Microwave-safe bowl: Melt the chocolate chips smoothly
- Fork: Dip and coat the balls in chocolate
Step-by-step guide to peanut butter balls
- Gather all your equipment and ingredients. Have a baking sheet lined with parchment or a silicone mat ready for rolling and setting.
- In a large mixing bowl, combine 1 cup of creamy peanut butter, 1/4 cup of honey, and 1 teaspoon of vanilla extract. Mix until smooth and slightly fluffy, about 2 minutes.
- Add 1 1/2 cups of old-fashioned rolled oats and 1/2 cup of mini chocolate chips to the peanut butter mixture. Stir well until everything is evenly incorporated. If the mixture feels too sticky, sprinkle in a little more oats, a tablespoon at a time.
- Using a small cookie scoop or your hands, portion out about 1 tablespoon of the mixture. Roll between your palms into a compact ball, about 1 inch in diameter. Place each ball on the prepared baking sheet, spacing them about 1 inch apart.
- Once all the balls are formed, melt 1 cup of semi-sweet chocolate chips in a microwave-safe bowl in 20-second bursts, stirring after each, until smooth and shiny. This takes around 1 minute total. Alternatively, melt in a double boiler.
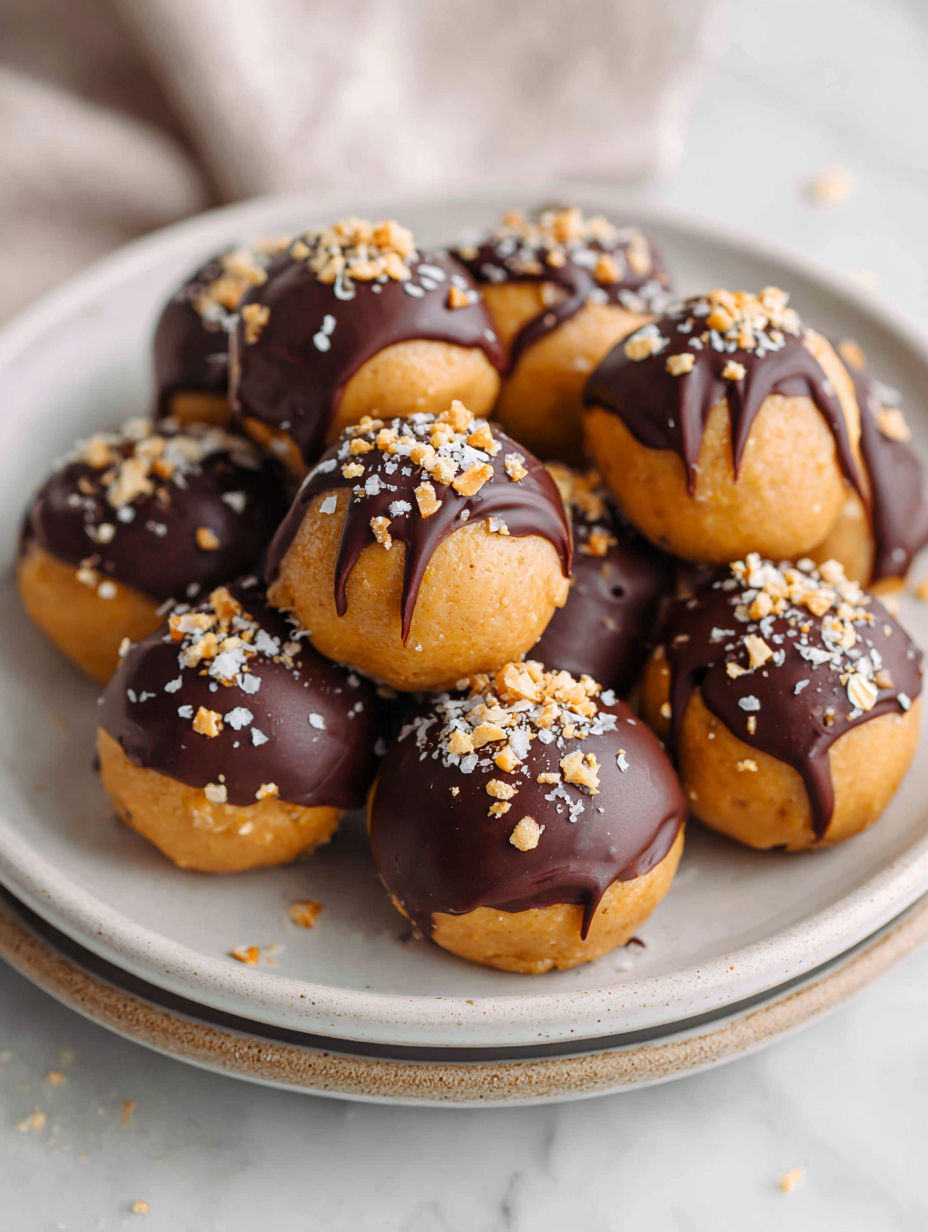
- Dip each peanut butter ball into the melted chocolate, using a fork to help. Let the excess chocolate drip off. Place the coated balls back on the parchment-lined sheet. For a prettier finish, drizzle with additional chocolate if desired.
- Chill the peanut butter balls in the fridge for at least 30 minutes to set the chocolate. They firm up as the chocolate cools and hardens.
- After chilling, check the texture. The chocolate should be crackly but not brittle, and the balls should hold their shape firmly. Serve straight from the fridge for best texture.
Chill the coated peanut butter balls in the fridge for at least 30 minutes to let the chocolate fully set. Serve straight from the fridge for a firm bite, or store in an airtight container for up to a week. For longer storage, freeze them and thaw at room temperature before serving.
How to Know It’s Done
- Chocolate coating is shiny and firm upon cooling.
- Balls are compact and hold shape without cracking when gently squeezed.
- The mixture is easily scoopable and sticks together without being too sticky.
No-Bake Peanut Butter Balls
Ingredients
Equipment
Method
- Start by placing 1 cup of creamy peanut butter, 1/4 cup of honey, and a teaspoon of vanilla extract into a large mixing bowl. Stir everything together until the mixture is smooth and slightly fluffy, releasing a nutty aroma.
- Add 1 1/2 cups of rolled oats and 1/2 cup of mini chocolate chips to the bowl. Fold everything together with a spatula until the ingredients are evenly combined and the mixture feels sticky but manageable.
- Using a small cookie scoop or tablespoon, portion out about 1 tablespoon of the mixture. Roll it between your palms to create a compact ball, about 1 inch in diameter, and place it on a parchment-lined baking sheet. Repeat with the remaining mixture, spacing the balls evenly.
- Pour 1 cup of semi-sweet chocolate chips into a microwave-safe bowl. Microwave in 20-second bursts, stirring between each, until the chocolate is melted and smooth with a shiny finish. This should take around 1 minute total.
- Using a fork, dip each peanut butter ball into the melted chocolate, turning to coat evenly. Allow any excess chocolate to drip off before placing the coated ball back on the parchment. Repeat with all the balls, then place the tray in the fridge.
- Chill the coated peanut butter balls in the refrigerator for at least 30 minutes, or until the chocolate is set and firm. Once chilled, they are ready to serve or store in an airtight container in the fridge for up to a week.
Pro tips for perfect peanut butter balls
- Bolded Mini-Head: Chill the chocolate just until shiny and smooth; over-melting can cause seizing.
- Bolded Mini-Head: Use cold hands when rolling; it prevents the mixture from sticking and makes shaping easier.
- Bolded Mini-Head: When dipping, tap off excess chocolate gently; it prevents drips and creates a smooth coating.
- Bolded Mini-Head: For even chocolate coats, dip and then place on a cool surface; avoid stacking immediately.
- Bolded Mini-Head: Slightly under-melt your chocolate; it firms up faster and reduces over-torching risk.
- Bolded Mini-Head: Refrigerate the balls for at least 30 minutes; they set better and are less sticky to handle.
- Bolded Mini-Head: Add a pinch of sea salt to the chocolate; it enhances sweetness and adds a subtle savory note.
Common mistakes and how to fix them
- FORGOT to chill: Let chocolate set for 30 minutes; if sticky, chill longer and check texture.
- DUMPED too much: Use a small spoon for controlled portioning; avoid overloading with ingredients.
- OVER-TORCHED chocolate: Melt in short bursts on low power; stir often to prevent burning and seize.
- MISSED mixing: Combine ingredients thoroughly to ensure even flavor and texture distribution.
Quick fixes and pantry swaps
- If chocolate seizes, splash in a few drops of coconut oil and stir until smooth.
- When mixture is too sticky, patch with a handful of extra oats for better rolling.
- Splash cold water on your hands to prevent sticking when rolling the balls.
- Dumped too much chocolate? Dip only half the ball for a lighter coating.
- When chocolate crackles during dipping, shield with a thin layer of warm oil for shine.
Prep, store, and reheat tips
- You can prepare the peanut butter mixture a day in advance; keep it covered in the fridge to prevent drying out, and the flavors will meld beautifully.
- Chilled chocolate coating can be melted and stored in a jar or bowl, then gently reheated in short bursts until smooth, for a glossy finish.
- Store the finished peanut butter balls in an airtight container in the fridge for up to one week, maintaining their firm texture and rich flavor.
- For longer storage, freeze the balls on a baking sheet until solid, then transfer to a zip-top bag. They keep well for up to three months.
- Reheat chilled or frozen balls briefly at room temperature or in the fridge; the chocolate may soften slightly, but the flavors stay rich and satisfying.
Top questions about peanut butter balls
1. Can I use chunky peanut butter?
Use natural, unsweetened peanut butter for best flavor and texture. If you prefer creamy, smooth, or chunky, choose accordingly, but natural varieties give a richer, nuttier taste.
2. Can I use chopped chocolate instead of chips?
Yes, you can substitute chocolate chips with chopped chocolate bars or cacao nibs for a different texture and flavor intensity.
3. Can I substitute honey?
You can replace honey with maple syrup or agave nectar. The flavor will be slightly different—more caramel or neutral—so adjust sweetness accordingly.
4. Can I use different grains instead of oats?
Rolled oats can be swapped for crushed graham crackers, crushed cookies, or gluten-free cereal to alter texture or accommodate dietary needs.
5. Are these dairy-free?
To keep these dairy-free, choose dairy-free chocolate chips and skip any dairy ingredients. The taste remains rich, but the texture might be slightly different.
6. How long do they last?
Store the balls in an airtight container in the fridge for up to a week, or freeze for longer storage, about 3 months. Let thaw slightly before serving.
7. My chocolate is too thick or crackly, how fix it?
If the chocolate coating is too thick or cracks, gently reheat it in short bursts or add a splash of coconut oil for better pourability.
8. How do I get the right texture?
For softer balls, chill for at least 30 minutes. For firmer texture, refrigerate longer or freeze briefly before serving.
9. How do I get a smooth chocolate coating?
When dipping, tap off excess chocolate gently to prevent drips and ensure a smooth, even coating on each ball.
10. How should I handle and serve them?
Use a silicone spatula or your hands for rolling, and refrigerate the finished treats to set the chocolate without melting.
These no-bake peanut butter balls are surprisingly versatile, making them my quick fix for both busy weekdays and casual get-togethers. They bring a nostalgic sweetness that’s hard to resist, especially when the chocolate cracks and melts in your mouth. No matter the season, they’re a small, satisfying reminder that simple ingredients can deliver real comfort.
In the end, it’s about those little moments—messy hands, shared laughs, and that first bite of something homemade and familiar. They’re not just treats; they’re a way to pause, indulge, and enjoy the chaos of everyday life.
Welcome to Proud of This Mess – a place where food, creativity, and a little chaos come together on a plate!
I’m Emily Carter, the founder and heart behind this little corner of the internet. Born and raised in the United States, I’ve always had a passion for cooking, experimenting, and sharing the messy, delicious journey of creating food that brings people together. My philosophy is simple: good food doesn’t have to be perfect, and a little mess makes it memorable.
At Proud of This Mess, we believe that cooking is more than just following recipes—it’s about exploring flavors, discovering new techniques, and making every meal an experience worth savoring. From comforting weeknight dinners to indulgent desserts, our goal is to inspire home cooks of all levels to embrace the joy of food without fear of imperfection.