
There’s something about late-night sweet cravings that just won’t quit, and this no bake Oreo cheesecake is my go-to fix when I want something quick, satisfying, and not a fuss to put together in the dark. No oven, no fuss, just crushed Oreos and cream doing all the heavy lifting. It’s like a little rebellion against the usual baking marathon, especially when I’m too tired to turn on the stove but still want that creamy, chocolatey hit.
I love how forgiving this recipe is—no fancy techniques, just a bit of patience while it chills. It’s the kind of dessert that feels indulgent but doesn’t demand hours in the kitchen. Plus, the smell of crushed Oreos mixing with cream cheese is somehow oddly comforting, like a warm hug late at night. It’s a perfect treat for those moments when only something rich and cold will do.
This recipe is inspired by my late-night craving for something sweet but easy enough to make in the dark without turning on the stove.
A Midnight Craving Solution
- Making this no bake cheesecake reminds me of my first apartment—those late nights experimenting with simple desserts.
- I get a little thrill whenever I see the smooth, creamy surface after the chill, like a mini victory each time.
- This recipe is my secret weapon for last-minute gatherings—everyone always leaves asking for the recipe, and I love that pride.
- There’s a nostalgic joy in crushing Oreos between my fingers, feeling that rich, chocolaty dust under my nails.
- I’ve made this so many times I can almost do it in my sleep, yet it still surprises me how effortlessly it comes together.
The story behind this recipe
- This recipe was born out of a lazy summer afternoon when I needed a dessert that wouldn’t demand turning on the oven or fussing with layers. I was craving something cool, creamy, and chocolatey, but I didn’t want to wait hours or deal with messy baking. The idea of crushing Oreos and mixing them with cream cheese struck me as pure comfort, something that could come together as easily as a snack.
- Every time I make this, I remember the chaos of trying to entertain with limited time and ingredients—yet somehow, this dessert always saves the day. It’s become my go-to for spontaneous gatherings or a simple treat after a long day. There’s a satisfaction in how quickly it’s assembled, and the fact that it tastes like a decadent bakery-style cheesecake, without the hassle.
- heading:
Historical & Cultural Tidbits
- This no bake Oreo cheesecake has roots in 1970s American dessert innovation, where convenience became key.
- The crushed Oreo crust was originally a way to use up leftover cookies, now it’s a beloved classic.
- Surprisingly, early versions of no-bake cheesecakes gained popularity in the UK during the 1980s as quick party treats.
Key ingredients at a glance
- Oreo cookies: First, I love how the rich, chocolatey aroma fills the kitchen when crushing these—just like childhood. You can swap in gluten-free Oreos if needed, but the texture and flavor do shift slightly.
- Cream cheese: I prefer the tangy punch it gives, but if you want a lighter version, mascarpone works too—just a bit less tang, more mellow creaminess.
- Heavy cream: Whips up to a fluffy cloud that gives the cheesecake structure. If you want a lighter finish, try whipped coconut cream, but keep in mind the flavor will be subtly different.
- Butter: I melt it into the Oreo crumbs, adding richness. For a vegan tweak, coconut oil is a good sub, though it adds a faint coconut aroma.
- Sugar: Just a touch to balance the richness. You can skip it if your Oreos are extra sweet, but don’t skip the sweetening entirely—it’s what makes it addictive.
- Lemon juice: A splash brightens the cream cheese, cutting through the richness. If you don’t have fresh, a little bottled lemon works, but fresh is brighter.
- Optional toppings: Fresh berries or chocolate shavings elevate the look and flavor, but honestly, this cheesecake is delicious all on its own.
Spotlight on key ingredients
Oreo cookies:
- The rich, chocolaty aroma when crushing these is nostalgic and inviting. They become a fine, oozy dust that clings to your fingers.
- Cream cheese: Its tangy, smooth texture melts slightly during mixing, creating a luscious, velvety filling that’s unmistakably creamy and slightly tart.
Heavy cream and lemon juice:
- Heavy cream: Whips into a cloud of stiff peaks, adding airy lightness to the dense filling. The first crackle as it reaches peak is satisfying and tells you it’s ready.
- Lemon juice: Brightens the entire mixture with a citrus shimmer that cuts through the richness, making each bite feel fresh despite the indulgence.
Notes for ingredient swaps
- Dairy-Free: Swap cream cheese for vegan cream cheese or blended silken tofu for a similar creamy texture, though the tang may be milder.
- Gluten-Free: Use gluten-free Oreos or omit the cookie crust altogether and opt for a nut-based crust like almonds or pecans.
- Sweetener: Replace sugar with honey or maple syrup for a richer, more complex sweetness—adjust the amount to taste.
- Vegan Cream: Coconut whipped cream can replace heavy cream, adding a subtle coconut flavor and a lighter, airy finish.
- Lemon Juice: Use bottled lemon juice or lime juice if fresh lemons aren’t available; the brightness is key, so don’t skip it.
- Cookies: For a different flavor, try graham crackers or chocolate digestives, but expect a different biscuit flavor profile.
- Toppings: Fresh berries, caramel sauce, or chocolate shavings can add texture and flavor, especially if you want extra visual appeal.
Equipment & Tools
- Springform pan: Holds the crust and filling, easy to remove the cheesecake.
- Food processor or zip-top bag: Crush Oreos efficiently and evenly.
- Mixing bowls: Combine and whip ingredients separately.
- Spatula: Spread the filling and press the crust.
- Electric mixer or whisk: Whip the cream to stiff peaks.
- Knife: Slice the cheesecake smoothly.
Step-by-step guide to no bake Oreo cheesecake
- Gather your equipment: a 20cm (8-inch) springform pan, a mixing bowl, a spatula, and a food processor or zip-top bag for crushing Oreos.
- Crush Oreos: Place about 24 cookies in a food processor or in a zip-top bag, then crush until fine crumbs. Measure out 1 3/4 cups of crushed Oreos.
- Make the crust: Mix Oreo crumbs with 4 tbsp melted butter in a bowl until evenly coated. If using a food processor, pulse briefly to combine.
- Press the crust: Transfer Oreo mixture into the springform pan. Use the back of a spoon or your fingers to press evenly into the base and slightly up the sides. Chill in the fridge for 15 minutes to set.
- Prepare the filling: In a mixing bowl, beat 250g (8 oz) softened cream cheese with 1/4 cup sugar until smooth and fluffy, about 2 minutes.
- Add flavor: Mix in 1 tsp vanilla extract and 1 tbsp lemon juice for brightness.
- Whip the cream: In a separate bowl, whip 1 cup heavy cream until stiff peaks form, about 3-4 minutes.
- Combine: Gently fold the whipped cream into the cream cheese mixture. Be careful not to deflate the air—fold until just combined.
- Assemble the cheesecake: Pour the filling over the chilled crust. Smooth the top with a spatula. Cover loosely with plastic wrap.
- Chill to set: Refrigerate for at least 4 hours or overnight. The filling should be firm to the touch and hold a slight jiggle in the center.
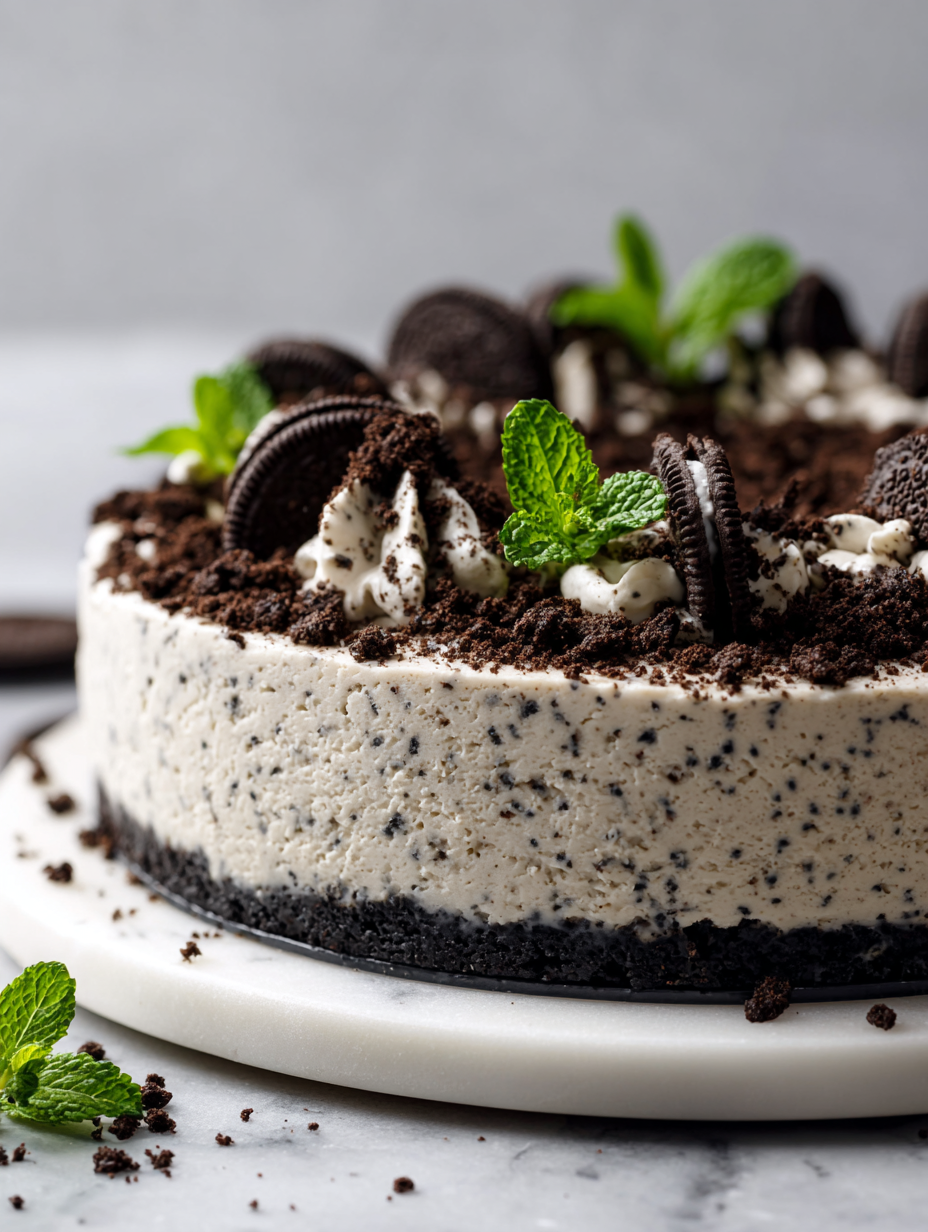
- Finish and serve: Remove the sides of the springform pan carefully. Decorate with crushed Oreos, chocolate shavings, or berries if desired. Slice with a clean, warm knife for neat pieces.
Refrigerate the assembled cheesecake for at least 4 hours, preferably overnight. Remove sides of the springform pan carefully. Decorate with toppings if desired. Slice with a warm, sharp knife for clean cuts and serve chilled.
How to Know It’s Done
- Crust is firm and evenly pressed without cracks.
- Filling is smooth, no lumps, and holds a gentle jiggle when ready.
- Cheesecake has a creamy, dense texture with a glossy surface.
No Bake Oreo Cheesecake
Ingredients
Equipment
Method
- Place about 24 Oreos in a food processor or zip-top bag and crush until fine crumbs form, measuring out about 1 3/4 cups. This creates your crunchy, chocolaty crust base.
- Mix the crushed Oreos with 4 tablespoons of melted butter in a bowl until the crumbs are evenly coated and resemble wet sand. This helps the crust hold together when pressed.
- Press the Oreo mixture firmly into the bottom of a springform pan, using the back of a spoon or your fingers to create an even layer. Chill the crust in the fridge for about 15 minutes to set.
- While the crust chills, soften the cream cheese in a mixing bowl and beat until smooth and fluffy, about 2 minutes. Add in the sugar, vanilla extract, and lemon juice, mixing briefly to combine.
- In a separate bowl, whip the heavy cream with an electric mixer or whisk until stiff peaks form, listening for the telltale crackle when it reaches full stiffness.
- Gently fold the whipped cream into the cream cheese mixture using a spatula, taking care to keep the mixture light and airy. This creates a creamy, fluffy filling with a rich chocolate flavor.
- Pour the filling over the chilled crust, spreading it evenly with a spatula. Smooth the surface and cover loosely with plastic wrap.
- Refrigerate the cheesecake for at least 4 hours or overnight until the filling is firm and glossy on top, with a smooth, dense appearance.
- Once set, carefully remove the sides of the springform pan. Decorate the top with additional crushed Oreos or chocolate shavings if desired, then slice with a warm, sharp knife for clean pieces.
- Serve the cheesecake chilled, enjoying its rich, creamy texture with a crunchy Oreo crust and glossy, chocolatey top. Delight in this quick, no bake treat that’s perfect for late-night cravings or spontaneous gatherings.
Pro Tips for Perfect Cheesecake
- Bolded mini-head: Chill the crust before filling to prevent cracks and ensure stability.
- Bolded mini-head: Fold whipped cream gently into the cheese mixture to keep the cheesecake light and airy.
- Bolded mini-head: Use a warm knife when slicing to get clean, neat pieces.
- Bolded mini-head: Press the crust firmly and evenly; a flat base makes for easier slicing later.
- Bolded mini-head: Don’t overmix the filling; it can deflate the whipped cream and make it dense.
- Bolded mini-head: Add toppings right before serving to keep them fresh and visually appealing.
- Bolded mini-head: If the cheesecake cracks, a quick swipe of whipped cream can hide the imperfection.
Common mistakes and how to fix them
- FORGOT to chill the crust before adding filling → Chill for 15 minutes to prevent cracking.
- DUMPED the whipped cream into the cream cheese mixture all at once → Fold gently to keep it airy.
- OVER-TORCHED the edges of the cheesecake → Remove from fridge immediately if edges turn golden.
- FAILED to check the jiggle test before refrigerating → Gently shake; slight wobble means it’s ready.
Quick fixes and pantry swaps
- When the crust crumbles, spritz with a little water and press back together gently.
- If the filling is too runny, add a spoonful of crushed Oreos for thickness and flavor.
- Splash a bit of hot water on the knife before slicing for cleaner cuts.
- Patch cracks by smoothing with a warm spatula or adding a dollop of whipped cream.
- Shield the cheesecake from fridge odors by covering it tightly with plastic wrap.
Make-Ahead & Storage Tips
- Prepare the crust and press it into the pan a day ahead; keep covered in the fridge to maintain freshness.
- Assemble the filling and whip the cream the night before, then fold and refrigerate until ready to set.
- This cheesecake benefits from overnight chilling—its flavors meld and texture firms up beautifully after 12 hours in the fridge.
- Reheat slices gently in the microwave for 10-15 seconds if you prefer it slightly softer; watch for melting or over-softening.
- Store leftovers tightly wrapped in plastic in the fridge for up to 3 days; the texture remains creamy and the flavors stay bright.
Top questions about no bake Oreo cheesecake
1. Why is my cream cheese lumpy?
Use room temperature cream cheese for smooth mixing, which prevents lumps and makes the process easier.
2. How long should I chill the cheesecake?
Chill the cheesecake for at least 4 hours, but overnight is best, to let it set properly and enhance flavor.
3. Can I make this dairy-free?
Replace heavy cream with coconut cream for a dairy-free version; whip it until fluffy, just like dairy cream.
4. How finely should I crush the Oreos?
Crush Oreos finely for a smooth crust, but leave some larger pieces if you prefer a bit of crunch in every bite.
5. How do I get neat slices?
Use a warm knife to slice; dip it in hot water, wipe dry, then cut for clean slices without cracks.
6. My cheesecake cracked, what now?
If your cheesecake cracks, gently cover the cracks with whipped cream or a drizzle of chocolate sauce.
7. Can I customize the flavor?
Add a splash of lemon juice or vanilla extract to brighten flavors or adjust sweetness to taste before setting.
8. Can I make the crust gluten-free?
Yes, you can substitute gluten-free cookies or graham crackers for the crust, but texture and flavor will vary slightly.
9. My filling is too runny, what do I do?
If the mixture is too runny, fold in extra crushed Oreos or refrigerate briefly to thicken before pouring into the crust.
10. How long does it last in the fridge?
Store leftovers covered in the fridge for up to 3 days; the texture remains creamy, and flavors stay fresh.
This no bake Oreo cheesecake is more than just a quick fix; it’s a reminder that some of the best desserts come together with minimal fuss and maximum flavor. Each bite offers that familiar crunch, creamy richness, and just enough sweetness to satisfy a craving in a moment’s notice.
In times when time feels tight but the need for something indulgent persists, this recipe saves the day. It’s a simple pleasure that’s hard to resist, especially when served chilled and topped with a sprinkle of crushed Oreos or fresh berries—little touches that elevate it from everyday to special.
Welcome to Proud of This Mess – a place where food, creativity, and a little chaos come together on a plate!
I’m Emily Carter, the founder and heart behind this little corner of the internet. Born and raised in the United States, I’ve always had a passion for cooking, experimenting, and sharing the messy, delicious journey of creating food that brings people together. My philosophy is simple: good food doesn’t have to be perfect, and a little mess makes it memorable.
At Proud of This Mess, we believe that cooking is more than just following recipes—it’s about exploring flavors, discovering new techniques, and making every meal an experience worth savoring. From comforting weeknight dinners to indulgent desserts, our goal is to inspire home cooks of all levels to embrace the joy of food without fear of imperfection.