
This no-bake peanut oat bar recipe is my shortcut to childhood in a bite. I remember tearing into similar bars after school, messy hands and all, the salty-sweet crunch always hitting just right. Now, I love how quick and honest this version is—no oven, no fuss, just ingredients coming together with a bit of patience.
What makes this recipe stand out isn’t just the ease but the way it captures that nostalgic, comforting feel of those old-school snacks. It’s perfect for mornings when breakfast feels like too much effort or when late-night cravings sneak up. The smell of toasted oats and peanut butter melding together makes my kitchen smell like a warm hug, even on busy days.
Focusing on the nostalgic comfort of childhood snacks, this recipe transforms a classic treat into a simple, wholesome no-bake bar that’s perfect for busy mornings or late-night cravings. I love how it brings back memories of weekend kitchen chaos, but with a grown-up twist on flavor and texture. It’s about capturing that gooey, salty-sweet balance we all crave, without turning on the oven or fussing over complicated steps.
The story behind this recipe
- This recipe came together one lazy afternoon when I realized I was out of my usual snack stash. Instead of running to the store, I started rummaging through the pantry, remembering how my grandma used to press peanut butter and oats into everything—cookies, bars, you name it. That nostalgic crunch and salty-sweet aroma hit me hard, and I figured, why not turn it into a no-fuss bar?
- It’s a bit of a love letter to those childhood afternoons spent in the kitchen, trying to mimic my mom’s baking but with zero oven involved. Sometimes, simplicity turns out to be the best kind of comfort, especially when you’re craving something satisfying but don’t want to wait or fuss. Plus, these bars are just messy enough to feel like a treat, without the cleanup.
- heading: The story behind this recipe
Ingredient breakdown: key components
- Peanut butter: I use creamy peanut butter for a smooth, rich base that melts into the oats—try crunchy for extra texture if you like a bit of crunch.
- Old-fashioned oats: They give that hearty chew I love—if you prefer a softer bite, quick oats can work, but lose a bit of that rustic texture.
- Honey or maple syrup: I like honey for its floral sweetness and stickiness—adjust quantity for more or less sweetness, or try brown rice syrup for a milder flavor.
- Coconut oil: It helps everything bind and adds subtle richness—skip if you want a firmer bar, but don’t skip completely; it’s key for texture.
- Sea salt: Just a pinch to balance the sweetness—if you use salted peanut butter, reduce or skip the added salt, but don’t forget to taste before setting.
- Add-ins (optional): Chocolate chips, dried fruit, or seeds—layer them in for bursts of flavor and crunch, but keep it balanced so the bars don’t get overwhelmed.
- Vanilla extract: A splash adds warmth and a hint of depth—skip if you’re out, but it really lifts the overall flavor.
Spotlight on key ingredients
Peanut Butter:
- I love the way creamy peanut butter melts into the oats, creating a rich, velvety base. For extra crunch, try crunchy peanut butter, but smooth is easier to spread evenly.
- Old-fashioned oats: They give the bars a hearty chew and rustic texture. If you prefer softer bars, quick oats work, but they lose some of that chewy integrity.
Sweetener & Oil:
- Honey or maple syrup: I choose honey for its floral sweetness and sticky texture that helps hold everything together. Maple syrup adds a caramel note, and both create that oozy, sticky bite we crave.
- Coconut oil: It acts as a binder and adds a subtle richness. When melted, it creates a glossy sheen and helps the mixture set firm without drying out.
Notes for ingredient swaps
- Nuts & Seeds: I prefer roasted peanuts for a deep, toasty flavor—try raw nuts if you want a milder, fresher taste.
- Sweetener: Maple syrup offers a caramel-like richness—honey provides floral sweetness, but agave is a neutral swap.
- Oats: Use quick oats for a softer bite—if you like more chew, stick with old-fashioned, but avoid instant oats for texture.
- Binding Fat: Coconut oil adds a subtle coconut aroma and helps set the bars—olive oil gives a different, more neutral richness.
- Add-ins: Chocolate chips melt slightly and add gooey pockets—dried fruit gives bursts of sweetness and chew, but seeds add crunch.
- Salt: Sea salt balances sweetness with a briny hit—skip it if using salted peanut butter, but taste first.
- Vanilla Extract: Adds warmth and depth—skip if you’re out, but it really enhances the overall flavor.
Equipment & Tools
- 20x20cm (8×8 inch) dish: To shape and set the bars
- Mixing bowls: To combine ingredients
- Spatula: To mix and press the mixture down
- Parchment paper: For easy removal and cleanup
- Sharp knife: To cut the bars cleanly
Step-by-step guide to no-bake bars
- Gather your equipment: a 20x20cm (8×8 inch) square dish, mixing bowls, a spatula, parchment paper, and a sharp knife.
- Line the dish with parchment, leaving some overhang for easy removal later. This helps with cleanup and neat edges.
- In a large mixing bowl, combine 2 cups (200g) old-fashioned oats and 1/2 teaspoon sea salt. Mix well.
- In a microwave-safe bowl, melt 1/2 cup (125g) peanut butter, 1/3 cup (80ml) honey, and 2 tablespoons (28g) coconut oil. Microwave in 30-second bursts, stirring each time, until smooth and glossy. This takes about 1-2 minutes total.
- Pour the peanut butter mixture over the oats. Use a spatula to stir until everything is coated evenly. The mixture should feel sticky but not dry.
- Transfer the mixture into your prepared dish. Use the back of a spatula or your hands to press it down firmly and evenly—this step is key for bars that hold together.
- Once pressed, sprinkle optional add-ins like chocolate chips or dried fruit on top and gently press them in.
- Place the dish in the fridge for at least 2 hours, or until the mixture is firm enough to cut. For best results, let it rest overnight, covered with plastic wrap.
- When ready, lift the block out using the parchment overhang. Cut into 8-10 bars with a sharp knife, pressing down firmly and wiping the blade between cuts.
- Serve straight from the fridge for a chewy, gooey texture, or at room temperature for a softer bite.
Refrigerate the bars until firm, then lift out using parchment overhang. Cut into squares and serve chilled or at room temperature. Store leftovers in an airtight container in the fridge for up to a week.
How to Know It’s Done
- The mixture feels sticky but holds together when pressed.
- The edges are firm and set when touched after refrigeration.
- Bars are evenly cut without crumbling or sticking excessively.
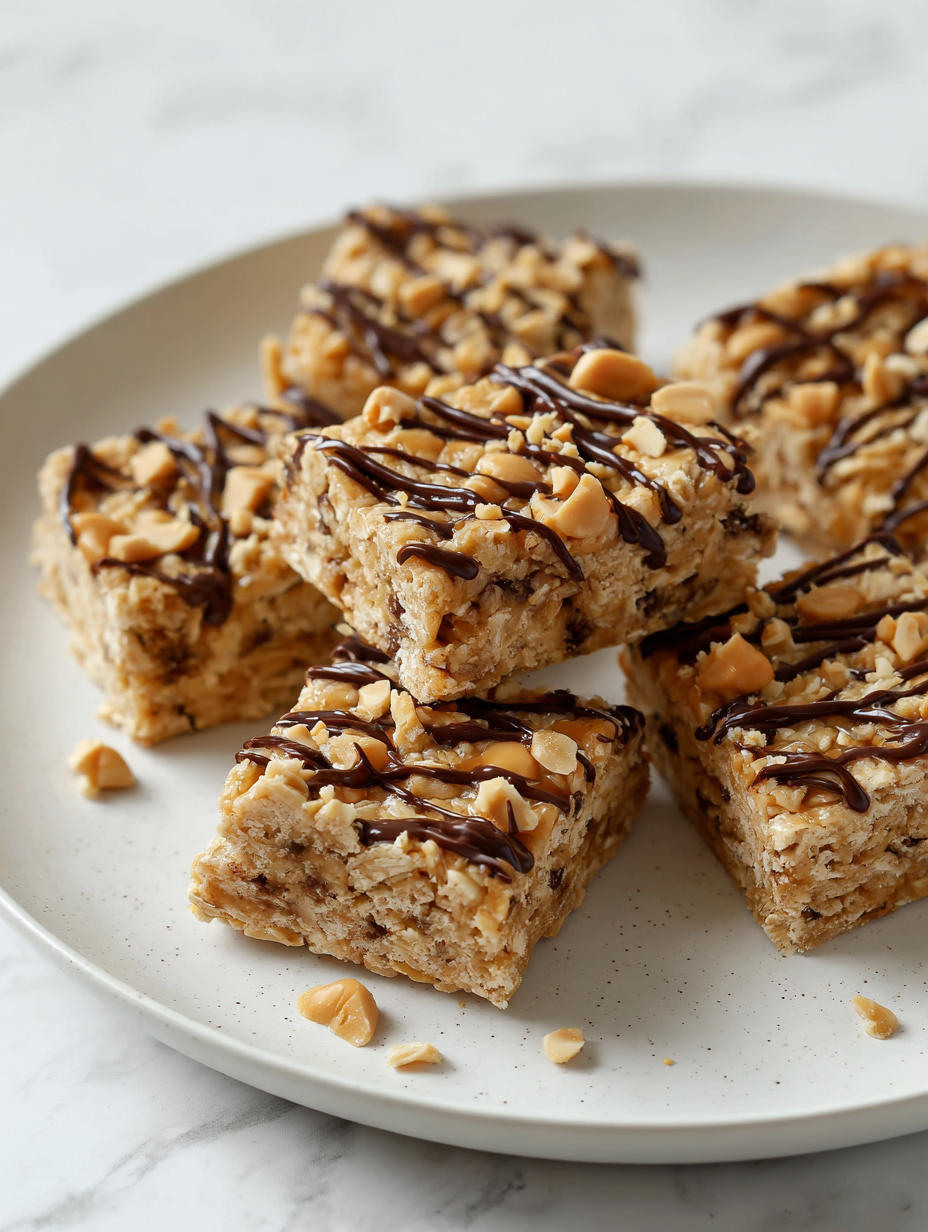
No-Bake Peanut Oat Bars
Ingredients
Equipment
Method
- Line your 20x20cm dish with parchment paper, leaving some overhang on the sides to make removal easy. This helps with cleanup and neat edges.
- In a large mixing bowl, combine the oats and sea salt. Stir them together until evenly distributed. This creates a hearty base for your bars.
- In a microwave-safe bowl, melt the peanut butter, honey, and coconut oil together in 30-second bursts, stirring each time until the mixture is smooth and glossy with a fragrant aroma. This should take about 1-2 minutes total.
- Pour the melted peanut butter mixture over the oats. Use a spatula to stir and coat all the oats evenly, feeling the mixture become sticky and cohesive.
- Transfer the mixture into your prepared dish. Use the back of a spatula or your hands to press it down firmly and evenly, creating a smooth surface. This compacts the mixture and ensures the bars will hold together.
- If desired, sprinkle optional add-ins like chocolate chips, dried fruit, or seeds on top. Gently press them into the surface so they stay embedded in the bars.
- Place the dish in the refrigerator and chill for at least 2 hours, or until the mixture is firm and set. For best results, leave it overnight covered with plastic wrap.
- Once chilled, lift the set block out of the dish using the parchment overhang. Place it on a cutting board and use a sharp knife, warmed slightly with hot water, to cut into 8-10 bars.
- Serve the bars straight from the fridge for a chewy, gooey texture or at room temperature for a softer bite. Store leftovers in an airtight container in the fridge for up to a week, or freeze for longer storage.
Notes
Pro tips for perfect bars
- Use a warm spatula to press mixture evenly into the pan for a compact, uniform bar.
- Chill the mixture in the fridge until it feels just firm enough to cut cleanly, avoiding crumbles.
- When melting ingredients, do so gently over low heat or short bursts in the microwave to prevent scorching and separation.
- Press add-ins like chocolate chips firmly into the surface to prevent them from falling out after cutting.
- Use a sharp knife, warmed slightly with hot water, for cleaner, smoother cuts through the bars.
- For extra smoothness, briefly microwave the peanut butter mixture before pouring to loosen it up.
- Keep ingredients at room temperature before mixing to ensure everything combines smoothly and evenly.
Common mistakes and how to fix them
- FORGOT to evenly press mixture → Use a sturdy spatula or hands for firm packing.
- DUMPED mixture too hot → Allow melted ingredients to cool slightly before mixing.
- OVER-TORCHED the edges → Stir frequently when melting to prevent burning.
- FAILED to chill thoroughly → Refrigerate at least 2 hours, or until bars are firm and set.
Quick fixes and pantry swaps
- When mixture feels too dry → Splash in a tiny bit of warm water or more peanut butter.
- If bars are crumbly → Patch with a thin layer of melted chocolate to bind edges.
- Splash melted chocolate over bars for extra shine and flavor, shimmer even after setting.
- Shield edges with parchment if they crack during cutting, and re-press for a cleaner look.
- DUMPED too much salt → Rinse briefly and balance with a touch more honey or sweetener.
Prep, store, and reheat tips
- Prepare the mixture and press into the dish ahead of time; refrigerate for at least an hour for easier cutting.
- Bars can be stored in an airtight container in the fridge for up to a week, maintaining their chewy texture and rich aroma.
- For longer storage, wrap bars individually and freeze for up to a month; thaw in the fridge before serving for best texture.
- Refrigerated bars are best enjoyed within 3-4 days; bring to room temperature for softer, gooey bites with intensified peanut aroma.
- Reheat slightly in the microwave for 5-10 seconds if you prefer softer, melty bars—watch for aroma and texture changes.
Top questions about peanut oat bars
1. Can I use crunchy peanut butter instead of smooth?
Use crunchy peanut butter for more texture, or smooth for creaminess. Both work well, but the texture differs slightly.
2. Can I substitute honey with another sweetener?
Yes, you can replace honey with maple syrup or agave. Expect a slightly different flavor and stickiness.
3. Can I use quick oats instead of old-fashioned oats?
Quick oats will give a softer, less chewy bar, but old-fashioned oats offer more rustic texture and bite.
4. How long do these bars last in the fridge or freezer?
Store the bars in the fridge for up to a week, or freeze for longer. Reheat briefly to soften or serve chilled.
5. What if my mixture is too dry or too sticky?
If mixture feels too dry, add a splash of warm water or extra peanut butter. For overly sticky, refrigerate before cutting.
6. How do I get clean cuts without crumbling the bars?
Use a sharp knife warmed slightly with hot water for cleaner cuts. Press firmly to avoid crumbling.
7. How long should I chill the mixture before cutting?
Chill the mixture until firm, about 2 hours, before cutting. It helps the bars hold together better.
8. How do I know when the mixture is ready to press into the pan?
Feel the mixture; it should be sticky but hold when pressed. If it’s not, adjust with more honey or oats.
9. How do I ensure add-ins stay in the bars?
Add-ins like chocolate chips should be pressed into the surface to stay embedded after cutting.
10. What if my bars crack when I cut them?
If the bars crack or crumble, patch with a little melted chocolate or press the pieces back together.
These no-bake peanut oat bars are a little reminder that sometimes, the simplest ingredients make the best snacks. They’re perfect for those afternoons when you need something quick but crave that familiar, satisfying crunch. Plus, they’re a no-fuss way to get a bit of nostalgic comfort without turning on the oven.
Once you get the hang of pressing and chilling, they come together faster than you’d expect. Whether you stash them in the fridge or toss a few in the freezer for later, they’re a handy, honest treat that tastes like a little bit of childhood in every bite.
Welcome to Proud of This Mess – a place where food, creativity, and a little chaos come together on a plate!
I’m Emily Carter, the founder and heart behind this little corner of the internet. Born and raised in the United States, I’ve always had a passion for cooking, experimenting, and sharing the messy, delicious journey of creating food that brings people together. My philosophy is simple: good food doesn’t have to be perfect, and a little mess makes it memorable.
At Proud of This Mess, we believe that cooking is more than just following recipes—it’s about exploring flavors, discovering new techniques, and making every meal an experience worth savoring. From comforting weeknight dinners to indulgent desserts, our goal is to inspire home cooks of all levels to embrace the joy of food without fear of imperfection.