
This no bake chocolate rice bar recipe takes me straight back to lazy afternoons in my childhood kitchen. I’d sneak a spoonful of melted chocolate and crunch into the rice, feeling like I’d uncovered a secret stash of sweetness. Now, I’ve tweaked that simple pleasure—no oven, no fuss—just a handful of ingredients and a bit of patience.
What I love about this recipe is how it balances indulgence with ease. It’s perfect when you need a quick fix of chocolate and crunch without heating up the house or waiting for baked goods. Plus, it’s a no-fail way to satisfy a sweet tooth, especially when those moments of craving hit unexpectedly.
This recipe is inspired by childhood memories of sneaking into the kitchen for a sweet, chewy treat, but I’ve perfected it for grown-up palates—rich, chocolatey, with a satisfying crunch that reminds me of simpler times.
The story behind this recipe
- This recipe actually came from a messy afternoon in my kitchen, trying to combine a love for chocolate and the chaos of a busy household. I wanted something simple, no bake, that I could whip up quickly without sacrificing flavor. The crunch of the rice and the richness of the chocolate just stuck with me, a perfect combo I kept coming back to.
- One day, I had a handful of rice cereal and a melting pot of chocolate, and I thought, why not mash them together? That accidental mix turned into a treat I keep making—perfect for lazy weekends or when I need a quick, nostalgic snack that’s honest and straightforward.
- heading: The story behind this recipe
Ingredient breakdown
- Chocolate: I prefer a good quality semi-sweet chocolate that melts smoothly and gives that rich, deep flavor. If you only have milk chocolate, it’s sweeter and creamier, but less intense.
- Rice cereal: The crunch of toasted rice cereal is what makes these bars addictive. Try using puffed quinoa or millet for a nutty twist and different texture.
- Butter: I use unsalted butter for control over saltiness, but margarine can work in a pinch. The butter adds a glossy sheen and helps everything stick together.
- Sweetener: I stick with honey or maple syrup for a gentle sweetness that balances the chocolate. You can swap with agave or corn syrup, but watch the consistency.
- Vanilla extract: A splash of vanilla brightens the chocolate and cereal flavor. Skip it if you want a more straightforward, intense chocolate hit.
- Optional add-ins: Nuts, dried fruit, or even a pinch of sea salt on top can elevate the bars. Add just before setting so they stick in place and add texture.
- Optional binding: If you want extra chew, a spoonful of melted marshmallows or a touch of coconut oil can help hold everything together without making it sticky.
Spotlight on key ingredients
Chocolate:
- I prefer a good quality semi-sweet chocolate that melts smoothly and gives that rich, deep flavor. If you only have milk chocolate, it’s sweeter and creamier, but less intense.
- Rice cereal: The crunch of toasted rice cereal is what makes these bars addictive. Try using puffed quinoa or millet for a nutty twist and different texture.
Butter:
- I use unsalted butter for control over saltiness, but margarine can work in a pinch. The butter adds a glossy sheen and helps everything stick together.
- Optional add-ins: Nuts, dried fruit, or even a pinch of sea salt on top can elevate the bars. Add just before setting so they stick in place and add texture.
Notes for ingredient swaps
- Dairy-Free: Coconut oil or vegan butter can replace butter, but expect a slightly different sheen and a hint of coconut flavor.
- Chocolate: Dark chocolate with at least 70% cocoa offers a rich, less sweet taste. Milk chocolate makes it sweeter and creamier.
- Sweetener: Maple syrup or agave syrup can be used instead of honey, adding a different flavor note—more floral or neutral.
- Rice Cereal: Quinoa flakes or toasted oats give a nuttier crunch, but keep an eye on texture—less airy than rice cereal.
- Add-ins: Nuts, seeds, or dried fruit can be swapped or omitted for a different texture or flavor, but they affect crunch and sweetness.
- Binding Agent: Melted marshmallows or coconut oil can help hold the bars together if you want extra chew or gloss.
- Flavor accent: A pinch of sea salt or espresso powder can heighten the chocolate taste without overpowering sweetness.
Equipment & Tools
- Medium saucepan: To melt the chocolate gently over low heat.
- Spatula: To stir and fold ingredients smoothly.
- Square baking dish: To hold and shape the bars.
- Parchment paper: To prevent sticking and aid in removal.
- Sharp knife: To cut the bars cleanly after setting.
Step-by-step guide to no bake bars
- Gather your equipment: a medium-sized saucepan, a mixing spatula, a square baking dish (about 20cm/8in), and parchment paper. Line the dish with parchment for easy removal.
- In the saucepan, melt 150g (around 5 oz) of semi-sweet chocolate over low heat. Stir constantly until smooth. (Approx. 5 minutes, the chocolate should be glossy and fully melted.)
- Add 50g (1/4 cup) of unsalted butter to the melted chocolate. Continue stirring until fully incorporated and the mixture is smooth and shiny. If it’s too thick, a quick splash of warm water can loosen it up.
- Remove from heat. Stir in 2 tablespoons of honey or maple syrup, and 1 teaspoon of vanilla extract. Mix well, the mixture should be fragrant and slightly runny.
- In a large bowl, pour 3 cups of rice cereal. Pour the chocolate mixture over it and fold gently with a spatula. The cereal should be evenly coated, and the mixture will start to stick together.
- Transfer the mixture into the prepared baking dish. Use the spatula or your hands (dampened slightly) to press it evenly into the dish. Aim for a compact, even layer. (About 2-3 minutes, the edges should look shiny and set.)
- Let the bars rest at room temperature for 30 minutes, or until firm. For quicker setting, refrigerate for 15-20 minutes. The bars should be firm enough to cut cleanly without crumbling.
- Once set, lift the block out of the dish using the parchment paper. Slice into squares or rectangles with a sharp knife. Store in an airtight container at room temperature or in the fridge for up to a week.
Allow the bars to rest at room temperature for 30 minutes or chill for 15-20 minutes until firm. Slice into squares and serve directly or store in an airtight container at room temperature or refrigerated.
How to Know It’s Done
- Chocolate is fully melted and glossy before mixing.
- Cereal is evenly coated and mixture is cohesive when pressed.
- Bars are firm and set after resting or chilling.
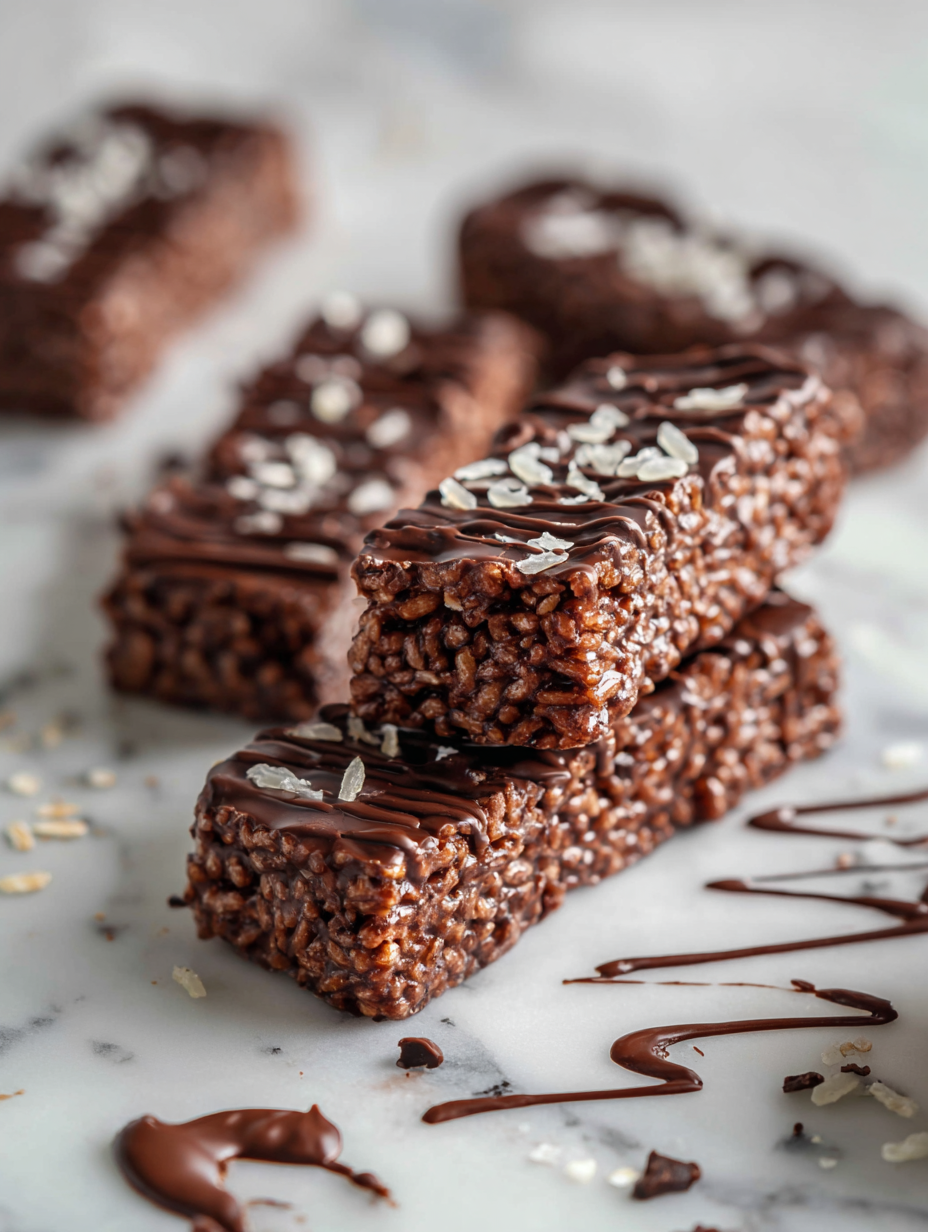
No Bake Chocolate Rice Bars
Ingredients
Equipment
Method
- Line your square baking dish with parchment paper, leaving some overhang for easy removal.
- In a medium saucepan, gently melt the chopped chocolate and butter over low heat, stirring constantly until smooth and glossy. You should hear a gentle bubbling and see a shiny sauce forming.
- Remove the saucepan from heat, then stir in the honey (or maple syrup) and vanilla extract until fully integrated. The mixture will be fragrant and slightly runny.
- Pour the warm chocolate mixture over the rice cereal in a large bowl. Gently fold with a spatula until the cereal is evenly coated and the mixture starts to stick together.
- Transfer the coated cereal mixture into the prepared dish. Use the back of a spatula or damp hands to press firmly and evenly into the dish, creating a compact, shiny layer.
- Let the bars set at room temperature for about 30 minutes, or place in the refrigerator for 15-20 minutes to speed up the process. The mixture will turn firm and glossy.
- Once firm, lift the entire block out of the dish using the parchment overhang. Place on a cutting board and slice into squares with a sharp knife.
- Serve immediately or store in an airtight container at room temperature for up to a week. The bars will stay chewy and chocolatey, perfect for a quick snack or dessert.
Notes
Pro tips for perfect bars
- Gentle melt: Use low heat to melt chocolate; it prevents burning and keeps the glossy finish.
- Even coating: Fold the cereal gently into the chocolate to avoid crushing the cereal and losing crunch.
- Press firmly: When transferring to the dish, press the mixture down with damp hands for an even, compact layer.
- Chill for speed: Refrigerate for 15-20 minutes to set quickly; the bars will be firm and easier to cut.
- Avoid overmixing: Mix just until combined to keep the cereal crunchy and prevent the mixture from becoming greasy.
- Temperature check: The chocolate should be fully melted, smooth, and shiny before mixing with other ingredients.
- Use parchment: Line your dish with parchment paper for easy removal and cleaner cuts.
Common mistakes and how to fix them
- FORGOT to level ingredients → Use a scale for accuracy, especially for rice cereal and chocolate.
- DUMPED too much chocolate → Measure carefully; too much makes bars greasy and hard to cut.
- OVER-TORCHED the chocolate → Melt slowly over low heat; remove as soon as smooth to avoid bitterness.
- MISSED the setting time → Let the bars firm up fully; rushing results in crumbles and uneven texture.
Quick fixes and pantry swaps
- When the chocolate seizes, splash in a teaspoon of warm milk to smooth it out.
- If the rice cereal looks too oily, toss it with a little powdered sugar before mixing.
- DUMPED too much chocolate? Add more cereal or let it set slightly longer for a firmer texture.
- When bars are crumbly, refrigerate for an extra 10 minutes to help them firm up.
- Splash a few drops of vanilla or salt on top to enhance flavor if the bars taste flat.
Prep, store, and reheat tips
- You can prep the chocolate mixture up to a day ahead; keep it covered at room temperature to prevent skin formation, which can add a dull sheen.
- Store the finished bars in an airtight container at room temperature for up to 5 days; the chocolate will develop a slight bloom but remains deliciously chewy.
- For longer storage, refrigerate the bars for up to 2 weeks; the cold firms them up, but bring to room temp for 10 minutes before serving to restore softness.
- Reheat briefly in the microwave at medium power (about 10 seconds) if bars become too firm—look for a gentle shimmer and soft texture when warm.
Top questions about no bake rice bars
1. Can I use different types of chocolate?
Use good quality semi-sweet chocolate for a rich flavor and smooth melting. Milk chocolate is sweeter and creamier, but less intense.
2. Can I substitute the rice cereal?
Puffed quinoa or millet can replace rice cereal for a nuttier, different crunch. Just keep the texture similar.
3. What about different fats or oils?
Use unsalted butter for control, but margarine works in a pinch. It adds shine and helps ingredients stick together.
4. Can I swap the sweetener?
Maple syrup or agave syrup can replace honey, but they bring a different flavor—think floral or neutral sweetness.
5. How do I know when they’re ready to cut?
Chill the bars in the fridge for 15-20 minutes or until firm. They should be easy to cut and hold together well.
6. What if the chocolate doesn’t melt smoothly?
If the chocolate seizes or gets lumpy, add a teaspoon of warm milk to smooth it out.
7. My bars are greasy, what should I do?
When the mixture is too greasy, toss the cereal with a bit of powdered sugar before mixing to absorb excess oil.
8. How do I avoid the bars sticking to the dish?
Use parchment paper to line your dish for easy removal and cleaner cuts. It prevents sticking.
9. How should I store the finished bars?
Store the bars in an airtight container at room temperature for up to 5 days or refrigerate for up to 2 weeks.
10. Can I reheat the bars?
To reheat, microwave in 10-second bursts until just soft and shiny; avoid overheating to prevent melting too much.
These no bake chocolate rice bars feel like a small rebellion against busy mornings and dinner prep. They offer a moment of simple joy, crunching through that glossy, chocolatey layer with a nostalgic smile. Whenever I make them, I remember that good things don’t need to be complicated or hot to be satisfying.
In the end, it’s about those little wins—quick, honest treats that remind us sweetness is never out of reach, no oven required. A batch of these might not solve everything, but they sure make the day a bit sweeter.
Welcome to Proud of This Mess – a place where food, creativity, and a little chaos come together on a plate!
I’m Emily Carter, the founder and heart behind this little corner of the internet. Born and raised in the United States, I’ve always had a passion for cooking, experimenting, and sharing the messy, delicious journey of creating food that brings people together. My philosophy is simple: good food doesn’t have to be perfect, and a little mess makes it memorable.
At Proud of This Mess, we believe that cooking is more than just following recipes—it’s about exploring flavors, discovering new techniques, and making every meal an experience worth savoring. From comforting weeknight dinners to indulgent desserts, our goal is to inspire home cooks of all levels to embrace the joy of food without fear of imperfection.