
During rushed mornings or busy afternoons, I reach for these no-bake seed bars without a second thought. They’re honestly my go-to for a quick, nourishing boost that doesn’t require any fuss or heat. The best part is that I can customize them with whatever seeds I have sitting around, making each batch a little different and always satisfying.
What I love most is how honest and simple this recipe is. No oven, no complicated ingredients—just a handful of seeds, some sticky sweetener, and a bit of patience while they set. It’s like a little act of kitchen mindfulness, turning everyday pantry staples into something wholesome and surprisingly indulgent.
These bars have become more than just a snack; they’re a small act of self-care during chaotic days, a reminder that good, nourishing food can be quick and unpretentious. Plus, they store well, so I can grab one on my way out or keep a stash tucked in my bag when I need a boost that’s both satisfying and energizing.
How these no-bake seed bars turned into my go-to energy boost during hectic mornings, offering a quick, nutritious fix without any fuss.
The story behind this recipe
- This recipe actually started as a way to use up a random mix of seeds I had lying around after a baking spree that went a bit overboard. I wanted something quick, no fuss, and nutritiously satisfying—these bars came together when I needed a grab-and-go snack that wouldn’t fall apart in my bag.
- One afternoon, I was rushing out the door and remembered I’d forgotten to prep anything for my long hike. I threw a handful of seeds, a sticky sweetener, and a dash of salt into a bowl, pressed it into a pan, and hoped for the best. The result was surprisingly good—crunchy, sweet, and just enough salt to keep me energized without feeling heavy.
- Since then, these seed bars have become my pantry staple. They’re like little portable bites of calm in a busy day, a reminder that simple ingredients can turn into something nourishing with a little bit of patience and a lot of flavor.
Seed Bar Ingredients Breakdown
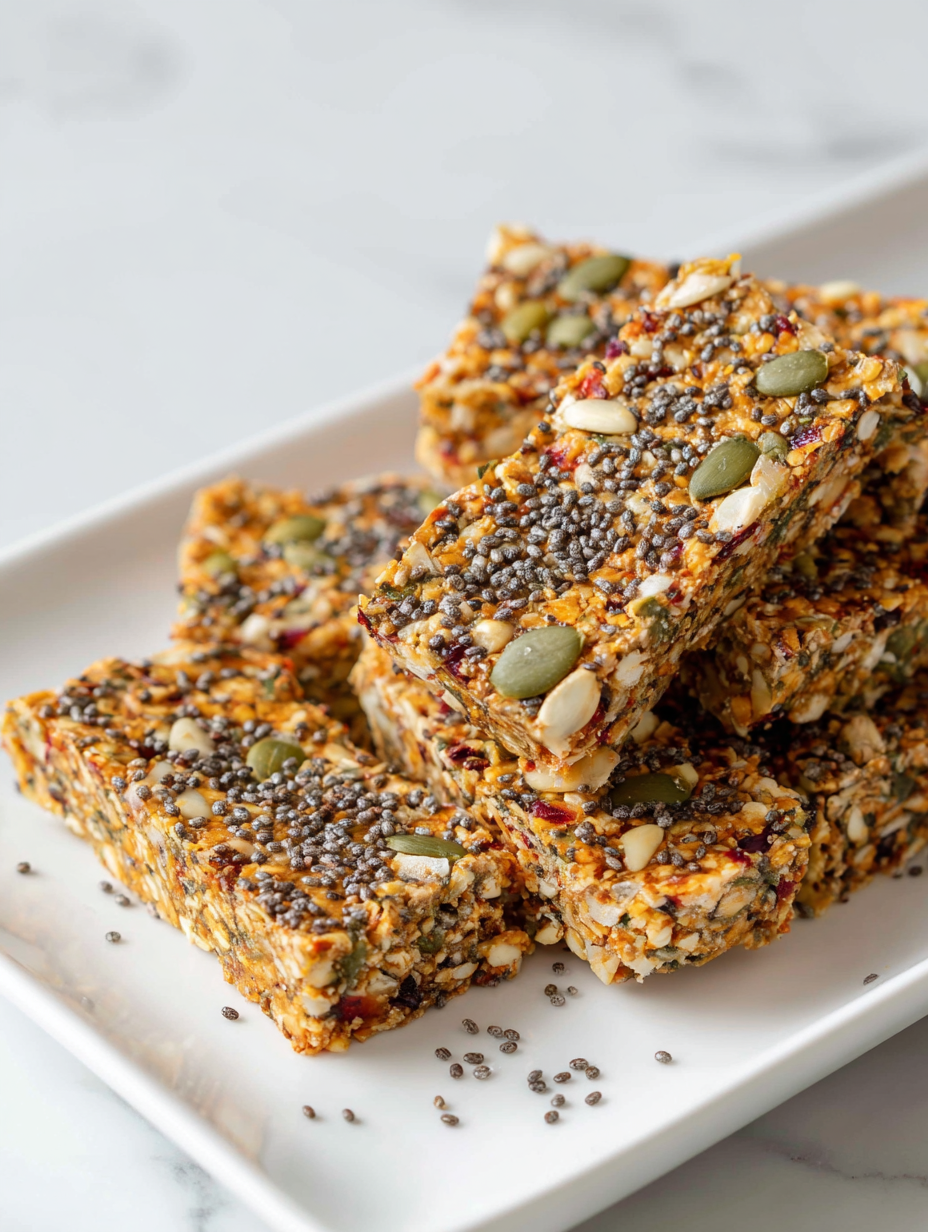
- Sunflower seeds: I love their nutty flavor and crunch. If you prefer a milder taste, try pumpkin seeds for a softer bite.
- Chia seeds: These tiny powerhouses add a subtle chewiness and help bind the bars. Swap with flaxseeds if you want a slightly earthier note.
- Honey: It’s the glue that holds everything together and gives a sweet, floral aroma. Maple syrup can work as a vegan alternative, but expect a richer, deeper sweetness.
- Rolled oats: I use them for texture and bulk, but oats with a bit of toasted flavor can add depth. For a gluten-free version, choose certified GF oats.
- Coconut flakes: They add a touch of tropical aroma and a chewy texture. You can leave them out or replace with chopped nuts for more crunch.
- Salt: A pinch enhances all the flavors and balances sweetness. If you want a savory touch, add a tiny bit of soy sauce or smoked paprika.
- Vanilla extract: A splash brings warmth and complexity. Skip it if you want a more neutral, seed-forward flavor.
Spotlight on key ingredients
Sunflower seeds:
- Their nutty aroma and crunchy bite make each bar satisfyingly textured. During mixing, they feel slightly oily and toasted, which enhances their flavor.
- Chia seeds: Tiny and unassuming, they swell and develop a chewy, mucilaginous texture as they absorb moisture. When heated slightly or mixed with honey, they become a gel-like binder that holds everything together.
Chia seeds:
- These tiny seeds add a subtle crunch and a mucilaginous feel when soaked. During cooking, they soften and turn translucent, providing both texture and cohesion.
- They behave differently depending on moisture; when properly absorbed, they form a sticky, gel-like substance that helps bind the bars without added binders.
Notes for ingredient swaps
- Nuts: Swap sunflower seeds for chopped almonds or walnuts for a richer, more buttery crunch.
- Sweetener: Use maple syrup or agave nectar instead of honey for a vegan-friendly, slightly caramelized flavor.
- Seeds: Flaxseeds can replace chia for a milder, slightly earthier taste, and they need to be ground for best binding.
- Coconut: Dried fruit like chopped apricots or cranberries can add a chewy, tart contrast to the seeds.
- Oats: Quinoa flakes can stand in for rolled oats, offering a subtle nutty flavor and a slightly lighter texture.
- Salt: A pinch of smoked sea salt can add a subtle smoky depth, especially if you’re skipping added fats.
- Vanilla: Almond extract can be an interesting alternative, bringing a different aromatic note to the bars.
Equipment & Tools
- Small saucepan: Gently melts honey and binds ingredients
- Mixing bowl: Combines seeds and seasonings
- Parchment paper: Prevents sticking and makes removal easy
- Spatula: Stirs ingredients and presses mixture into the pan
- Knife: Cuts the set mixture into bars
Step-by-step guide to seed bars
- Gather your equipment: a small saucepan, a mixing bowl, a baking sheet, and parchment paper. The saucepan is for melting honey and binding ingredients, the bowl for mixing seeds, and the sheet for setting the bars.
- Line your baking sheet with parchment paper for easy lifting later. Set aside.
- In the saucepan, gently warm 1/3 cup honey over low heat (about 60°C / 140°F). Stir constantly until just melted and fragrant—about 2-3 minutes. Keep a close eye to prevent boiling or burning.
- While honey warms, combine 1 1/2 cups mixed seeds (sunflower, chia, pumpkin) in the mixing bowl. Add a pinch of salt and a teaspoon of vanilla if using.
- Pour the warm honey over the seed mixture. Stir vigorously until all seeds are evenly coated and sticky, about 1-2 minutes. The mixture should clump together when pressed.
- Transfer the seed mixture to the prepared parchment-lined sheet. Using a spatula or your hands (dampened slightly), press firmly into an even layer, about 1/2 inch thick. Scratch the surface gently with the spatula for a textured finish.
- Place the sheet in the fridge for at least 2 hours, or until the mixture firms up and becomes firm to the touch. If in a hurry, freeze for 30-45 minutes but don’t rush the setting process.
- Once set, lift the slab using the parchment paper. Use a sharp knife to cut into bars or squares, depending on your preference.
- For a cleaner cut, wipe the knife with a damp cloth between cuts. Store in an airtight container at room temperature for up to a week, or in the fridge for longer freshness.
- Enjoy your seed bars as a quick energy boost or nourishing snack at any time of day.
Let the bars rest in the fridge for at least 2 hours until firm. Slice into bars and store in an airtight container at room temperature or refrigerated. Serve directly or wrap individually for portable snacks.
How to Know It’s Done
- The mixture should be sticky and hold together when pressed.
- The edges of the bars are golden and slightly toasted after refrigeration.
- When pressed, the bars feel firm but not hard, with a bit of bounce.
No-Bake Seed Bars
Ingredients
Equipment
Method
- Line a baking sheet with parchment paper and set aside.
- In the small saucepan, gently warm the honey over low heat, stirring constantly until it becomes fragrant and slightly runny, about 2-3 minutes. This releases its sweetness and helps it blend easily.
- Meanwhile, in a mixing bowl, combine your mixed seeds with a pinch of salt and vanilla extract for added flavor.
- Pour the warm honey over the seed mixture, then stir vigorously with a spatula until all the seeds are evenly coated and sticky. The mixture should start clumping together.
- Transfer the seed mixture onto the prepared parchment-lined sheet. Use the spatula or dampened hands to press it firmly into an even layer, about half an inch thick. Pressing well helps the bars hold together.
- Place the sheet in the fridge and let it chill for at least 2 hours, or until the mixture is firm and set. For faster setting, you can freeze it for about 30-45 minutes.
- Once firm, lift the set mixture out using the parchment paper. Use a sharp knife to cut into bars or squares of your preferred size. Wiping the knife with a damp cloth between cuts ensures clean edges.
- Store the bars in an airtight container at room temperature for up to a week, or refrigerate for longer freshness. Enjoy as a quick snack or energy boost whenever needed!
Notes
Pro tips for perfect seed bars
- Use a silicone spatula to evenly distribute honey without sticking or tearing the mixture.
- Warm honey gently over low heat until just fragrant; avoid boiling to preserve flavor and texture.
- Press mixture firmly into the pan with dampened hands or a spatula to ensure compact bars that hold together.
- Refrigerate for at least 2 hours until the mixture firms up; skipping this makes the bars crumbly.
- Wipe the knife with a damp cloth between cuts for clean, crisp edges and easier slicing.
- Add a pinch of sea salt on top before chilling to enhance the seed flavors and add contrast.
- Incorporate chopped dried fruits or nuts after mixing to add bursts of flavor and texture.
Common mistakes and how to fix them
- FORGOT to measure ingredients precisely → Use a scale for accuracy and consistent texture.
- DUMPED too much honey → Adjust sweetness and binding by reducing honey slightly if too sticky.
- OVER-TORCHED the seeds → Stir constantly and remove from heat once lightly toasted, not burnt.
- MISSED chilling time → Ensure the bars are fully set in the fridge for clean cuts and firm texture.
Quick fixes and pantry swaps
- When mixture feels crumbly, splash a tiny bit more honey to help it bind.
- If bars crack when cutting, patch with a dab of honey for seamless edges.
- Splash cold water on knife if sticking, for clean, smooth cuts.
- When seeds seem dull, toast slightly longer until fragrant and golden.
- Patch over over-torched seeds with fresh seeds to restore crunch and flavor.
Prep, store, and reheat tips
- Pre-measure seeds and honey to streamline assembly on busy mornings, keeping everything ready in small bowls for quick mixing.
- Store cut bars in an airtight container at room temperature for up to a week; for longer storage, freeze for up to a month, keeping them firm and fresh.
- Refrigerate the bars if you want a firmer texture; let sit at room temperature for 10 minutes before eating to regain chewiness and aroma.
- For best flavor, wrap individually if packing for on-the-go snacking; the flavors deepen slightly as they sit, developing a more toasted seed aroma.
Top questions about seed bars
1. How do I get clean cuts without cracking the bars?
Use a clean, sharp knife and wipe it with a damp cloth between cuts for smooth edges.
2. How long do seed bars stay fresh?
Store the bars in an airtight container at room temperature for up to a week, or freeze for longer.
3. Can I refrigerate or freeze these bars?
Refrigerate the bars for a firmer texture, and let sit at room temp for 10 minutes before eating.
4. My mixture is crumbly, what can I do?
If mixture is too crumbly, add a splash more honey to help it bind better.
5. How do I toast seeds properly?
Toast the seeds longer until fragrant and golden to enhance flavor and crunch.
6. Can I add other ingredients to the bars?
Add dried fruits or chopped nuts after mixing for extra flavor and texture contrast.
7. What are good vegan options for sweetener?
Use maple syrup or agave nectar as vegan substitutes for honey, but expect a richer flavor.
8. How do I ensure the bars are firm enough?
Press mixture firmly into the pan to ensure compact, sturdy bars that hold together.
9. How can I get a clean cut every time?
Wipe your knife with a damp cloth between cuts to avoid sticking and get neat edges.
10. What if my mixture is too dry or crumbly?
If mixture feels too dry, add a little more honey or a splash of water to moisten.
These no-bake seed bars are a simple reminder that nourishing food doesn’t have to be complicated or time-consuming. They’re perfect for busy mornings or when you need a quick, wholesome snack that satisfies without fuss.
In a world that often feels rushed, these bars offer a moment of honest, handcrafted comfort—crunchy, sweet, and just a little salty. They’re not just a treat; they’re a small act of care you can make anytime, with ingredients you probably already have on hand.
Welcome to Proud of This Mess – a place where food, creativity, and a little chaos come together on a plate!
I’m Emily Carter, the founder and heart behind this little corner of the internet. Born and raised in the United States, I’ve always had a passion for cooking, experimenting, and sharing the messy, delicious journey of creating food that brings people together. My philosophy is simple: good food doesn’t have to be perfect, and a little mess makes it memorable.
At Proud of This Mess, we believe that cooking is more than just following recipes—it’s about exploring flavors, discovering new techniques, and making every meal an experience worth savoring. From comforting weeknight dinners to indulgent desserts, our goal is to inspire home cooks of all levels to embrace the joy of food without fear of imperfection.