
On scorching summer days, the last thing you want is to heat up the kitchen. These no bake fudge bars are my go-to for when I need something sweet, fast, and totally satisfying without turning on the oven. They come together in no time, using simple ingredients I usually have lurking in the pantry or fridge, which makes them perfect for spontaneous cravings or last-minute guests.
There’s a certain comfort in the richness of these bars—the way the chocolate melts on your tongue and the crunch of the base. I love how forgiving the recipe is; you can tweak the sweetness or add nuts or dried fruit depending on what you have. It’s a no-fuss treat that feels indulgent but doesn’t demand a lot of effort or mess.
Making these fudge bars is almost like a ritual for me. It’s a quick fix that’s easy to customize, and I swear the aroma alone makes the house feel cozier. Plus, they keep well in the fridge, so I often make a batch to stash away for when the sweet tooth strikes unexpectedly.
This recipe appeals to those who want a rich, indulgent treat without turning on the oven, especially during hot summer days or when quick gratification is needed. It’s about embracing simplicity, minimal mess, and the joy of a homemade sweet that’s as satisfying as it is effortless.
The story behind this recipe
- This recipe came together on a lazy summer afternoon when I was rummaging through my pantry and craving something sweet but didn’t want to turn on the oven. I remembered making a similar no-bake treat years ago at a friend’s house, and it hit me how perfect it was for hot days and quick cravings. It’s one of those recipes that’s been handed down in my family, adapted over time to fit what’s in the cupboard and my mood.
- I love how these fudge bars bring back childhood memories of my mom’s quick desserts—rich, chocolatey, and wildly satisfying without the fuss. Over the years, I’ve added my own twists, like tossing in a handful of sea salt or a dash of espresso powder, which makes me smile every time I make them. It’s a simple, honest recipe that reminds me that good things don’t need to be complicated.
- heading
- story_type
Ingredient breakdown
- Dark chocolate: I love the deep, bittersweet richness it adds—look for a bar with at least 70% cacao. You can swap in milk chocolate if you prefer something sweeter, but the flavor will be less intense.
- Butter: I use unsalted butter to control the saltiness, and it gives the fudge a smooth, melt-in-your-mouth texture. For a dairy-free version, try coconut oil, which brings a subtle coconut aroma and a softer bite.
- Sweetened condensed milk: It’s the glue that makes everything creamy and binds the bars together. If you want a less sweet version, use evaporated milk and add a touch of honey or maple syrup.
- Crushed graham crackers: They add crunch and a slight toasted flavor. You can substitute with digestive biscuits or even oatmeal for a different texture, but keep the crumbs fine so the base stays firm.
- Vanilla extract: It brightens up the chocolate and adds warmth. For a twist, try a splash of espresso or orange zest—just a small dash to keep the flavors balanced.
- Sea salt: A pinch enhances the chocolate’s depth and cuts the sweetness. Use coarse sea salt for a noticeable crunch, or sprinkle a little flaky salt on top before chilling for a salty-sweet finish.
Spotlight on key ingredients
Dark chocolate:
- I love its intense, bittersweet aroma and smooth melt. When melted, it becomes glossy and velvety, with a lingering cocoa scent. It can seize if overheated, so melt slowly and stir often.
- Sweetened condensed milk: It’s the creamy glue that makes the bars rich and chewy. When heated, it turns silky and slightly bubbly, filling the kitchen with a sweet, caramelized aroma. Use it straight from the can—no fuss.
Graham crackers & Butter:
- Crushed graham crackers: They add a toasty crunch and a hint of sweetness. When mixed with butter, they become fragrant and crumbly, pressing into the pan with a satisfying resistance. Toasting the crumbs slightly enhances their aroma.
- Butter: It’s the tenderizer and binder, giving the base a rich, melt-in-your-mouth texture. When melted, it’s glossy and smooth, releasing a warm, comforting dairy scent. Use good quality butter for the best flavor.
Notes for ingredient swaps
- Dark chocolate: I prefer a rich, 70% cacao bar for depth. Swap with milk chocolate for sweetness, but expect a milder flavor.
- Butter: Unsalted butter keeps control over saltiness. Coconut oil is a good dairy-free alternative, offering a slight coconut aroma and softer texture.
- Sweetened condensed milk: It’s creamy and binds everything. For less sweetness, try evaporated milk plus a touch of honey or maple syrup.
- Crushed graham crackers: They add crunch and toastiness. Digestive biscuits or even crushed oatmeal can work, but grind finely for a firm base.
- Vanilla extract: Brightens the chocolate. For a flavor twist, add a splash of espresso or a hint of orange zest—small doses keep balance.
- Sea salt: Enhances chocolate flavor and adds crunch. Use coarse salt for more texture, or sprinkle flaky salt on top before chilling.
Equipment & Tools
- 9×9 inch (23×23 cm) pan: To hold and shape the bars.
- Parchment paper: For easy removal and cleanup.
- Mixing bowl: To combine ingredients.
- Spatula: To spread and smooth the layers.
- Double boiler or microwave: To melt the chocolate gently.
- Knife: To cut the finished bars.
Step-by-step guide to no bake fudge bars
- Line your 9×9 inch (23×23 cm) pan with parchment paper, leaving a slight overhang for easy removal.
- Combine 1 1/2 cups (150g) crushed graham crackers, 1/2 cup (60g) powdered sugar, and 1/2 cup (115g) melted unsalted butter in a bowl. Mix until crumbs are evenly coated and mixture is crumbly but holds together when pressed.
- Press the graham cracker mixture evenly into the prepared pan. Use the bottom of a glass to pack it down firmly and create an even surface. Chill in the fridge for 15 minutes to set the base.
- In a heatproof bowl, melt 2 cups (340g) dark chocolate chips and 1/4 cup (60ml) heavy cream over a double boiler or in short bursts in the microwave (20 seconds each), stirring until smooth. For the microwave, stir well after each burst to prevent scorching.
- Pour the melted chocolate mixture over the chilled crust, spreading it evenly with a spatula. Tap the pan gently on the counter to settle the chocolate and eliminate air bubbles.
- Sprinkle a pinch of flaky sea salt or a dash of espresso powder on top for extra flavor, if desired.
- Place the pan in the fridge and let it chill for at least 2 hours, or until the fudge is firm and set. For best results, leave it overnight.
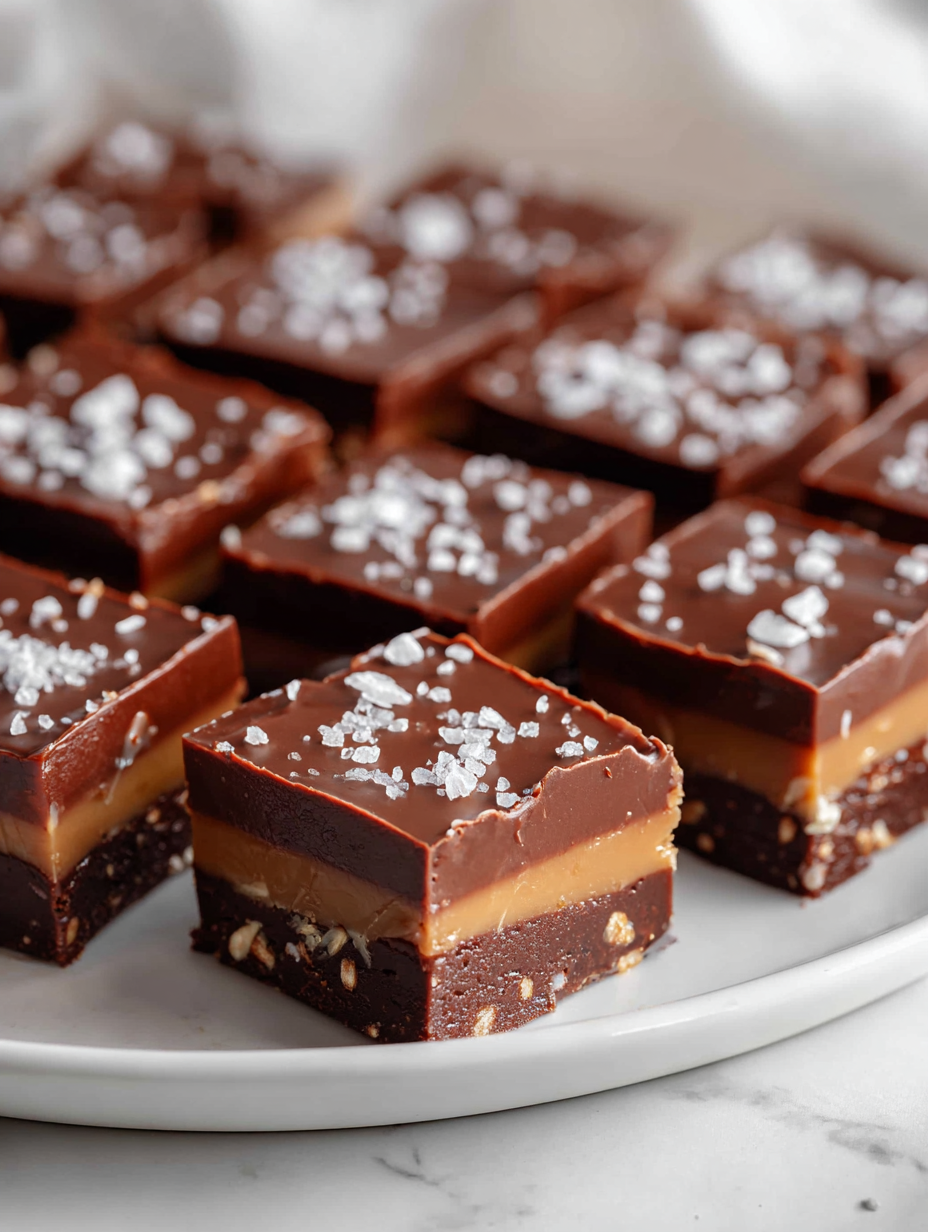
- Once set, use the parchment overhang to lift the fudge out of the pan. Cut into 12 equal bars with a sharp knife, wiping the blade between cuts for clean edges.
- Serve immediately or store in an airtight container in the fridge. The bars will keep well for up to a week, or freeze for longer storage.
Let the fudge chill in the fridge for at least 2 hours until firm. Use the parchment overhang to lift it out and cut into bars. Serve immediately or store in an airtight container in the fridge for up to a week.
How to Know It’s Done
- Chocolate is shiny and firm, not sticky or greasy.
- The base presses smoothly and holds together when pressed.
- Bars are evenly cut with clean edges and no cracks.
No Bake Fudge Bars
Ingredients
Equipment
Method
- Line your pan with parchment paper, leaving some overhang for easy removal.
- In a mixing bowl, combine the crushed graham crackers and powdered sugar, then pour in the melted butter. Mix everything together until the crumbs are evenly coated and the mixture becomes crumbly but holds together when pressed.
- Press this crumb mixture firmly into the prepared pan using the back of a spatula or your fingers, creating an even crust. Chill the crust in the fridge for about 15 minutes to set.
- Meanwhile, melt the dark chocolate chips with the heavy cream in a heatproof bowl over a double boiler or in short bursts in the microwave, stirring after each interval until smooth and glossy. You’ll hear a gentle bubbling or see the chocolate melt into a silky consistency.
- Pour the melted chocolate mixture over the chilled crust, spreading it out evenly with a spatula. Gently tap the pan on the counter to settle the chocolate and remove any air bubbles. Sprinkle a pinch of sea salt or flaky salt on top if you like that salty-sweet contrast.
- Place the pan in the fridge and chill for at least 2 hours, or until the chocolate is firm and the bars are set. For best results, leave it overnight for a clean cut.
- Once set, lift the fudge out of the pan using the parchment overhang and cut into 12 equal bars with a sharp knife. Wipe the blade between cuts for clean edges. Serve immediately or store in an airtight container in the fridge for up to a week.
Notes
Pro tips for perfect fudge bars
- Chill the mixture: Keep the chocolate and butter mixture slightly cool before pouring to avoid melting the base when spreading.
- Use a warm spatula: Slightly warming your spatula helps smooth the chocolate layer evenly and reduces cracks.
- Tap the pan: Gently tap the pan on the counter after pouring to settle the chocolate and eliminate air bubbles.
- Don’t rush the chill: Let the fudge set fully in the fridge, at least 2 hours, for clean cuts and firm texture.
- Wipe the knife: For clean slices, wipe the knife between cuts, especially if the chocolate starts to stick or crack.
- Add salt at the end: Sprinkle flaky sea salt just before chilling to enhance the chocolate’s depth and add a satisfying crunch.
- Avoid over-melting: Use low heat or short microwave bursts when melting chocolate to prevent seizing or burning.
Common mistakes and how to fix them
- FORGOT to chill the crust? Fix by pressing it firmly and chilling for 15 minutes.
- DUMPED too much chocolate? Adjust by adding a splash of cream or butter to loosen.
- OVER-TORCHED chocolate? Use a double boiler or microwave in short bursts, stirring often.
- MISSED the salt sprinkle? Fix by adding flaky sea salt on top just before chilling.
Quick fixes and pantry swaps
- If chocolate seizes, splash in a bit of hot milk and stir gently.
- When the mixture is too thick, patch with a teaspoon of warm cream.
- Splash a little more butter if your base feels crumbly and won’t press smoothly.
- Shield over-torched chocolate by adding a spoonful of warm cream to mellow bitterness.
- When in doubt, swap chocolate chips for chopped baking chocolate for a richer melt.
Prep, store, and reheat tips
- Prepare the crust mixture and press it into the pan ahead of time; it firms up better when chilled for a couple of hours.
- Store the assembled but not yet chocolate-coated base in an airtight container in the fridge for up to 24 hours to keep it fresh and crumbly.
- The fudge bars will last in the fridge for up to a week; keep them covered to prevent drying out and absorbing other fridge odors.
- Reheat leftovers slightly by letting them sit at room temperature for 10-15 minutes or warming briefly in a low microwave setting (about 10 seconds) until just soft, releasing a warm, chocolatey aroma.
Top questions about no bake fudge bars
1. Can I substitute dark chocolate with milk chocolate?
Yes, you can use milk chocolate, but the fudge will be sweeter and less intense.
2. Can I use coconut oil instead of butter?
Absolutely, coconut oil melts similarly and adds a delicate coconut aroma, perfect for dairy-free needs.
3. Should I add salt to the fudge?
Adding a pinch of sea salt enhances the chocolate flavor and provides a satisfying crunch on top.
4. How long should I chill the fudge bars?
Chill the bars for at least 2 hours, or overnight for the best firmness and clean slices.
5. How do I get clean cuts without cracking?
Use a sharp knife wiped with a warm cloth between cuts for clean, neat bars.
6. What if my melted chocolate gets grainy?
If the chocolate seizes or becomes grainy, stirring in a small splash of warm milk can rescue it.
7. Why does my chocolate crack when I spread it?
To prevent cracking, let the chocolate cool slightly before pouring and avoid over-melting.
8. How should I store leftover fudge bars?
Store leftovers in an airtight container in the fridge for up to a week, or freeze for longer.
9. Can I reheat the fudge bars?
Reheat slightly at room temperature or warm in short bursts in the microwave until just soft.
10. How can I boost the flavor of my fudge?
For a richer flavor, try adding a teaspoon of espresso powder or vanilla extract to the chocolate.
These no bake fudge bars are the kind of treat I keep coming back to, especially when I need something quick and satisfying. They’re simple, rich, and just a little indulgent without the fuss of baking or complicated steps. Perfect for those moments when you want a sweet fix that’s honest and straightforward.
Honestly, I find myself craving them during late afternoons or when I’ve had a hectic day. The best part is how adaptable they are—tweaking the chocolate, adding nuts, or a pinch of sea salt. They’re a small, sweet reminder that sometimes, the simplest recipes are the most memorable.
Welcome to Proud of This Mess – a place where food, creativity, and a little chaos come together on a plate!
I’m Emily Carter, the founder and heart behind this little corner of the internet. Born and raised in the United States, I’ve always had a passion for cooking, experimenting, and sharing the messy, delicious journey of creating food that brings people together. My philosophy is simple: good food doesn’t have to be perfect, and a little mess makes it memorable.
At Proud of This Mess, we believe that cooking is more than just following recipes—it’s about exploring flavors, discovering new techniques, and making every meal an experience worth savoring. From comforting weeknight dinners to indulgent desserts, our goal is to inspire home cooks of all levels to embrace the joy of food without fear of imperfection.