
This no-bake oat squares recipe is a little piece of childhood magic for me. It’s the kind of treat that feels like a quick hug after a long day, especially when I don’t want to turn on the stove. I remember helping my grandma mix these up in her tiny kitchen, the scent of toasted oats filling the air, and feeling proud to be part of the process.
What I love most is how simple it is — just a handful of ingredients, stirred together without any fuss. Perfect for summer when the heat makes heating up the house unbearable, or when I need something sweet but don’t want to wait. It’s a small reminder that sometimes, the best comfort food is straightforward, honest, and made with love.
This recipe is inspired by childhood memories of helping my grandma in her small kitchen, where quick, no-bake treats were a lifesaver after a long day. I love how these oat squares come together without turning on the stove, making them perfect for hot summer days or when I need something sweet but simple. It’s a reminder that sometimes, the best comfort food is just a handful of ingredients and a bit of patience.
The story behind this recipe
- This recipe came about during a particularly busy week when I needed something quick and satisfying, but I didn’t want to turn on the oven. I remembered how my mom used to toss oats with a bit of honey and butter, pressing them into a pan for a no-fuss snack. That memory stuck, and I started experimenting with ingredients I had on hand, aiming for something that felt homemade but effortless.
- The best part is how adaptable it is—adding nuts, dried fruit, or even chocolate chips changes it up without fuss. It’s become my go-to for when I need a quick, no-bake fix that’s both wholesome and nostalgic. Every batch feels like a little victory, especially when I slice them into neat squares and see the caramelized edges.
- heading
- story_type
Key ingredients and tips
- Old-fashioned rolled oats: I love their chewy texture and nutty flavor; if yours are too soft, try toasting them lightly for extra crunch.
- Honey: It’s the glue that holds everything together, giving a subtle sweetness and sticky bite; swap with agave for a more neutral sweetness, but reduce the amount slightly.
- Butter: It makes these squares rich and tender; if you want dairy-free, coconut oil works, but the texture might be a tad more crumbly.
- Chopped nuts: I usually use almonds or walnuts for crunch; if you’re allergic or out, try sunflower seeds for a similar crunch without the bitterness.
- Dried fruit (like cranberries or raisins): Adds chewiness and a burst of sweetness; fresh fruit can be used, but it may make the mixture wetter and affect setting.
- Vanilla extract: It brightens all the flavors with a warm aroma; skip if you prefer a more straightforward oat taste, or add a pinch of cinnamon instead.
- Chocolate chips (optional): I love the melty pockets they form, especially when warm; for a dairy-free version, try carob chips or chopped dark chocolate.
Spotlight on key ingredients
Old-fashioned rolled oats:
- I love their chewy texture and nutty flavor; if yours are too soft, try toasting them lightly for extra crunch.
- Honey: It’s the glue that holds everything together, giving a subtle sweetness and sticky bite; swap with agave for a more neutral sweetness, but reduce the amount slightly.
- Butter: It makes these squares rich and tender; if you want dairy-free, coconut oil works, but the texture might be a tad more crumbly.
Honey:
- It’s the glue that holds everything together, giving a subtle sweetness and sticky bite; swap with agave for a more neutral sweetness, but reduce the amount slightly.
- Butter: It makes these squares rich and tender; if you want dairy-free, coconut oil works, but the texture might be a tad more crumbly.
Ingredient swap tips
- Dairy-Free: Swap butter for coconut oil or vegan margarine. It’ll be a bit more crumbly, but still tasty.
- Sweetener Options: Use maple syrup or agave instead of honey for a different flavor profile, but reduce the amount slightly.
- Nuts and Seeds: Almonds or walnuts are classic, but sunflower seeds or pumpkin seeds make good crunchy swaps without missing a beat.
- Dried Fruit: Cranberries or apricots can replace raisins or cranberries. Fresh fruit? Not ideal, as it may make the squares too moist.
- Oats: Quick oats will work in a pinch, but they won’t toast as well and may give a softer texture. Stick with old-fashioned if possible.
- Flavor Boosters: A pinch of cinnamon or nutmeg can add warmth; skip if you want a purer oat flavor.
- Chocolate Chips: Carob chips or chopped dark chocolate are great alternatives, especially if dairy-free is needed.
Equipment & Tools
- 20×20 cm (8×8 inch) square pan: To hold and shape the mixture for setting.
- Mixing bowls: For tossing oats and mixing ingredients.
- Spatula: To fold ingredients and press mixture into the pan.
- Parchment paper: For easy removal and cleaning.
- Small saucepan: To melt honey and butter gently.
Step-by-step guide to no bake oat squares
- Gather your equipment: a 20×20 cm (8×8 inch) square pan, mixing bowls, spatula, and parchment paper. Line the pan with parchment, leaving some overhang for easy removal.
- Measure 3 cups (240g) of old-fashioned rolled oats. Toast them lightly in a dry skillet over medium heat until golden and fragrant, about 5 minutes. Let cool slightly.
- In a small saucepan, melt 1/2 cup (120ml) of honey and 1/4 cup (60g) of butter over low heat. Stir until smooth, about 2-3 minutes. Add 1 teaspoon of vanilla extract. If it smells nutty and warm, it’s ready.
- Pour the warm honey-butter mixture over the toasted oats. Use a spatula to fold and coat each oat. The mixture should stick together when pressed. If it feels dry, add a teaspoon of honey or butter.
- If adding nuts or dried fruit, fold in 1/2 cup (60g) chopped nuts and 1/4 cup (40g) dried fruit now. Distribute evenly.
- Transfer the mixture into the prepared pan. Press firmly with the back of a spatula or dampened hands to compact it. Aim for an even layer with a slight sheen on top.
- Refrigerate uncovered for at least 2 hours or until firm. If in a hurry, freeze for 30-45 minutes, but avoid rushing the setting.
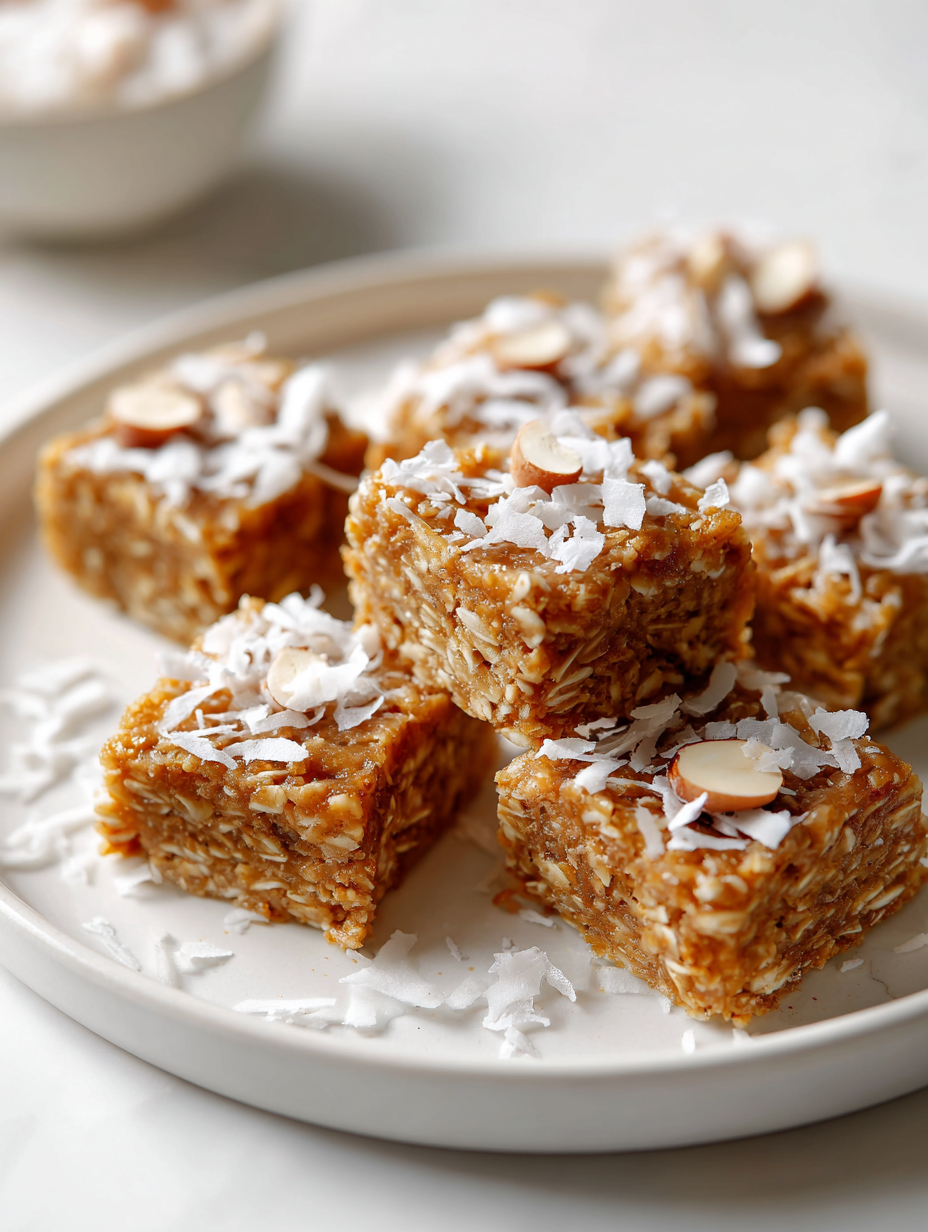
- Once set, lift the slab out using the parchment overhang. Slice into 12 equal squares. For clean cuts, wipe the knife between slices.
- Let the squares sit at room temperature for 10 minutes before serving. Enjoy the chewiness, caramelized edges, and fragrant oats.
Refrigerate uncovered until firm, about 2 hours. Slice into squares and serve at room temperature for optimal chew and flavor. Store leftovers in an airtight container in the fridge.
How to Know It’s Done
- Oats are toasted to a golden hue and smell nutty.
- Honey-butter mixture is smooth and fragrant, not burnt or smoky.
- Squares are firm and hold their shape when sliced, with a slight sheen on top.
No-Bake Oat Squares
Ingredients
Equipment
Method
- Line your square pan with parchment paper, leaving some overhang for easy removal.
- Toast the oats in a dry skillet over medium heat, stirring frequently until they turn a golden brown and smell nutty, about 5 minutes. Let them cool slightly.
- In a small saucepan, melt the butter and honey together over low heat, stirring until smooth and fragrant, about 2-3 minutes. Remove from heat and stir in the vanilla extract.
- Pour the warm honey-butter mixture over the toasted oats in the mixing bowl. Use a spatula to gently fold and coat all the oats evenly, creating a sticky, fragrant mixture.
- If using, fold in the chopped nuts and dried fruit for added texture and sweetness.
- Transfer the mixture into your prepared pan. Use a spatula or damp hands to press the mixture firmly into an even layer — this helps the squares hold together well.
- Refrigerate the pan uncovered for at least 2 hours or until the mixture is firm and set. For quicker setting, place in the freezer for about 30-45 minutes.
- Once firm, lift the entire block out of the pan using the parchment overhang. Slice into 12 neat squares with a sharp knife, wiping the blade between cuts for clean edges.
- Let the squares sit at room temperature for about 10 minutes before serving. Enjoy their chewy texture and caramelized edges, perfect for a quick, satisfying treat.
Notes
Pro tips for perfect oat squares
- Toast the oats: Lightly toast in a dry pan until golden and fragrant, about 5 minutes, for extra crunch and flavor.
- Use damp hands: When pressing mixture into the pan, slightly dampen your hands to prevent sticking and achieve an even layer.
- Check the aroma: Honey and butter melting should smell warm and nutty, not burnt — remove from heat at the right moment.
- Chill for firmness: Refrigerate uncovered for at least 2 hours; the squares will cut cleaner and hold their shape better.
- Wipe your knife: Between slices, wipe the blade to keep cuts neat and prevent crumbling, especially if the mixture is sticky.
- Avoid over-torching: Toast oats on medium heat, stirring constantly, to prevent burning and develop a deep, smoky aroma.
- Adjust sweetness: If mixture feels too sticky or soft, add a touch more oats or chill slightly longer before slicing.
Common mistakes and how to fix them
- FORGOT to evenly press the mixture → use a damp spatula for a compact, uniform surface.
- DUMPED too much honey → reduce by a tablespoon if squares are too sticky and soft.
- OVER-TORCHED oats → toast oats on medium heat, stirring constantly and smelling nutty.
- MISSED setting time → let squares chill at least 2 hours for proper firmness and clean slicing.
Fast fixes for common oat square hiccups
- When mixture is too sticky → splash in a bit more oats and fold gently.
- If squares crumble upon slicing → patch with a drizzle of honey and press again.
- Splash a few seconds more when toasting oats → smell should be nutty, not burnt.
- When mixture isn’t setting → shield from heat and chill longer, at least 2 hours.
- DUMPED too much honey → rescue with a sprinkle of oats and press firmly for better hold.
Prep, store, and reheat tips
- You can prep the mixture a day ahead; just keep it covered in the fridge to prevent drying out.
- Store the assembled squares in an airtight container in the fridge for up to 5 days; the flavors deepen and meld.
- For longer storage, freeze the squares wrapped tightly in plastic wrap and then in foil; they’ll keep for up to 3 months.
- Reheat by letting a square sit at room temperature for 10 minutes, or briefly microwave for 15 seconds until warm and fragrant.
Top questions about no bake oat squares
1. Can I use quick oats instead of rolled oats?
Use rolled oats, not instant oats. They give the right chew and hold together better.
2. Can I toast quick oats for this recipe?
Yes, but they might toast faster and become softer. Keep an eye on them while toasting.
3. How long do no bake oat squares last?
Refrigerate the squares in an airtight container for up to 5 days. They firm up and become chewier.
4. Can I substitute honey in this recipe?
Yes, swapping honey with maple syrup or agave works. They’re a bit less sticky but still hold well.
5. Is there a dairy-free alternative for butter?
Use coconut oil or vegan margarine in place of butter for dairy-free options. Expect slightly crumblier squares.
6. Can I add spices to the squares?
Adding a pinch of cinnamon or nutmeg boosts warmth. Skip if you prefer a pure oat flavor.
7. How long should I chill the mixture before slicing?
Chill the mixture for at least 2 hours to help it set properly before slicing.
8. How do I get clean slices without crumbling?
Use a sharp knife and wipe it between cuts to prevent sticking and crumbling.
9. My mixture is too sticky, what can I do?
If your mixture feels too sticky, fold in a little more oats or press firmly when setting.
10. What if my oats burn while toasting?
When oats smell burnt, remove from heat immediately and toast fresh oats. Don’t rush the process.
These no-bake oat squares are more than just a quick treat; they’re a reminder that simplicity often delivers the best comfort. I find myself reaching for them when life feels busy or when I want something wholesome and satisfying without fuss.
They’re imperfect, honest, and versatile—perfect for experimenting with what you have on hand. Plus, they come together in no time, which is always a win in my book, especially during hectic weeks or lazy weekends.
Welcome to Proud of This Mess – a place where food, creativity, and a little chaos come together on a plate!
I’m Emily Carter, the founder and heart behind this little corner of the internet. Born and raised in the United States, I’ve always had a passion for cooking, experimenting, and sharing the messy, delicious journey of creating food that brings people together. My philosophy is simple: good food doesn’t have to be perfect, and a little mess makes it memorable.
At Proud of This Mess, we believe that cooking is more than just following recipes—it’s about exploring flavors, discovering new techniques, and making every meal an experience worth savoring. From comforting weeknight dinners to indulgent desserts, our goal is to inspire home cooks of all levels to embrace the joy of food without fear of imperfection.