
There’s something quietly satisfying about these no bake caramel bars. No oven, no fuss, just a handful of ingredients that come together with a little patience and a lot of good luck. It’s the kind of recipe I turn to when I want a sweet fix without heating up the kitchen, especially on hot summer days or when I’m short on time.
What keeps me coming back to this recipe is how forgiving it is. The caramel, buttery and oozy, melts into the crunchy base, creating this perfect balance of sticky and crisp. Plus, it’s honestly just a joy to make — no complicated steps, no waiting for dough to chill, just quick assembly and a little patience while it sets.
This recipe is inspired by those lazy summer afternoons when I crave something sweet but don’t want the fuss of turning on the oven. It’s about the simple magic of combining textures and flavors without heat, letting the ingredients do the work while I kick back.
The story behind this recipe
- This recipe came together one lazy Sunday afternoon when I was rummaging through my fridge, looking for something sweet but didn’t want to turn on the oven in the heat. I remembered those caramel candies I had stashed away, and suddenly it clicked: why not make a no-bake bar that’s rich and satisfyingly sticky? It’s become a go-to for quick treats that feel indulgent without the fuss.
- I love the way this recipe feels like a small act of rebellion against the usual baking routine. It’s messy in the best way — sticky fingers, caramel drips, a little chaos — but the payoff is worth it. Every bite reminds me of those summer afternoons when I’d sneak into the kitchen just to steal a piece of something sweet, the smell of caramel filling the air. It’s comfort food with a little edge of nostalgia.
- heading: The story behind this recipe
Ingredient breakdown: key components
- Sweetened condensed milk: It’s the gooey backbone that holds everything together, making the caramel rich and smooth. You can swap in coconut condensed milk for a more tropical flavor, but it’ll change the creaminess.
- Butter: I use unsalted butter for control, but salted butter adds a subtle depth and enhances the caramel’s richness. For a dairy-free version, coconut oil works, though it’s a bit less creamy.
- Golden syrup: This adds a glossy finish and a slight caramel note that’s hard to beat. Maple syrup can be a substitute, but it’ll bring a different, slightly fruitier tone.
- Vanilla extract: A splash brightens everything, giving the caramel a warm, aromatic layer. Skip it if you’re in a pinch, but it’s the secret to that cozy, inviting smell.
- Crushed graham crackers: They form the crunchy base, providing structure and flavor. Digestive biscuits are a solid swap, but watch out for added sweetness—less is more.
- Sea salt: Just a pinch enhances the caramel’s sweetness and adds a whisper of contrast. Fine sea salt dissolves better, but flaky salt on top makes a pretty finish.
- Chocolate (optional): I like a drizzle of dark chocolate for contrast, but white chocolate or caramel swirls can also work. Use good-quality chocolate for that glossy, melt-in-your-mouth finish.
Spotlight on key ingredients
Sweetened condensed milk:
- It’s the gooey backbone that holds everything together, making the caramel rich and smooth. You can swap in coconut condensed milk for a more tropical flavor, but it’ll change the creaminess.
- Butter: I use unsalted butter for control, but salted butter adds a subtle depth and enhances the caramel’s richness. For a dairy-free version, coconut oil works, though it’s a bit less creamy.
Golden syrup & sea salt:
- Golden syrup: This adds a glossy finish and a slight caramel note that’s hard to beat. Maple syrup can be a substitute, but it’ll bring a different, slightly fruitier tone.
- Sea salt: Just a pinch enhances the caramel’s sweetness and adds a whisper of contrast. Fine sea salt dissolves better, but flaky salt on top makes a pretty finish.
Notes for ingredient swaps
- Dairy-Free: Swap sweetened condensed milk for coconut condensed milk. It’s just as gooey but adds a coconut twist.
- Butter: Use vegan margarine or coconut oil. Expect a slightly different richness and a hint of coconut aroma.
- Golden Syrup: Maple syrup can stand in, bringing a deeper, earthy sweetness but less shine and gloss.
- Vanilla Extract: Almond extract or vanilla bean paste can add a different aromatic note—use sparingly.
- Crushed Graham Crackers: Digestive biscuits are a good substitute; just reduce the butter slightly if they seem sweet.
- Chocolate Topping: White chocolate or caramel drizzle works, but use good-quality chocolate for that shiny finish.
- Salt: Flaky sea salt on top adds a burst of flavor contrast, but fine salt dissolves more evenly.
Equipment & Tools
- Mixing bowls: Combine ingredients and prepare layers.
- Spatula: Spread crust and caramel smoothly.
- 9×9 inch baking dish: Hold the assembled bars.
- Small saucepan: Cook the caramel filling.
- Microwave or double boiler: Melt chocolate for drizzling.
- Parchment paper: Line the dish for easy removal.
- Knife: Slice into bars after setting.
Step-by-step guide to no bake caramel bars
- Gather all your ingredients and equipment. Line up your mixing bowls, spatula, and a small saucepan. Make sure your baking dish (9×9 inch) is ready lined with parchment paper.
- Start with the crust: in a mixing bowl, combine crushed graham crackers with melted butter. Stir until evenly coated and resembles wet sand. Press this mixture firmly into the bottom of the prepared dish. Use the back of a spatula or your fingers to press it flat and compact. Chill in the fridge for 15 minutes while you prepare the caramel.
- Make the caramel filling: in a small saucepan over medium-low heat (about 150°C / 300°F), combine sweetened condensed milk, butter, and golden syrup. Stir constantly. Watch as it melts and starts to bubble gently after about 5 minutes. The mixture will turn a rich caramel color and smell sweet and buttery. If it starts to boil too vigorously or stick to the bottom, reduce heat or remove from heat briefly.
- Once the caramel is smooth and thickened (about 10 minutes), remove from heat. Stir in vanilla extract and a pinch of sea salt. Pour the caramel evenly over the chilled crust. Use a spatula to spread and smooth the top. This layer should be glossy and thick but pourable.
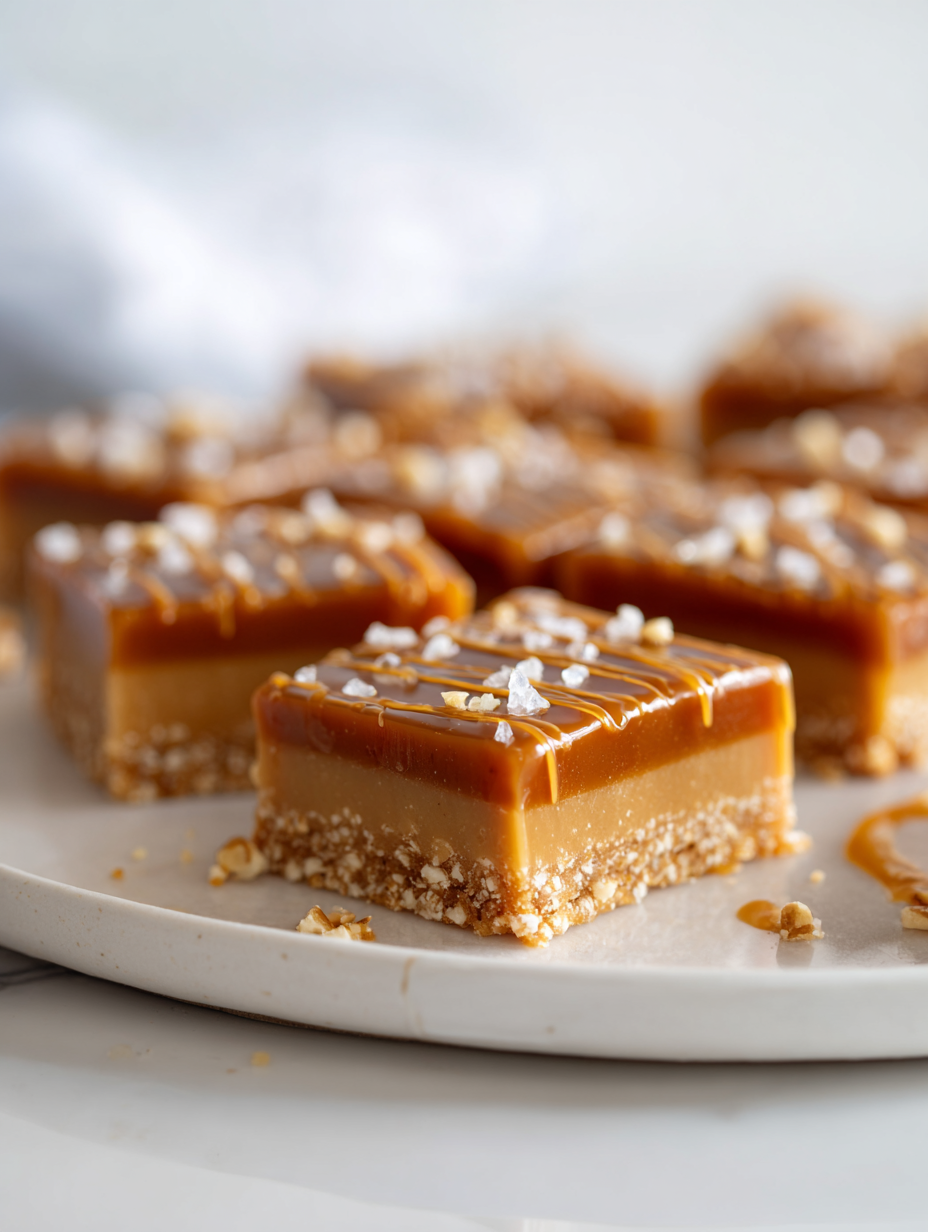
- Optional: melt dark chocolate in a microwave or double boiler. Drizzle over the caramel layer for a glossy, decadent finish. Use a toothpick or skewer to swirl it into patterns if desired.
- Let the bars set: refrigerate uncovered for at least 2 hours, or until firm. For a quicker set, freeze for 1 hour, but keep in mind they will be softer when thawed.
- Finish and serve: once set, lift the bars out using the parchment paper. Slice into squares with a sharp knife, wiping the blade between cuts for clean edges. Serve chilled, with a glass of cold milk or a cup of coffee.
Once set, lift the bars out using the parchment. Slice into squares with a sharp knife. Serve immediately or keep refrigerated for up to 3 days. For best texture, enjoy slightly chilled for that firm, fudgy bite.
How to Know It’s Done
- Caramel should be thick and glossy, not runny or grainy.
- Crust should be firm and hold shape when pressed.
- Bars should be chilled and firm, not sticky or soft.
No-Bake Caramel Bars
Ingredients
Equipment
Method
- Line your baking dish with parchment paper and set aside. In a mixing bowl, combine crushed graham crackers with melted butter and stir until evenly coated, resembling wet sand.
- Press the crumb mixture firmly into the bottom of the prepared dish, creating an even, compact crust. Use the back of a spatula or your fingers to smooth it out thoroughly. Chill in the fridge for 15 minutes while you prepare the caramel.
- In a small saucepan over medium-low heat, combine sweetened condensed milk, golden syrup, and butter. Stir constantly as the mixture begins to bubble gently after about 5 minutes, releasing a warm, sweet aroma. Continue stirring until the caramel thickens and turns a rich golden color, about 8-10 minutes.
- Remove the caramel from heat and stir in vanilla extract and a pinch of sea salt. Pour the hot caramel over the chilled crust, spreading it out with a spatula to form an even layer. It should be glossy and slightly thick but pourable.
- While the caramel cools slightly, melt the dark chocolate in a microwave or double boiler until smooth and glossy. Drizzle the melted chocolate over the caramel layer, creating a decorative swirl pattern.
- Refrigerate the assembled bars uncovered for at least 2 hours, or until the caramel is firm and set. For quicker results, freeze for 1 hour. Once chilled, lift the bars out using the parchment paper and cut into squares with a sharp knife.
- Serve the bars chilled, enjoying the crisp base contrasted with the sticky, rich caramel and glossy chocolate topping. Store leftovers in an airtight container in the fridge for up to 4 days.
Pro tips for perfect caramel bars
- Bolded mini-head: Use room temperature butter for a smoother, more even crust that presses easily.
- Bolded mini-head: When melting caramel ingredients, stir constantly to prevent sticking and scorching.
- Bolded mini-head: Chill the crust before adding caramel to ensure a clean, crisp edge when slicing.
- Bolded mini-head: Pour caramel slowly and spread evenly to avoid air bubbles and uneven layers.
- Bolded mini-head: For a shiny caramel finish, add a tiny pinch of sea salt on top before chilling.
- Bolded mini-head: If caramel thickens too much during cooking, gently reheat with a splash of cream to loosen.
- Bolded mini-head: Use a sharp knife warmed slightly in hot water for cleaner cuts through chilled bars.
Common mistakes and how to fix them
- FORGOT to level ingredients → Use a spoon to level for accuracy.
- DUMPED too much butter → Measure precisely to avoid greasy bars.
- OVER-TORCHED caramel → Remove from heat immediately and stir vigorously.
- MISSED chilling time → Chill at least 2 hours for proper set.
Quick fixes and pantry swaps
- When caramel is too thick → Splash in a little warm milk to loosen it up.
- If caramel is grainy → Stir constantly and cook on lower heat for a smoother texture.
- When bars stick to the pan → Patch with a warm spatula and chill briefly before slicing.
- Splash cold water on caramel drips → To salvage if it’s overcooked and burnt-smelling.
- When in doubt → Swap crushed digestive biscuits for graham crackers for a quick pantry fix.
Prep, store, and reheat tips
- Prepare the crust and caramel layers ahead of time. Keep the crust covered in the fridge for up to 24 hours, and the caramel in an airtight container for up to 2 days. The flavors deepen overnight.
- Store the assembled bars in an airtight container in the fridge for 3-4 days. The caramel stays gooey and flavorful, but the texture becomes slightly firmer after chilling.
- For longer storage, freeze the bars wrapped tightly in plastic wrap and then in foil. They keep well for up to 1 month. Thaw in the fridge for a few hours before serving.
- Reheat slightly in the microwave (about 10 seconds) if you want the caramel to become softer. Watch for steam and smell the sweet, buttery aroma as a cue it’s ready.
Top questions about no bake caramel bars
1. Can I make these dairy-free?
Yes, using coconut condensed milk creates a slightly coconutty, still creamy caramel without dairy. It’s a good swap if you’re vegan or dairy-free.
2. Can I use a dairy-free fat?
Absolutely. You can replace butter with coconut oil or vegan margarine. Expect a different flavor and slightly different texture, less rich but still delicious.
3. Can I substitute golden syrup?
Yes, you can swap golden syrup for maple syrup. It’s a bit thicker and adds a deeper, earthy sweetness, changing the shine and gloss.
4. How long should I chill the bars?
Chilling for at least 2 hours makes the bars firm and easy to cut. If you’re in a rush, freeze for 1 hour, but they’ll be softer.
5. How do I slice without cracking?
Use a sharp knife warmed in hot water for clean cuts. Wipe it dry before slicing to prevent sticking and get smooth, tidy edges.
6. What if the caramel is too soft or grainy?
If caramel is too runny, cook it a little longer over low heat until thick and glossy. If it’s grainy, stir constantly and reduce heat.
7. How should I store leftovers?
Store leftovers covered in the fridge for up to 4 days. For longer, freeze wrapped in plastic for up to a month, thaw in fridge before serving.
8. How do I fix overcooked caramel?
If caramel thickens during cooking, add a splash of warm milk and stir gently. If overcooked, remove from heat immediately and stir vigorously.
9. How can I make the top look shiny?
For a shiny finish, sprinkle sea salt on top before chilling. It enhances the caramel’s sweetness and adds a pleasing contrast.
10. Can I substitute the crackers?
Using crushed digestive biscuits instead of graham crackers makes a slightly sweeter, more crumbly base, but keep an eye on added sugar.
These no bake caramel bars are a quiet reminder that some of the best treats come together with minimal fuss. The buttery, sticky caramel paired with that crisp base feels like a small act of comfort, perfect for moments when the oven’s off-limits or just not in the mood. Sometimes, the simplest recipes hold the most unexpected joy.
In a world racing to be perfect, these bars let you embrace the messy, the imperfect, and the homemade. They’re a little chaotic, a little nostalgic, and totally worth sharing. Just a spoonful of caramel and a good story—nothing more needed.
Welcome to Proud of This Mess – a place where food, creativity, and a little chaos come together on a plate!
I’m Emily Carter, the founder and heart behind this little corner of the internet. Born and raised in the United States, I’ve always had a passion for cooking, experimenting, and sharing the messy, delicious journey of creating food that brings people together. My philosophy is simple: good food doesn’t have to be perfect, and a little mess makes it memorable.
At Proud of This Mess, we believe that cooking is more than just following recipes—it’s about exploring flavors, discovering new techniques, and making every meal an experience worth savoring. From comforting weeknight dinners to indulgent desserts, our goal is to inspire home cooks of all levels to embrace the joy of food without fear of imperfection.